

"Flying Dutchman" - Ghost Ship - OREL Russian Paper Model Build
- Thread starter mtrappett
- Start date
You are using an out of date browser. It may not display this or other websites correctly.
You should upgrade or use an alternative browser.
You should upgrade or use an alternative browser.

Thank you Revell-Fan. I find that my eyes, and my hands are not as good as they used to be back in the day, but I'm doing my best! 
")
Thank you so much! Your nice comments make me want to push myself harder! I really appreciate it!Very impressive! I hope this model finds it's way to a museum one day!
")
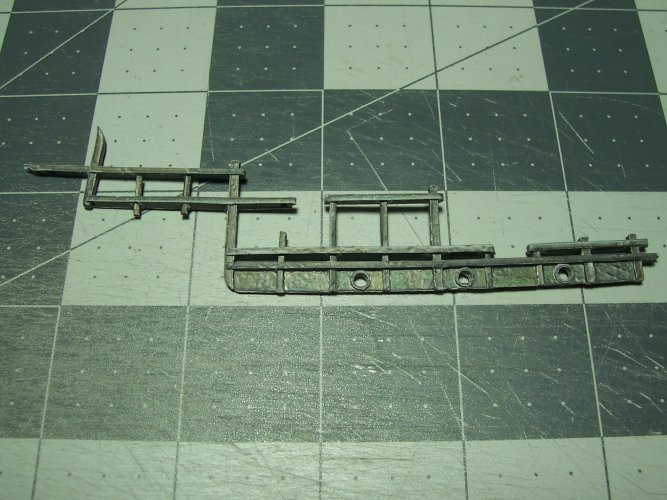
Time to continue with the ship's railings. Parts # 57.xy This is the next section of railing to build.

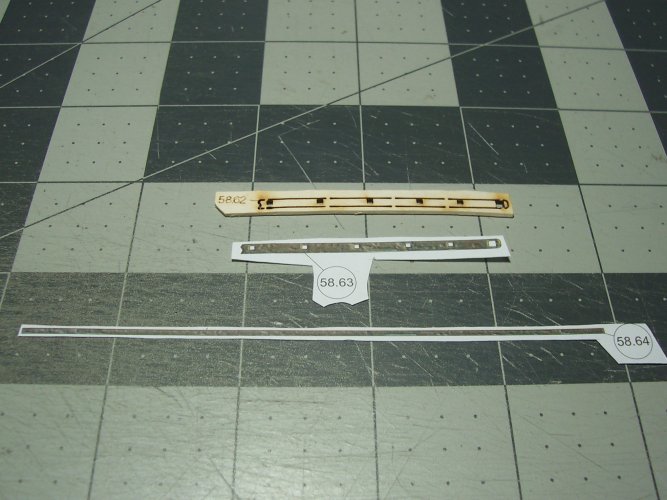
Parts 57.18 and 57.20 are the main card pieces for the railings. Parts 57.19, and 57.21 are the paper color skins that wrap around the parts. Make sure to score the folds to make nice clean and sharp edges.

And yet more railings. They are all different.

Just assemble the pieces without glue where possible.

Another horizontal top part for the railing.

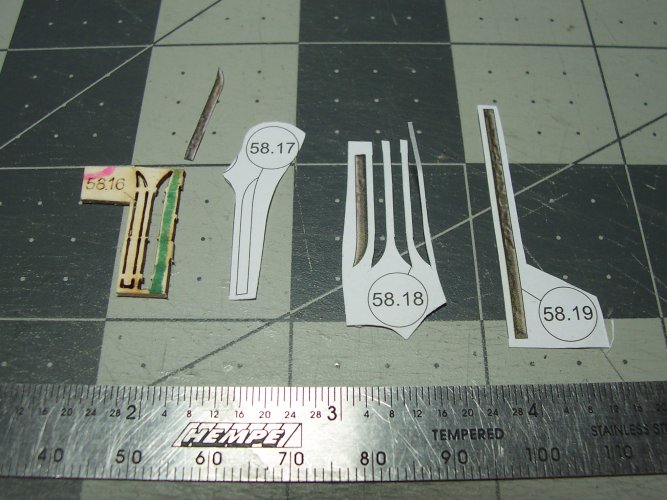
The rear of the ship has several cannons that require these cutout pieces. Work on one at a time to avoid getting things out of whack.

Another horizontal for the top of the railing.

The same technique for assembling these is required as the other railing horizontals.

These are VERY intricate, and will require some very gentle handling. The other thing to be aware of is the glue shrinkage that happens which will distort if not taken into consideration.

I have experimented with adding the color veneer to the card parts while they are still held in the main sheet. This only works in a few cases as problems occur when removing them later.

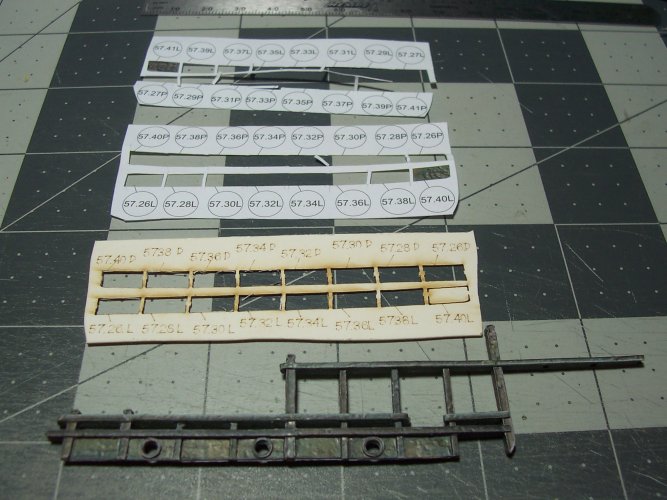
This gives an idea of the number of parts for just the small panels for each side of the rear deck. Smooth the base of the railing with some fine sandpaper. This will help to provide a nice close joint and not let the light shine through in some places.

Just work on them one at a time. Then add them to the assembly.

Make sure to paint all these to start with.

These are like a puzzle where the pieces only go together in a certain order. Stop and think about the process before fixing anything permanently. The horizontals all need to line-up from front to rear typically as well. Always remember, there are NO spares! You have to get it right the first time around.


These railings are angled backwards with a curve. Just keep that in mind so you don't install them the wrong way around!


This is it!! The completed rear railing assembly for the starboard side. It is only a test fit mind you! You will install it one assembly at a time working from the front end. Minor modification of the larger railing, 4th from the right of the pic may be needed... at least I had to adjust it a bit.

Parts 57.18 and 57.20 are the main card pieces for the railings. Parts 57.19, and 57.21 are the paper color skins that wrap around the parts. Make sure to score the folds to make nice clean and sharp edges.
And yet more railings. They are all different.
Just assemble the pieces without glue where possible.
Another horizontal top part for the railing.
The rear of the ship has several cannons that require these cutout pieces. Work on one at a time to avoid getting things out of whack.
Another horizontal for the top of the railing.
The same technique for assembling these is required as the other railing horizontals.
These are VERY intricate, and will require some very gentle handling. The other thing to be aware of is the glue shrinkage that happens which will distort if not taken into consideration.
I have experimented with adding the color veneer to the card parts while they are still held in the main sheet. This only works in a few cases as problems occur when removing them later.
This gives an idea of the number of parts for just the small panels for each side of the rear deck. Smooth the base of the railing with some fine sandpaper. This will help to provide a nice close joint and not let the light shine through in some places.
Just work on them one at a time. Then add them to the assembly.
Make sure to paint all these to start with.
These are like a puzzle where the pieces only go together in a certain order. Stop and think about the process before fixing anything permanently. The horizontals all need to line-up from front to rear typically as well. Always remember, there are NO spares! You have to get it right the first time around.
These railings are angled backwards with a curve. Just keep that in mind so you don't install them the wrong way around!
This is it!! The completed rear railing assembly for the starboard side. It is only a test fit mind you! You will install it one assembly at a time working from the front end. Minor modification of the larger railing, 4th from the right of the pic may be needed... at least I had to adjust it a bit.
Attachments

Having test fitted the rail assembly on the ship, you will notice that its looking more aligned, and accurate. Now I glued some of the pieces that are set to a certain height. Look down the assembly too making sure it looks straight and not distorted. If it is, carefully tweak the parts as required.


More detail and intricacy. I made this a second assembly. There is no detail in the instructions that explain how these parts should be put together, which really makes it very difficult, and planning had to be done throughout the build.


Now we are getting down to business Here's a view of the completed starboard rear railings.

Now to add the last 2 horizontal tops to the starboard side.

Another piece that needs to be bent to match up with the other top piece.

Notice the need to accurate setting of the height of the horizontal pieces.

A bit too close, but you get the idea from the picture.

The last middle section of the horizontals.

That completes all the right side railings.

Time now to work on the port side railings.


Similar only on the port side.

More detail and intricacy. I made this a second assembly. There is no detail in the instructions that explain how these parts should be put together, which really makes it very difficult, and planning had to be done throughout the build.
Now we are getting down to business
Here's a view of the completed starboard rear railings.Now to add the last 2 horizontal tops to the starboard side.
Another piece that needs to be bent to match up with the other top piece.
Notice the need to accurate setting of the height of the horizontal pieces.
A bit too close, but you get the idea from the picture.
The last middle section of the horizontals.
That completes all the right side railings.
Time now to work on the port side railings.
Similar only on the port side.
Attachments


THE DC
Highly Esteemed Member
This is my favorite model I have ever built! I am getting everything that I need from this experience. Each section of the ship is its own sub-project. I feel that one day when I am dead-and-gone 
 this will be a piece of me that I will leave behind... my wife said that to me yesterday
  I think she's right,
Anyway, just getting ready to install the last side-panel piece into the deck railings for the port side. It's been quite a lovely voyage so far!
Strange that there are no feelings of wanting to get the model completed at all? I am happy just to be working on it.
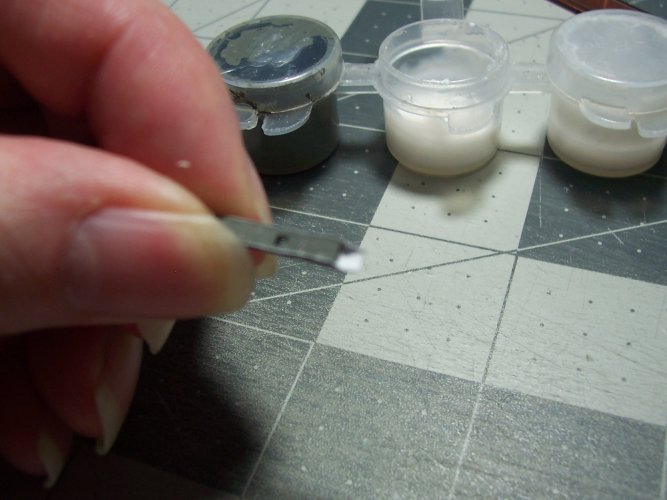
I would not place too much hope on cutting some of these card pieces out by hand! The tolerances are VERY tight! See how close the square holes are to the sides, and they have to be opened up some more too! The railings are too tight to go through after they are wrapped in their veneer color papers.
I did have to use a tiny bit of glue to build up the parts in some areas. Just apply the glue with a small pin. I found that I just had to build the glue up with several layers. Luckily, they dry very fast being such tiny surface areas.
Please excuse the long finger nails! I find them useful for handling the tiny parts to be honest.
Here is the port side section. It is slightly different from the starboard side, so don't just expect to repeat what you did for the other side exactly. Again. this is only for test fitting on the ship. Not all the joints are fixed yet.
Here we are, on board ship!  I'm just setting up the port side railing assembly and its interconnections. Many times, it is just a matter of using my eyes to get the alignment accurate, anything else is just too bulky to get into the needed area. I do use scraps of material though, a small steel rule, and calipers if possible. Make sure to look in all 4 planes to make sure you are happy with it before final gluing. You will also need to carefully, bend the straight sections to get them nice and true. If you don't take your time with all this, It will look like a total s**t show! Believe me!
The picture's blown out, but you can see all the railings here.

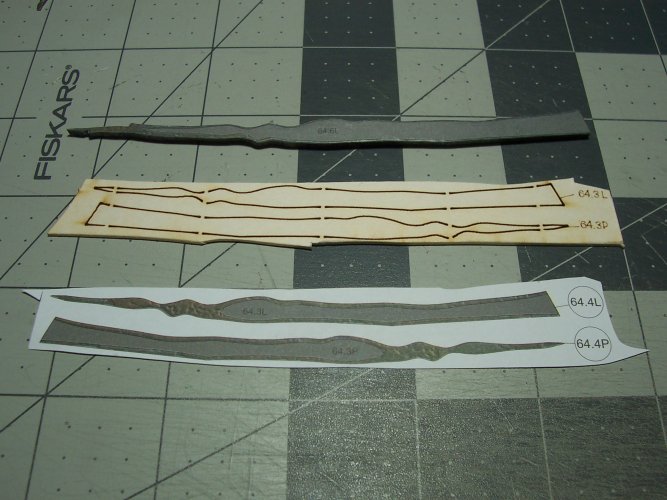
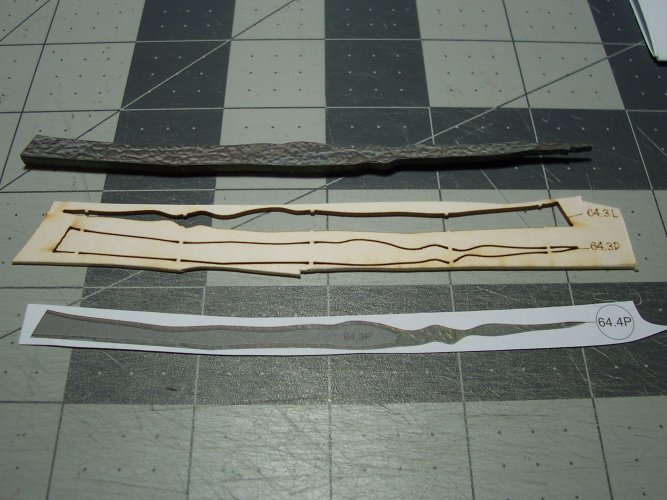
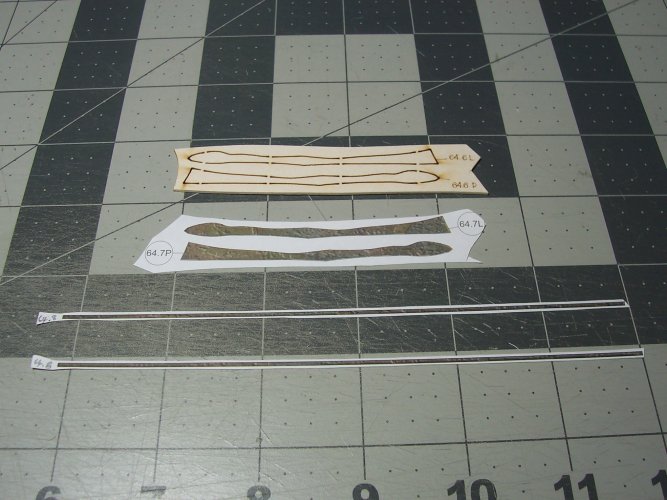
Here is the assembly picture for the Bowsprits, PIC 29. This is parts # 64.xy as you sort for them all through the sheets of parts. It's much better to get all the associated parts into a pile before you start rather than wading through each time you need one of them, so I found anyway.
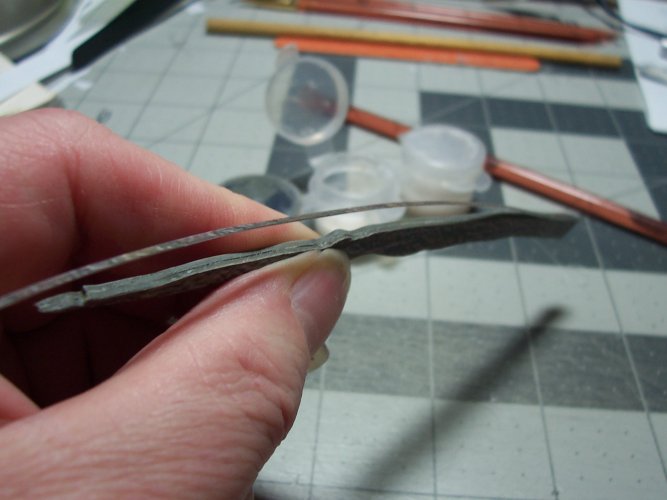
One of the stumbling areas can be not realizing that there are in fact, 2 pieces needed to be sandwiched together of the same, in some cases! These situations are never mentioned in the plans and instructions at all! One of the best ways of checking is to look at the long thin color veneer that goes around the edge perimeters to see how thick it is! You can easily see the number of parts needed to be glues together to arrive at that particular thickness. If you fail to realize, and use only one part, you will likely need to re-make it entirely!

Parts # 64 is a double thickness part! Make sure to glue them together accurately, and use just enough glue to bond the laminated pieces together in all places! Remember the parts should be cutout from the unmarked side using your sharpest blade, at a slight angle to make sure you don't finish up with small protrusions. Trying to cut, or sand the small peaks of the card is almost impossible in some cases without putting a crease in the cardboard

I often think of what inspired the design of the Flying Dutchman ship? Disney actually built a full-size version of it which seems amazing to me! I look at the tusk of a narwhal, and it makes me think of the bowsprits on this ship? I don't know? Just a gut-feeling?

this will be a piece of me that I will leave behind... my wife said that to me yesterday I think she's right,Anyway, just getting ready to install the last side-panel piece into the deck railings for the port side. It's been quite a lovely voyage so far!

Strange that there are no feelings of wanting to get the model completed at all? I am happy just to be working on it.
I would not place too much hope on cutting some of these card pieces out by hand! The tolerances are VERY tight! See how close the square holes are to the sides, and they have to be opened up some more too! The railings are too tight to go through after they are wrapped in their veneer color papers.
I did have to use a tiny bit of glue to build up the parts in some areas. Just apply the glue with a small pin. I found that I just had to build the glue up with several layers. Luckily, they dry very fast being such tiny surface areas.Please excuse the long finger nails! I find them useful for handling the tiny parts to be honest.

Here is the port side section. It is slightly different from the starboard side, so don't just expect to repeat what you did for the other side exactly. Again. this is only for test fitting on the ship. Not all the joints are fixed yet.
Here we are, on board ship! I'm just setting up the port side railing assembly and its interconnections. Many times, it is just a matter of using my eyes to get the alignment accurate, anything else is just too bulky to get into the needed area. I do use scraps of material though, a small steel rule, and calipers if possible. Make sure to look in all 4 planes to make sure you are happy with it before final gluing. You will also need to carefully, bend the straight sections to get them nice and true. If you don't take your time with all this, It will look like a total s**t show! Believe me!
The picture's blown out, but you can see all the railings here.
Milestone - Completed all Ship's Railings Assemblies
Building the Bowsprits (...or the bits that might poke you in the eye if you don't watch out!)
So, here are all parts needed to build both of the ship's Bowsprits. I really loved building these pieces! I hope you do too!Here is the assembly picture for the Bowsprits, PIC 29. This is parts # 64.xy as you sort for them all through the sheets of parts. It's much better to get all the associated parts into a pile before you start rather than wading through each time you need one of them, so I found anyway.
One of the stumbling areas can be not realizing that there are in fact, 2 pieces needed to be sandwiched together of the same, in some cases! These situations are never mentioned in the plans and instructions at all! One of the best ways of checking is to look at the long thin color veneer that goes around the edge perimeters to see how thick it is! You can easily see the number of parts needed to be glues together to arrive at that particular thickness. If you fail to realize, and use only one part, you will likely need to re-make it entirely!
Parts # 64 is a double thickness part! Make sure to glue them together accurately, and use just enough glue to bond the laminated pieces together in all places! Remember the parts should be cutout from the unmarked side using your sharpest blade, at a slight angle to make sure you don't finish up with small protrusions. Trying to cut, or sand the small peaks of the card is almost impossible in some cases without putting a crease in the cardboard
I often think of what inspired the design of the Flying Dutchman ship? Disney actually built a full-size version of it which seems amazing to me! I look at the tusk of a narwhal, and it makes me think of the bowsprits on this ship? I don't know? Just a gut-feeling?
Attachments
-
 Flying Dutchman - BUILD 1-26-22 041.JPG507.1 KB · Views: 2
 -
 Flying Dutchman - BUILD 1-26-22 042.JPG776.3 KB · Views: 1
 -
 Flying Dutchman - BUILD 1-26-22 043.JPG391.1 KB · Views: 0
 -
 Flying Dutchman - BUILD 1-26-22 044.JPG718.5 KB · Views: 0
 -
 Flying Dutchman - BUILD 1-26-22 046.JPG398.2 KB · Views: 0
 -
 Flying Dutchman - BUILD 1-26-22 047.JPG743 KB · Views: 0
 -
 Flying Dutchman - BUILD 1-26-22 048.JPG431.3 KB · Views: 0
 -
 Flying Dutchman - BUILD 1-26-22 049.JPG704.2 KB · Views: 0
Last edited:
Thank you for your kind words!The detail and skill that you have shared is truely impressive.
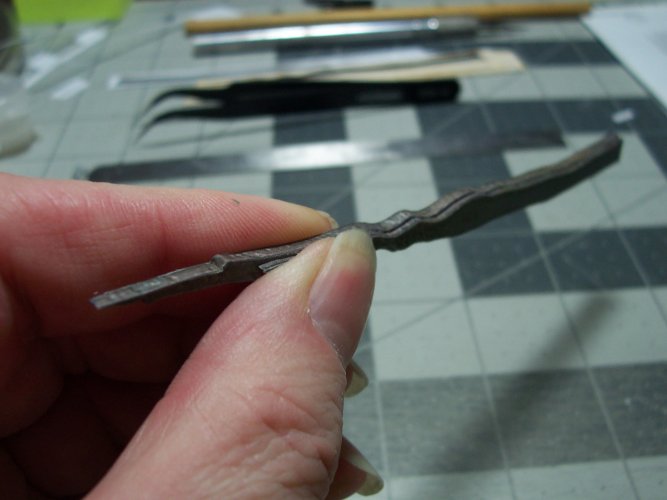
Back to working on the Bowsprit's. These are definite focal points so spend extra time getting them looking nice.

The pieces are laminated to arrive at the shape required.

This the edge color veneer that runs around the parts.


Make sure the assembly looks good and true.

Putting on some thickness now with the additional layers.


The layers give the ornate shape to the bowsprit.

The main bowsprit is ready to be installed on the ship.

Next is the upper bowsprit. This is much smaller.


Now its time to install the upper smaller bowsprit first. Look at the pictures carefully.

It will be necessary to modify the front of the ship and the bowsprit itself. Note how the bowsprit has been carved down so it will locate in the hole inside on the bulkhead. The opening is also too small and needs to be squared up and made bigger.

Just take off a bit at a time. Don't overdo it!


Use glue to seal any edges where you can see the light of day around the small bowsprit. I also had to carve away a bit because the bowsprit was off at a weird angle. Make sure to look in all planes to ensure it is true to the ship before gluing.

So, there we are! Bowsprits in place!

The pieces are laminated to arrive at the shape required.
This the edge color veneer that runs around the parts.
Make sure the assembly looks good and true.
Putting on some thickness now with the additional layers.
The layers give the ornate shape to the bowsprit.
The main bowsprit is ready to be installed on the ship.
Next is the upper bowsprit. This is much smaller.
Now its time to install the upper smaller bowsprit first. Look at the pictures carefully.
It will be necessary to modify the front of the ship and the bowsprit itself. Note how the bowsprit has been carved down so it will locate in the hole inside on the bulkhead. The opening is also too small and needs to be squared up and made bigger.
Just take off a bit at a time. Don't overdo it!
Use glue to seal any edges where you can see the light of day around the small bowsprit. I also had to carve away a bit because the bowsprit was off at a weird angle. Make sure to look in all planes to ensure it is true to the ship before gluing.
So, there we are! Bowsprits in place!
Onwards, and upwards as my old boss used to say, just before he got fired 
Bear in mind that in the instructions, there is about one line of text for all the Bowsprits assembly, and installation on the ship after they are built. There's no help so far as the way of putting the parts together, just a diagram that shows where the pieces all go. Its not possible to build the jaws on ship. They have to be built as separate assemblies, and components which I found to be the best way.

Please look carefully at these pics to see where these braces are located. I took a LONG time trying to get these looking right!

One each side of course!

Leave the ends that touch the hull unglued until you are sure you have them the correct place. Port side done!

Now the starboard side braces.

Upper and lower braces.

Here are the starboard side braces installed. Only glued on the bowsprit sides.

This looks like the "Grim Reapers scythe!" At least it does to me anyway. Again, just make sure to install it in position like I have here! I did know the thing off while working on the rest of the detail, so you might want to leave it off for now? I think I will "pin" it in place eventually too! Maybe with a piece of 24 gauge wire.

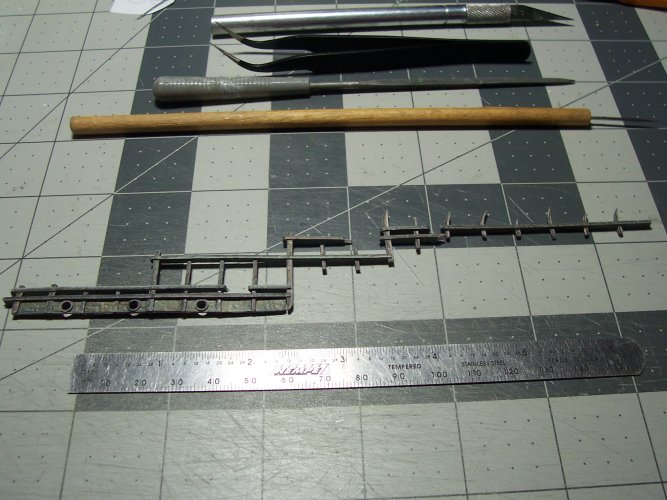
PNC 30 should be referred to for making the upper and lower jaws and teeth.

These are all of the associated parts to construct the upper and lower jaws together with the teeth.

The lower jaws, parts 65 thru 65.2 P & L are quite a difficult part of the ships construction.

There are 2 identical parts # 65 that need to be glued together as a sandwich. Again, nothing is mentioned anywhere about parts that need to be doubled together.

Also add the edging veneer.

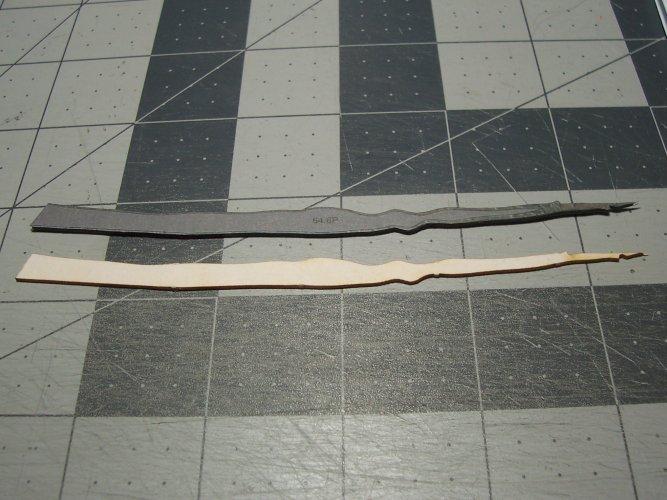
I scored all the panel lines for the wooden planks into the paper. This had to be done freehand because of all the curves needed.

A completed lower jaw side in the upper part of the picture, and a raw parts side below.

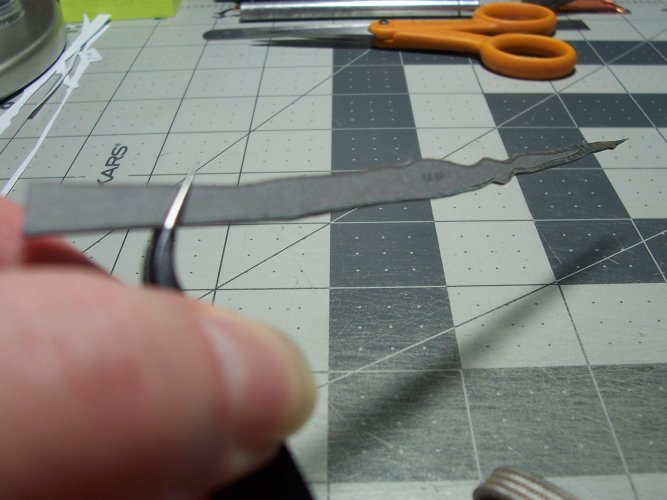
Now is the hard part! You need to shape the part by bending it to match the edge veneer as a guide. You can get an idea of what's needed in the picture below, The bends are quite aggressive, and you will need to twist the sides as well in one small area!

This should really help when getting the parts in the correct shapes. I had to test fit, bend, curve, test fit and so on, over and over and over again. I used water as well to help, but it really only helped a bit. Here are the jaw sides before being glued at the tip.

Just like a big chicken wishbone! I found it much better to glue these off the ship. That way I can get the alignment just right. Again, this is a difficult part of building the ship, so be prepared for lots of coffee, new blades, and keep your cool!

Another view to help you guys see the angles needed.


Bear in mind that in the instructions, there is about one line of text for all the Bowsprits assembly, and installation on the ship after they are built. There's no help so far as the way of putting the parts together, just a diagram that shows where the pieces all go. Its not possible to build the jaws on ship. They have to be built as separate assemblies, and components which I found to be the best way.
Please look carefully at these pics to see where these braces are located. I took a LONG time trying to get these looking right!
One each side of course!
Leave the ends that touch the hull unglued until you are sure you have them the correct place. Port side done!
Now the starboard side braces.
Upper and lower braces.
Here are the starboard side braces installed. Only glued on the bowsprit sides.
This looks like the "Grim Reapers scythe!" At least it does to me anyway. Again, just make sure to install it in position like I have here! I did know the thing off while working on the rest of the detail, so you might want to leave it off for now? I think I will "pin" it in place eventually too! Maybe with a piece of 24 gauge wire.
Ships Jaws and Teeth Assembly and Installation
PNC 30 should be referred to for making the upper and lower jaws and teeth.
These are all of the associated parts to construct the upper and lower jaws together with the teeth.
The lower jaws, parts 65 thru 65.2 P & L are quite a difficult part of the ships construction.
There are 2 identical parts # 65 that need to be glued together as a sandwich. Again, nothing is mentioned anywhere about parts that need to be doubled together.
Also add the edging veneer.
I scored all the panel lines for the wooden planks into the paper. This had to be done freehand because of all the curves needed.
A completed lower jaw side in the upper part of the picture, and a raw parts side below.
Now is the hard part! You need to shape the part by bending it to match the edge veneer as a guide. You can get an idea of what's needed in the picture below, The bends are quite aggressive, and you will need to twist the sides as well in one small area!
This should really help when getting the parts in the correct shapes. I had to test fit, bend, curve, test fit and so on, over and over and over again. I used water as well to help, but it really only helped a bit. Here are the jaw sides before being glued at the tip.
Just like a big chicken wishbone! I found it much better to glue these off the ship. That way I can get the alignment just right. Again, this is a difficult part of building the ship, so be prepared for lots of coffee, new blades, and keep your cool!
Another view to help you guys see the angles needed.
Last edited:
Now, this is a good picture of the braces for the bowsprits, and they are now fully glued into place. Got to say it! The ship looks awesome with the jaws and teeth lower down this post 
Is this a cool shot, or what? Okay, or what! This will be super-helpful to anyone that is in the process of fitting the lower jaws! I drilled a couple of hair drill holes in the sides of the lower jaws so I could use a couple of model pins to hold them in place as this all has to be done by eye. I also used a tiny clothes pin to pinch the front pieces to the bowsprit. Now, this is the hard part! Line it all up, keep shifting the parts until you get it perfectly aligned, then glue them all in place!
This is the lower teeth of the ship. These are intricate, actually, all of the ship is intricate but particularly this!

Cut and flap the color veneers around the tooth. Work one tooth at a time. I found it much better to add the teeth to the ship. after adding the jaws. This ensures that the teeth can be angled perfectly.

The first couple of lower teeth added.

Three lower teeth added. It looks like the braces may double as support for the teeth to rest against? Not too sure? I did add a tiny bit of glue to stop the teeth from being too weak.

Here's the side view of a single tooth that is to be fitted with its color veneer.

About half way through adding the lower teeth. Don't make them aligned exactly straight as that looks totally funky! Stagger the teeth a little to make it look more menacing

Notice the pile of blades. That's just for this assembly. They quickly lose their edge.

Kind of looks like a caiman, or alligator maybe? Oh, I found that the teeth looked better if you score the lines to simulate the grain.

That is all the lower teeth fitted for the front of the ship.

Here we start on the upper teeth assembly and installation.
These are the parts needed for building the upper jaw.

Here's a tip for building this model. Use a highlighter pen (or a hundred) to carefully mark off after every part you fit! It is VERY easy to get confused on what you were supposed to do next, and this I found is super-useful! Also, make notes in pencil to keep a track on anything that you might need to know later, like maybe a part that had to be modified or whatever?

Upper jaws and teeth.

I think that it is a really cool thought that the designer of the ship used different shapes to ensure the correct tooth is fitted and aligned correctly! Each tooth has a unique "key". Very cool

.Starboard, upper jaw completed, and ready to fit on the ship.

It adds some nice detail scoring the grain of the jaw and teeth.

View of the starboard jaws and teeth. I LOVED working on these items!


Is this a cool shot, or what? Okay, or what! This will be super-helpful to anyone that is in the process of fitting the lower jaws! I drilled a couple of hair drill holes in the sides of the lower jaws so I could use a couple of model pins to hold them in place as this all has to be done by eye. I also used a tiny clothes pin to pinch the front pieces to the bowsprit. Now, this is the hard part! Line it all up, keep shifting the parts until you get it perfectly aligned, then glue them all in place!

Lower Teeth
This is the lower teeth of the ship. These are intricate, actually, all of the ship is intricate but particularly this!
Cut and flap the color veneers around the tooth. Work one tooth at a time. I found it much better to add the teeth to the ship. after adding the jaws. This ensures that the teeth can be angled perfectly.
The first couple of lower teeth added.
Three lower teeth added. It looks like the braces may double as support for the teeth to rest against? Not too sure? I did add a tiny bit of glue to stop the teeth from being too weak.
Here's the side view of a single tooth that is to be fitted with its color veneer.
About half way through adding the lower teeth. Don't make them aligned exactly straight as that looks totally funky! Stagger the teeth a little to make it look more menacing
Notice the pile of blades. That's just for this assembly. They quickly lose their edge.
Kind of looks like a caiman, or alligator maybe? Oh, I found that the teeth looked better if you score the lines to simulate the grain.
That is all the lower teeth fitted for the front of the ship.
Upper Teeth
Here we start on the upper teeth assembly and installation.
These are the parts needed for building the upper jaw.
Here's a tip for building this model. Use a highlighter pen (or a hundred) to carefully mark off after every part you fit! It is VERY easy to get confused on what you were supposed to do next, and this I found is super-useful! Also, make notes in pencil to keep a track on anything that you might need to know later, like maybe a part that had to be modified or whatever?
Upper jaws and teeth.
I think that it is a really cool thought that the designer of the ship used different shapes to ensure the correct tooth is fitted and aligned correctly! Each tooth has a unique "key". Very cool
.Starboard, upper jaw completed, and ready to fit on the ship.
It adds some nice detail scoring the grain of the jaw and teeth.
View of the starboard jaws and teeth. I LOVED working on these items!
Last edited:
You are most kind! I have built models of many types all of my life starting in England, and then after moving here to the United States. I have always suffered from depression and anxiety inherited from my mother, and I used model building to help deal with those problems. It works very well for meExcellent detailing! Do you have a background in modelmaking?
I use modelbuilding to help me deal with my low self esteem, and low self worth. I learned long ago that, for me at least, self deprecating humor also helps me see that it's not as bad as I think.
Your skills as shown in this build are top notch.
Your skills as shown in this build are top notch.
I suffer from anxiety too. And the seasonal depression. Modeling and creating things help with that.You are most kind! I have built models of many types all of my life starting in England, and then after moving here to the United States. I have always suffered from depression and anxiety inherited from my mother, and I used model building to help deal with those problems. It works very well for me
Ship's Figurehead Assembly, & Installation on Ship's Bowsprit
Now this part is building the skeletal figurehead as shown in PNC 31. I have been lookin forward to this part for so long

I found a few really cool sinister looking figureheads that were created for other ships. I LOEV this one!

Check out his "child skeleton buddy on his back!"


These look so awesome to me!

So, with all those babies in mind, we will start building ours! These are all the parts for the skeleton below.

First step, build the backbone!
There are 4 parts for the backbone.
The picture below has the completed backbone assembly. Now we will create the ribs! I'd LOVE some ribs!
 Just work on one at a time! That is the best way to work with these! I found that it is beneficial to break down the assembly and gluing procedures into small sections. If you're having problems with a piece, just do it a tiny bit at a time! Hold the parts together between thumb and forefinger, and glue half way or a quarter of the way.
There are no medals given for finishing stuff as soon as possible! It's not about winning the race, but about enjoying the view as you run! If there are 2 ways of doing it, take the third way.

The ribs were much better to be painted while still in the sheet. It also helps to prevent delamination issues that might occur

I have a couple of the half-ribs glued in place here! Each of the half-ribs have 4 parts to it.

Half of the rib cage completed. You can see the white glue drying in the picture below. I found it good to build a glue-gusset at the rib bases where they join the backbone.

Here's the finished rib-cage. There is meant to be a gap where the ribs come together so, don't glue them!


Next, is the arms assembly. Super-micro cutting needed here! Time for another new blade for the scalpel! Paint the card piece first for the same reason of de-lamination prevention.

Now we have the rib cage and arm assemblies ready. Next is his skull! There are 4 pieces for the skull, which you can see below!

This part is the main skull and needs to be carefully folded and bended into the correct shape.

Just starting to get the shape of the top of the skull. The "leaves" need to be curved down and tiny bits of white glue along one of the seams at a time applied with a small modeling pin.

The eye sockets fold around to the front of the skull sides. There's no doubt that this will take some perseverance to get looking good! It almost moves into the realm of the black arts of paper modeling

The skull Pretty much assembled, shaped and glued! I just touched up the seams with some paint to make it look nicer.

Now, time for the lower jaw to be attached to the skull. There are 3 parts to the jaw. I glued it on the one side of the skull first. Then folded it around and glued the other side. You want to get it so its in the extreme open position, like he is screaming at the deep blue sea in front of the ship


This is the finished figurehead! You will also need to bend the arms at the shoulders so that they lay in a realistic pose! The hands also need some love to get them looking good. I used my tweezers on each finger to get a realistic curve to the bones. The left hand needs to be put into a holding pose, like you were supporting your body while on a piece of gym equipment. The right hand just needs the wrist to be shaped a bit, and just a gentle bend on each of the fingers. Just try to get some interesting poses on the parts. It helps if you have some knowledge of human body mechanics, but not essential.

Last edited:
