Latest beta build results
Hey Gearz (and other interested parties),
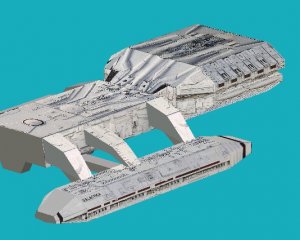
Here are my latest beta build results. This is for the latest Bridge and LB versions. I'll insert several pictures below. My camera is on vacation with my wife so I'm using my PC camera - sorry about the quality.
Bridge - assembled as per your guide and all went smoothly except I slipped up and glued 8b and 9b in step three instead of just checking fit. I'd advise adding a trailer there - check the fit into parent parts, but do not glue. Having them glued into place too early made it tougher in step 4. This is more likely to trip up intermediate or experienced builders who pay less attention to the instructions. Novices would likely be more careful.
Center section, LB arms, LB's Assembly sequence
o Assembled the main box for the center section.
o Assembled the LB braces - need to be careful to keep these straight when you glue them - any twist or warp in them tends to get transfered to the finished LB.
o Assembled LB body and inserted braces. I put a dab of glue at each end of the braces to hold them in position.
o I then assembled the end caps for the LB's.
When assembling the end caps that have the landing bay inserts don't glue the bottom until you glue in the landing bay insert as shown here

Make sure you test fit the insert - the tabs were oversize and needed to be trimmed down to fit properly.
o Glue the endcaps to the LB arms.
o Cut and assemble the LB arms
o Glue the front and rear LB arms into position
o Glue the "bumps" into position and insert the crosspiece (warrior companion way).
You should have something like this:

o Glue the LB into place on one side. Pay attention to which end is which - the crosspiece is towards the front of the ship, the landing bay opening is towards the rear. I wasn't paying attention and glued the LB's on backwards (but at least I did them both the same so they match :roll: )
o Slide the crosspiece into position and glue the one end.

o Attach the other LB arm gluing the front and rear arms and crosspice all at once.

o Using the crosspiece as a guide for the position, glue the center LB arms into place.
o Voila! The center section is done.

Gearz,
Comments and gotcha's.
1 - The only issue I had with the bridge section was the very front - it didn't close up quite cleanly. Very careful fitting and placement of all parts is required to get a good clean fit up front. Other than that the bridge module looks good to me. Seems to be sturdy enough, and the detailing is coming along nicely.
2 - When I printed the patterns the LB braces at the bottom of pages 1 and 5 got cut off at the bottom.
3 - A very small piece of the tab at the left end of the second lb arm on page 5 also got cut off.
4 - The tabs on the LB insert are slightly big as noted above. It's easy to misjudge the size - stress test fitting these in the instructions.
5 - Also the note from above about gluing LB's on backwards - easy to do if you're me, I'm sure others have the same concern.
Other comments:
I'd be curious to hear what others think of the size - The first beta I did seemed a bit too small, this one almost seems a bit too big. The bridge and center section come out at about 16 inches long, so with the engines in place the whole thing would be about 20 inches. If I recall correctly, the first beta came out at about 15 inches overall. Seems to me something in between would be best - say about 18 inch overall.
Using the sequence above the entire center section went together without a hitch. The LB braces seem to work very well, although as noted any misalignment transfers to the finished LB.
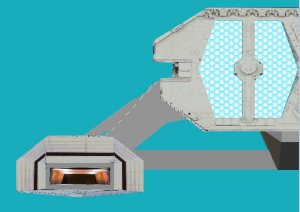
I'll insert some reference pics in a moment, but your new center LB arms stray from the original design and no longer really match the plastic kit I have. They should be more blocky and less tapered. Also, if you look at the reference shots below you'll notice that the warrior companion way is not a separate piece - it's solid all the way across. I never noticed that on the last build. Not sure if it's important, just something I noticed this time.
The center LB arms in your current version glue to the top of the LB module. In the earlier version, and in the plastic kit they connect in exactly the same way as the front and rear arms.


The image below shows the mid and front LB arm. The front is to the right in this photo.

There you have it. So far so good. I'm looking forward to doing another build of the entire ship.
Gotta go start a test build of the Aurora now....
Steve
Hey Gearz (and other interested parties),
Here are my latest beta build results. This is for the latest Bridge and LB versions. I'll insert several pictures below. My camera is on vacation with my wife so I'm using my PC camera - sorry about the quality.
Bridge - assembled as per your guide and all went smoothly except I slipped up and glued 8b and 9b in step three instead of just checking fit. I'd advise adding a trailer there - check the fit into parent parts, but do not glue. Having them glued into place too early made it tougher in step 4. This is more likely to trip up intermediate or experienced builders who pay less attention to the instructions. Novices would likely be more careful.
Center section, LB arms, LB's Assembly sequence
o Assembled the main box for the center section.
o Assembled the LB braces - need to be careful to keep these straight when you glue them - any twist or warp in them tends to get transfered to the finished LB.
o Assembled LB body and inserted braces. I put a dab of glue at each end of the braces to hold them in position.
o I then assembled the end caps for the LB's.
When assembling the end caps that have the landing bay inserts don't glue the bottom until you glue in the landing bay insert as shown here
Make sure you test fit the insert - the tabs were oversize and needed to be trimmed down to fit properly.
o Glue the endcaps to the LB arms.
o Cut and assemble the LB arms
o Glue the front and rear LB arms into position
o Glue the "bumps" into position and insert the crosspiece (warrior companion way).
You should have something like this:
o Glue the LB into place on one side. Pay attention to which end is which - the crosspiece is towards the front of the ship, the landing bay opening is towards the rear. I wasn't paying attention and glued the LB's on backwards (but at least I did them both the same so they match :roll: )
o Slide the crosspiece into position and glue the one end.
o Attach the other LB arm gluing the front and rear arms and crosspice all at once.
o Using the crosspiece as a guide for the position, glue the center LB arms into place.
o Voila! The center section is done.
Gearz,
Comments and gotcha's.
1 - The only issue I had with the bridge section was the very front - it didn't close up quite cleanly. Very careful fitting and placement of all parts is required to get a good clean fit up front. Other than that the bridge module looks good to me. Seems to be sturdy enough, and the detailing is coming along nicely.
2 - When I printed the patterns the LB braces at the bottom of pages 1 and 5 got cut off at the bottom.
3 - A very small piece of the tab at the left end of the second lb arm on page 5 also got cut off.
4 - The tabs on the LB insert are slightly big as noted above. It's easy to misjudge the size - stress test fitting these in the instructions.
5 - Also the note from above about gluing LB's on backwards - easy to do if you're me, I'm sure others have the same concern.
Other comments:
I'd be curious to hear what others think of the size - The first beta I did seemed a bit too small, this one almost seems a bit too big. The bridge and center section come out at about 16 inches long, so with the engines in place the whole thing would be about 20 inches. If I recall correctly, the first beta came out at about 15 inches overall. Seems to me something in between would be best - say about 18 inch overall.
Using the sequence above the entire center section went together without a hitch. The LB braces seem to work very well, although as noted any misalignment transfers to the finished LB.
I'll insert some reference pics in a moment, but your new center LB arms stray from the original design and no longer really match the plastic kit I have. They should be more blocky and less tapered. Also, if you look at the reference shots below you'll notice that the warrior companion way is not a separate piece - it's solid all the way across. I never noticed that on the last build. Not sure if it's important, just something I noticed this time.
The center LB arms in your current version glue to the top of the LB module. In the earlier version, and in the plastic kit they connect in exactly the same way as the front and rear arms.
The image below shows the mid and front LB arm. The front is to the right in this photo.
There you have it. So far so good. I'm looking forward to doing another build of the entire ship.
Gotta go start a test build of the Aurora now....
Steve
")