

"Flying Dutchman" - Ghost Ship - OREL Russian Paper Model Build
- Thread starter mtrappett
- Start date
You are using an out of date browser. It may not display this or other websites correctly.
You should upgrade or use an alternative browser.
You should upgrade or use an alternative browser.

I never take anybody's feedback for granted, and I REALLY appreciate you taking the time Micah! It does help me to push forward!Paper modeler necromancer, just awesome.

- Apr 5, 2013
- 13,876
- 10,216
- 228
I want to give you a little pointer on taking clear pics. When taking a picture of a part or a section of ship that will not focus correctly, take a sheet of white paper and put in along the plane on which you wish to photograph. Pressed the button on your camera lightly and it will focus on the sheet, lift the sheet, and take the pic. It will be clear as the LED's and sensors have now focused on the place on which the subject is one and will not change unless you stop focusing. Depending on the camera/camera phone, you may have to move the white sheet quickly. The sheet of paper can also allow you to make depth of field pictures which is an awesome effect once learned. ")
Thank you Zathros! I will use your technique for taking photos moving forward. I will also replace ones from the past as I get a chanceI want to give you a little pointer on taking clear pics. When taking a picture of a part or a section of ship that will not focus correctly, take a sheet of white paper and put in along the plane on which you wish to photograph. Pressed the button on your camera lightly and it will focus on the sheet, lift the sheet, and take the pic. It will be clear as the LED's and sensors have now focused on the place on which the subject is one and will not change unless you stop focusing. Depending on the camera/camera phone, you may have to move the white sheet quickly. The sheet of paper can also allow you to make depth of field pictures which is an awesome effect once learned.

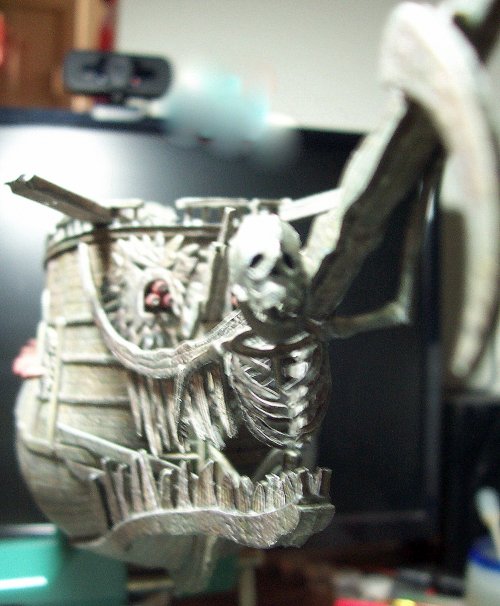
Continuing on with the Grim Reaper figurehead assembly, and installation. Good looking guy or what? 

With it installed on the ship. Kind of a sinister view from below.
Complete with his scythe.
I folded the skeleton's hand over the bowsprit.
I tried to find if there was a name for these but the closest I could find, was a casket. There is no mention in the instructions. They apparently built the same way as a barrel or casket with overlapping wooden planks to form a rounded shape.
I have to say that these were VERY difficult to construct. They were also extremely labor intensive. The smaller caskets are 94 parts X 2 = 188 total, and the large caskets are 168 parts X 2 = 336 total, giving a grand total just for caskets of 524 pieces.
This is the plan for the structural bases.

Parts for the structure of the caskets.

Using discarded pieces of card to ensure that the layers are aligned true.

This is what it the 2 smaller caskets look like complete and ready for final panelling.

The start of the build for the first small casket.

Make sure the formers are true using a small square and eyes. This is just assembled for test.

This is the central backbone with color veneers.

Glued and color veneers in place.

This is the "turret" that sits on the one side of the casket.

View of the turret assembled.

Base and turret ready for assembly together with the upper skin.

Its easy to get confused with this and put the pieces in the wrong positions, so be mindful.
The upper skin is cut and ready for rolling and folding into place.

I used water applied with a cotton swab to help roll the skin into the correct form prior to gluing in place.

This is the inside view of the casket so far.


With it installed on the ship. Kind of a sinister view from below.

Complete with his scythe.

I folded the skeleton's hand over the bowsprit.

The Ships Storage Caskets
I tried to find if there was a name for these but the closest I could find, was a casket. There is no mention in the instructions. They apparently built the same way as a barrel or casket with overlapping wooden planks to form a rounded shape.
I have to say that these were VERY difficult to construct. They were also extremely labor intensive. The smaller caskets are 94 parts X 2 = 188 total, and the large caskets are 168 parts X 2 = 336 total, giving a grand total just for caskets of 524 pieces.
This is the plan for the structural bases.
Parts for the structure of the caskets.
Using discarded pieces of card to ensure that the layers are aligned true.
This is what it the 2 smaller caskets look like complete and ready for final panelling.
The start of the build for the first small casket.
Make sure the formers are true using a small square and eyes. This is just assembled for test.
This is the central backbone with color veneers.
Glued and color veneers in place.
This is the "turret" that sits on the one side of the casket.
View of the turret assembled.
Base and turret ready for assembly together with the upper skin.
Its easy to get confused with this and put the pieces in the wrong positions, so be mindful.
The upper skin is cut and ready for rolling and folding into place.
I used water applied with a cotton swab to help roll the skin into the correct form prior to gluing in place.
This is the inside view of the casket so far.
Attachments
The upper skin complete. The bottom skin has been cutout and ready to install below it.

The lower skin being prepared.

The end of the skin needs to be glued one frond at a time to make sure it gets the right shape.

I built this off the structural assembly first as I found it much easier that way.

The 2 smaller caskets with their draft paneling in place.

Now to start work on the larger of the caskets.

Similar steps to build the casket.

This casket is more complex with a turret at either end.

I like to paint the parts prior to assembly in case there are any tiny exposed areas.

The color veneer is just a slim piece that is on the edge.

Again, double layer for the center backbone, and single layer for bulkheads.

These are the 2 turrets that need to be cutout and built.

The following is a step guide for building and gluing the turret.


Finally glued and ready. There are zero tabs on this model so be careful to butt-joint the edges accurately.

The lower skin being prepared.
The end of the skin needs to be glued one frond at a time to make sure it gets the right shape.
I built this off the structural assembly first as I found it much easier that way.
The 2 smaller caskets with their draft paneling in place.
Now to start work on the larger of the caskets.
Similar steps to build the casket.
This casket is more complex with a turret at either end.
I like to paint the parts prior to assembly in case there are any tiny exposed areas.
The color veneer is just a slim piece that is on the edge.
Again, double layer for the center backbone, and single layer for bulkheads.
These are the 2 turrets that need to be cutout and built.
The following is a step guide for building and gluing the turret.
Finally glued and ready. There are zero tabs on this model so be careful to butt-joint the edges accurately.

THE DC
Highly Esteemed Member
Thank you! I'm glad you like it! It was enjoyable to work on!Awesome love the skeleton.
I'm glad you like it Zathros! Thank youAwesome build. The skeleton figurehead looks excellent!!")

Thank you Rhaven! Looks like the skeleton has his own fan-club nowThis is really coming together beautifully! The skeleton looks AMAZING!!!
Thank you so much! He does look kind of cool on the front! I really love the design of the actual ship!Then skeleton is a masterful touch!

You are most kind Revell-Fan! I appreciate the feedback from all you guys! Thank you! Oh, and the skeleton thanks you tooFantastic!
Continuing on with the storage caskets located on each side of the stern. As mentioned before, these are somewhat difficult to make but with the aid of these photos, it should help quite a bit.

Make sure to get the towers in the correct orientation. Look at the angles of the tips of the towers to make sure they are angled as needed. I found it a good idea to carve and sand the joints to make them smooth to assist with adding the planking later on.

The upper skin is a good guide to make sure you have everything else installed correctly. Just tack it on the inside a few places to hold it in the correct fashion.

There are a LOT of curves on these caskets! They must match the places for them marked on the sides of the ship. I found I needed to stop the sides of the caskets pushing in on the long runs. This could make them look very bad. So, I used some scrap card to add some formers to the edges as required.

It is necessary to get a bit medieval on these things to get them to conform to the right shapes. I slit the skins where necessary to get the correct curves. This is the same for the bottom and the top skins.

This is the plan for the Caskets Assembly. There are several minor issues on the plan but nothing too drastic. There are a lot of parts that are not actually shown here? Its not too hard though using some intuitive knowledge once you are in the zone.

These are all of the cardboard parts for the "soft" parts of the caskets. Note that these are laser-cut for accuracy.

These are the color veneers that are glued onto the card pieces in the picture above. Its pretty much a one-to-one card for color veneer. These all require cutting out of course with the new scalpel blade, and small sharp scissors. Just work on one part at a time.

This is the upper casket for the starboard side. As you can see I have fitted the planks on the sides of the upper draft panel. I paint all the card pieces first and the edges of the parts to hide the raw color. This is the fitting of the straps. There are 4 of these distributed evenly along the casket. There are no guides for this so I measured the spaces for accuracy.

The photo below show the two starboard caskets completed. The ones on the right are for the port side of the ship which I will go over in more detail in the following explanation.

These are the upper planks that go over the draft paneling. Parts 68L through 68.xx L. These need to be pasted together one at a time following the numbering sequences.

The first one that is fitted is on the bottom edge. They do require pulling and pushing to shape. I used some small clips to hold them while the glue dried.

Working the way up to the top of the casket. Note that the planks overlap on the upper edges. Do not cut them down! If there's a problem with them fitting, fix the shape of the casket. I glued them first in the center of the plank, and then the edges one at a time.

All of the upper planks in place! They start to give a nice affect to the casket, and add a LOT of strength!

You can see that its easy to distort the shapes of the edges as you hold the part in your hands. I packed the corners with small pieces of tissue rolled into a ball later on.

Now we add the planking to the turret. Again, just do one part at a time! This is critical to avoid all kinds of problems.

These are the first 6 parts in place. I found it easier to score the fold lines on each of the parts where needed. And then pre-fold them to shape before you glue them in place.

I carved and sanded the turret at the very top to allow a better base for the final top "cap".

This is the rear view of the casket showing the progress so far. Also, there are the four straps that will go around the body of the casket on the upper section.

I glued the base of the strap first and waited for that to dry before gluing the rest of the strap. Note too that the straps have different ends! The short stubby round end goes to the middle of the casket in all cases.

Make sure to get the towers in the correct orientation. Look at the angles of the tips of the towers to make sure they are angled as needed. I found it a good idea to carve and sand the joints to make them smooth to assist with adding the planking later on.
The upper skin is a good guide to make sure you have everything else installed correctly. Just tack it on the inside a few places to hold it in the correct fashion.
There are a LOT of curves on these caskets! They must match the places for them marked on the sides of the ship. I found I needed to stop the sides of the caskets pushing in on the long runs. This could make them look very bad. So, I used some scrap card to add some formers to the edges as required.
It is necessary to get a bit medieval on these things to get them to conform to the right shapes. I slit the skins where necessary to get the correct curves. This is the same for the bottom and the top skins.
This is the plan for the Caskets Assembly. There are several minor issues on the plan but nothing too drastic. There are a lot of parts that are not actually shown here? Its not too hard though using some intuitive knowledge once you are in the zone.
These are all of the cardboard parts for the "soft" parts of the caskets. Note that these are laser-cut for accuracy.
These are the color veneers that are glued onto the card pieces in the picture above. Its pretty much a one-to-one card for color veneer. These all require cutting out of course with the new scalpel blade, and small sharp scissors. Just work on one part at a time.
This is the upper casket for the starboard side. As you can see I have fitted the planks on the sides of the upper draft panel. I paint all the card pieces first and the edges of the parts to hide the raw color. This is the fitting of the straps. There are 4 of these distributed evenly along the casket. There are no guides for this so I measured the spaces for accuracy.
The photo below show the two starboard caskets completed. The ones on the right are for the port side of the ship which I will go over in more detail in the following explanation.
These are the upper planks that go over the draft paneling. Parts 68L through 68.xx L. These need to be pasted together one at a time following the numbering sequences.
The first one that is fitted is on the bottom edge. They do require pulling and pushing to shape. I used some small clips to hold them while the glue dried.
Working the way up to the top of the casket. Note that the planks overlap on the upper edges. Do not cut them down! If there's a problem with them fitting, fix the shape of the casket. I glued them first in the center of the plank, and then the edges one at a time.
All of the upper planks in place! They start to give a nice affect to the casket, and add a LOT of strength!
You can see that its easy to distort the shapes of the edges as you hold the part in your hands. I packed the corners with small pieces of tissue rolled into a ball later on.
Now we add the planking to the turret. Again, just do one part at a time! This is critical to avoid all kinds of problems.
These are the first 6 parts in place. I found it easier to score the fold lines on each of the parts where needed. And then pre-fold them to shape before you glue them in place.
I carved and sanded the turret at the very top to allow a better base for the final top "cap".
This is the rear view of the casket showing the progress so far. Also, there are the four straps that will go around the body of the casket on the upper section.
I glued the base of the strap first and waited for that to dry before gluing the rest of the strap. Note too that the straps have different ends! The short stubby round end goes to the middle of the casket in all cases.
Last edited:
Continuing with the rear storage caskets construction. These are the upper straps in place.

Now, its time to install the bottom planking details over the draft panel skin.

Because the bottom planking starts at the bottom, you will need to glue the plank in the center of the casket. Its critical that this is measured accurately or it will throw off the alignment of the rest of the planks.

Unfortunately, there is a plank missing! I made one from some of the scrap card and textured paper supplied for anything that needs to be custom made.

That is all of the lower planks fitted. Now its time to install the lower straps.

The bottom straps line up with the top ones. They are actually not quite long enough to touch the edges but that's really not a problem. These are both of the completed upper caskets shown one above the other.

Also, these are the reverse sides. That completes these two for now.

Now we will build the lower casket for the port side. This is bigger and more complex in shape so make sure you've had your Wheaties before you attempt this

Starting with the upper planking.

Make sure to accurately align the planks or it will throw the whole thing off!

Almost at the crest of the casket with the planking.

I did carve and sand the turrets on both sides to make sure the planking fit well.

Here's the tissue wads to prevent crushing on the edges while working on the planking.

There are two turrets on this casket so double the work Here it shows the first plank installed at the bottom of the turret. The planks are better glued in three separate steps... middle, end 1, end 2.

Follow the overlapping line and it will line up okay!


A good view of the planks around the right turret.

Its hard to get this perfect but just do the best you can. A lot of this is hidden when on the ship.

The planking details completed on the right hand turret. I used Elmer's Extreme glue as grouting filler for any slight gaps. It dried matt finish to match the rest of it. Below we are also getting ready to build the thin belts that sg around the turret.

The top view of the turret.

Now, its time to install the bottom planking details over the draft panel skin.
Because the bottom planking starts at the bottom, you will need to glue the plank in the center of the casket. Its critical that this is measured accurately or it will throw off the alignment of the rest of the planks.
Unfortunately, there is a plank missing! I made one from some of the scrap card and textured paper supplied for anything that needs to be custom made.
That is all of the lower planks fitted. Now its time to install the lower straps.
The bottom straps line up with the top ones. They are actually not quite long enough to touch the edges but that's really not a problem. These are both of the completed upper caskets shown one above the other.
Also, these are the reverse sides. That completes these two for now.
Now we will build the lower casket for the port side. This is bigger and more complex in shape so make sure you've had your Wheaties before you attempt this
Starting with the upper planking.
Make sure to accurately align the planks or it will throw the whole thing off!
Almost at the crest of the casket with the planking.
I did carve and sand the turrets on both sides to make sure the planking fit well.
Here's the tissue wads to prevent crushing on the edges while working on the planking.
There are two turrets on this casket so double the work
Here it shows the first plank installed at the bottom of the turret. The planks are better glued in three separate steps... middle, end 1, end 2.Follow the overlapping line and it will line up okay!
A good view of the planks around the right turret.
Its hard to get this perfect but just do the best you can. A lot of this is hidden when on the ship.
The planking details completed on the right hand turret. I used Elmer's Extreme glue as grouting filler for any slight gaps. It dried matt finish to match the rest of it. Below we are also getting ready to build the thin belts that sg around the turret.
The top view of the turret.
Last edited:
Absolutely GobSmacked by this build, this and the 1/12th Apollo capsule are tied for model of the year in my book, okay, add the 1/25th Sherman Firefly.