Dr. Tetrode - Valkryie Build II - attempt with color.

dr_tetrode

Active Member
Finalizing the tail pieces. Edge coloring did not match, oh well, looks good when competed.

IMG_3236.JPG IMG_3238.JPG IMG_3239.JPG


Glue layers together and weight them.

IMG_3240.JPG IMG_3241.JPG IMG_3242.JPG


Using Prsimacolor markers for edges, did not match as well as I thought.

IMG_3243.JPG IMG_3244.JPG IMG_3245.JPG

Final look of the tail pieces, I kinda like the edging being a little off, adds definition to them.
What do you think?

IMG_3246.JPG IMG_3247.JPG


Keep cutting and gluing, this is fun!

Scott ;-)
 
Last edited:

dr_tetrode

Active Member
Now for the fuselage and laminations, before pictures.

IMG_3248.JPG IMG_3249.JPG IMG_3250.JPG IMG_3251.JPG


Next to the cockpit armour plated cut and edged.

IMG_3252.JPG


Left side pieces cut out, edged and some more greebles added to the lamination panels.

IMG_3253.JPG


Test fitting.

IMG_3254.JPGTIMG_3255.JPG


Final glued on state. I agree, adding the laminations is worth the work.

IMG_3256.JPG

Now have to do the other side, and the cockpit, it looks too plain.

Have fun!

Scott ;-)
 

Rhaven Blaack

!!!THE MAN BEHIND THE CURTAIN!!!
Staff member
Administrator
Moderator
I am sorry to hear that your PC died. I hope that you can either fix it or replace it and are able to recover everything that was on the old one.
I wish you the very best of luck!
 

Sudsy

Well-Known Member
Hello,

My PC died..... C drive failed, awaiting parts..... So, no new pix, but am doing some modeling and gathering pix.

Scott
So, that old hard drive... New target for the range? Shiny over weight frisbee? Or just something to set on a rock so you can hit with a sledge hammer?

Such is the fate of electronics that fail! Choices...
 

dr_tetrode

Active Member
So, that old hard drive... New target for the range? Shiny over weight frisbee? Or just something to set on a rock so you can hit with a sledge hammer?

Such is the fate of electronics that fail! Choices...
I will pull what I can and then..... decisions decisions, decisions! It has at least one good magnet in it!

Scott
 

dr_tetrode

Active Member
A tale of interrupts....

Hi,

Getting back into it, a little bit. Wow what a month or two. Two surgeries, got done, one planned for, the other for MRSA. And then C: drive fails, and then COVID 19 strikes.....

Well enough of the interrupts.

Now starting back up, working the wings. I have two sheets, that because of how they were coated, one on a cold day, and one on a normal day, that were two different colors! Same printer, same paper, just the spray was different. So... I had to laminate and cut another, that matched, but, wait, that is the same as the good one! Rats! I picked the same one to laminate and cut.... OK, now we do it again with the correct one! Such is the getting back into it again.


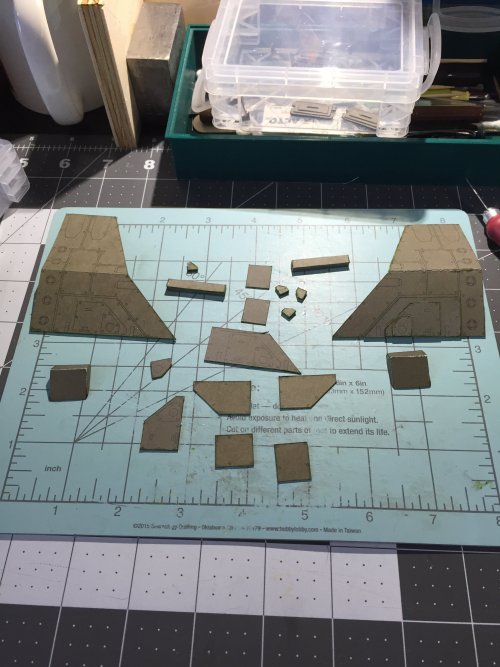
Found all the wing pieces. Check for symmetry, ie. both sides. Oops, different colors. See the big ones in the back of second picture.

IMG_3273.JPG IMG_3274.JPG

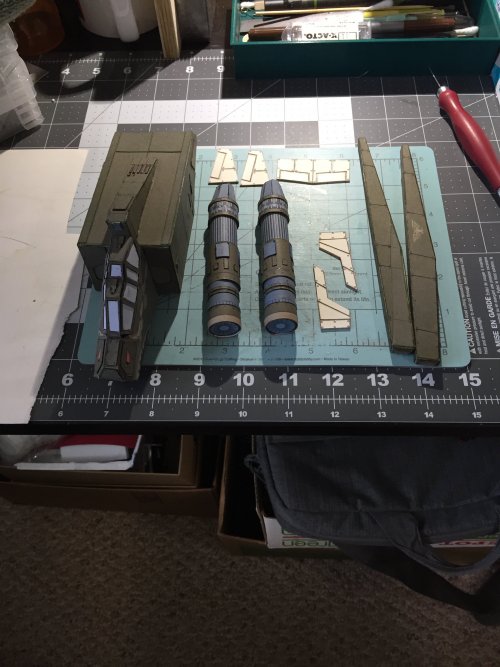
OK, dig into the extras pages, found them, laminated them, and cut them out, now we looking are good.

IMG_3276.JPG IMG_3277.JPG

Ahh, that's what those are, hardpoints, need to get them made. Scribe fold lines, cut, color edges, fold and glue....

IMG_3278.JPG IMG_3279.JPG IMG_3280.JPG

OK, let's check to see if we have the correct wings? Ooops, the left is missing.

IMG_3281.JPG

Alright now, we need to cut out and laminate the 'other' wing in the pile of extras....

IMG_3282.JPG IMG_3283.JPG IMG_3284.JPG

And now we wait for the glue to do its thing. I used the little card on the right, in middle picture to spread the glue out. Seemed to work better than using my toothpicks. Brayer'd the layers and put them under weight.

Thanks, and hope you all are doing well.

Keep cutting and gluing and posting!

Scott ;-)
 

dr_tetrode

Active Member
Continue with building the new wing, glued together and dried.

IMG_3285.JPG

Cut out and compared to the original wing for the other side, colors are now close.

IMG_3286.JPG IMG_3287.JPG

Let's check out the additional greebles, to make sure I still have them all.

IMG_3288.JPG


Another greeble to add, cut, edge color and glue it.

IMG_3289.JPG IMG_3290.JPG IMG_3292.JPG


Now to glue the two sides of the wing together, and getting it to bend in the middle at 45 degrees. Used a ruler and a ball tool to crease both pieces where the bend will be.
IMG_3293.JPG

Now glue and clamp the daylights out of it, just the first part, not the bent wing.

IMG_3294.JPG

Result, unglued end.


IMG_3295.JPG

Now, my question, should I put the greebles on before or after I glue the wing end at the correct angle?

Model away! and have a lot of fun!

Scott
 

Rhaven Blaack

!!!THE MAN BEHIND THE CURTAIN!!!
Staff member
Administrator
Moderator
You are doing a great job on this project!

To answer your questions: Put on the greebling that is closest to the mounting areas and other areas that would be difficult to access if other components are in place.
 

Sudsy

Well-Known Member
You are doing a great job on this project!

To answer your questions: Put on the greebling that is closest to the mounting areas and other areas that would be difficult to access if other components are in place.
Trial and error, mostly error... I find myself attempting to do this, only miss something that I come back to later with a magnifier and tweezers!
 

Rhaven Blaack

!!!THE MAN BEHIND THE CURTAIN!!!
Staff member
Administrator
Moderator
Trial and error, mostly error... I find myself attempting to do this, only miss something that I come back to later with a magnifier and tweezers!
I know the feeling. I have dealt with the very same thing myself many times.
 

dr_tetrode

Active Member
Well, hello all, long time, no post. Gotta' love COVID and cancer treatments. That knocked me way back. No ambition, no want to do things. So, I finally managed to get feeling better and it is time to continue this project.

First thing, Inventory, where am I? Some pictures of the stored assemblies and parts. Looks like the wings is where I stopped.

Hmmm..... forgot how to insert correctly. Here are thumbnails. Need to learn how to insert pictures again! Looking.......

Scott ;-)
 

Attachments

  • IMG_3310.JPG
    IMG_3310.JPG
    970.2 KB · Views: 3
  • IMG_3311.JPG
    IMG_3311.JPG
    910.2 KB · Views: 3
  • IMG_3312.JPG
    IMG_3312.JPG
    975 KB · Views: 3

mijob

Tie designer
Staff member
Moderator
Welcome back Scott, wow you have had a rough time I hope all is gone. You parts are looking great.
 

Rhaven Blaack

!!!THE MAN BEHIND THE CURTAIN!!!
Staff member
Administrator
Moderator
I am glad to see that you are feeling better and back to building again. I wholeheartedly understand the whole battle with cancer (as well as the after effects that you have to deal with).

This is coming together nicely!


As for uploading photos. It is quite easy.

1) Click on "Attach Files" button. Choose the photos that you want.
2) Once you have selected the photos, click on the "Insert multiple" button. This will automatically select all of the photos that you have initially uploaded.
3) click either the "thumbnail" or "full image" button ( usually pick "thumbnail")
4) space out the photos to add text as needed.

I hope that this helps.
 

Chuffy70

Well-Known Member
Good to have you back....

I hope you are on the road to recovery and look forward to seeing your further progress....

No matter what the maladies life throws at us, getting stuck back into model making is a wonderful therapy
 

Sudsy

Well-Known Member
Well, hello all, long time, no post. Gotta' love COVID and cancer treatments. That knocked me way back. No ambition, no want to do things. So, I finally managed to get feeling better and it is time to continue this project.

First thing, Inventory, where am I? Some pictures of the stored assemblies and parts. Looks like the wings is where I stopped.

Hmmm..... forgot how to insert correctly. Here are thumbnails. Need to learn how to insert pictures again! Looking.......

Scott ;-)
Picking up where you left off... Yeah.. Toughest part of any project!
 

dr_tetrode

Active Member
Thank you, all. Glad to almost be back. Some good days, Some bad days.

Anyhow, photos, next question. I remember having to set the size of the photos. Does that happen with "full image"? Or is that not a thing anymore? Is common practice to use thumbnails?

Scott ;-)
 

Rhaven Blaack

!!!THE MAN BEHIND THE CURTAIN!!!
Staff member
Administrator
Moderator
Anyhow, photos, next question. I remember having to set the size of the photos. Does that happen with "full image"? Or is that not a thing anymore? Is common practice to use thumbnails?

Scott ;-)
That is a very good question. The answer is simple. Since you are able to upload the photos that you have, you should be able to click on either thumbnail or full image. It is really up to the individual author of the thread how they wish to have the thread look.
 
Top