Don't laugh too hard...It's my first attempt!
- Thread starter Nazgul
- Start date
You are using an out of date browser. It may not display this or other websites correctly.
You should upgrade or use an alternative browser.
You should upgrade or use an alternative browser.
I have been watching your thread with great interest as well. Your experimentation with Sculptamold has turned out great... so great that I am considering trying it. If you have any Sculptamold pointers, I would be interested to hear them.Nazgul said:...By the way...I just found your thread:
http://www.the-gauge.com/showthread.php?t=22333
Awesome job!...
I finally finished reading this whole thread (all 31 pages of it) and now I have to post. You are doing a fantastic job. An absolute inspiration to first timers such as myself! The vids are great to watch, the pics are excellent, and dont worry about the water not moving, it's a model! besides, with the train rolling by, I was focused on the moving object, and took in the entire scene at the same time. Keep up the good work.
Hi,
Though this may be Steve's first go at layout building, it's obvious he's got a "knack" (talent) for doing things right the first time around, and not afraid of jumping right in and getting his feet wet (there's that reference to water again...). He's done more and better work on this layout in 10 months that many of us require years to accomplish (if ever).
Bottom line....Fantastic work...Keep it up...!!!:thumb:
Thanks EVERYBODY! ops:
ops:
Steven, Stephen,...thank you guys:thumb: :thumb:
Dominic...welcome to The Gauge...you read THE WHOLE THREAD!!!! You deserve a medal for that one
 just so you know I read ALL of your posts...all 6 of them...so we're even!sign1 I see you "inherited" some track and a bench....LET'S GET HOT!
 When you're ready, start a thread and we'll all be there to help or at least encourage...If I can do it...you can do it!:thumb: :thumb:
Deano...you know better than mentioning the dreaded "W" word around here! Thank you for your kind words!:thumb: :thumb:
Gus...You are too kind...thank you sir!!!:thumb: :thumb:
Last but not least, TrainNut.... "rocks" would look great in that IMPRESSIVE canyon you're modeling so I'll share what I can...First of all the best thing about sculptamold (sm) is it is CHEAP!!!! All the rock work I 've done on this layout has come from one $5.00 bag. That there is one BIG BANG for your buck!:thumb:
First of all, I follow the directions on the bag...2 parts sm to 1 part water. I mix a little at a time (3oz dixie cup for measuring) because it goes pretty far. Spread it on as thin as you can and still get the texture you want...it takes a long time to dry.
Everything in all these pics was put on and "worked" with a putty knife. I made little ledges in places so I have a place for greenery or even a tree later.
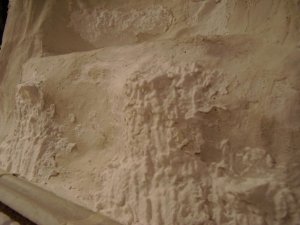
You may notice that I made some vertical ridges on the rock face (not necessary but I like em'). I made the ridges on a slight diagonal for interest. Real rocks were added as I've shown before.
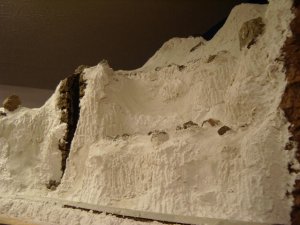
When you think you've done enough damage and it dries...paint it. I started with black (airbrush).....spooky (looks like Mordor)
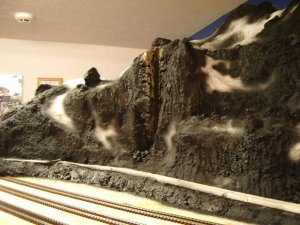
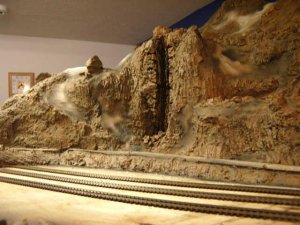
I then added The two shades of brown (also mentioned elsewhere in this thread) one dark (sprayed on) and one lighter (sponged on). And that is that!
****EDIT*******EDIT******EDIT*******
If you use sculptamold on foam (blue or otherwise)...paint the foam first to help the sm "grab" the suface! ops: :thumb:
I hope that helps...if you or anyone else has any questions, I'd be happy to answer if I can.
I just want to say once again...this is the way I did it...There are many other ways to do it...this one worked for me.:thumb:
Steven, Stephen,...thank you guys:thumb: :thumb:
Dominic...welcome to The Gauge...you read THE WHOLE THREAD!!!!
Deano...you know better than mentioning the dreaded "W" word around here!
Gus...You are too kind...thank you sir!!!:thumb: :thumb:
Last but not least, TrainNut.... "rocks" would look great in that IMPRESSIVE canyon you're modeling so I'll share what I can...First of all the best thing about sculptamold (sm) is it is CHEAP!!!! All the rock work I 've done on this layout has come from one $5.00 bag. That there is one BIG BANG for your buck!:thumb:
First of all, I follow the directions on the bag...2 parts sm to 1 part water. I mix a little at a time (3oz dixie cup for measuring) because it goes pretty far. Spread it on as thin as you can and still get the texture you want...it takes a long time to dry.
Everything in all these pics was put on and "worked" with a putty knife. I made little ledges in places so I have a place for greenery or even a tree later.

You may notice that I made some vertical ridges on the rock face (not necessary but I like em'). I made the ridges on a slight diagonal for interest. Real rocks were added as I've shown before.

When you think you've done enough damage and it dries...paint it. I started with black (airbrush).....spooky (looks like Mordor)

I then added The two shades of brown (also mentioned elsewhere in this thread) one dark (sprayed on) and one lighter (sponged on). And that is that!

****EDIT*******EDIT******EDIT*******
If you use sculptamold on foam (blue or otherwise)...paint the foam first to help the sm "grab" the suface!
I hope that helps...if you or anyone else has any questions, I'd be happy to answer if I can.
I just want to say once again...this is the way I did it...There are many other ways to do it...this one worked for me.:thumb:

I was just thinking the same thing when I was reading. YOU MAKE IT SOUND AND LOOK SO EASY!!!!:thumb: :thumb:
Maybe I will get around to making somethin like this on a future layout when I get my own place:thumb:
Maybe I will get around to making somethin like this on a future layout when I get my own place:thumb:
Great tip on painting the foam first...I would have suggested 'roughing' the surface with a surform or sandpaper if you canstand the dust, but painting may do the job without the mess.
On my previous layout I lo-temp glued cheesecloth to the white foam I was using to grab the plaster I slathered on. That was before I discovered (was introduced to) lightweight spackle...lightweight being especially important for modular railroaders, like the ones who introduced me to the stuff. The spackle is very sticky on its own and will smooth with water for a variation in texture, but can't get as rough as sculptamold (probably).
I have yet to experiment with using spackle, or sculptamold for that matter, in a latex rock mold. (anybody?) But another thought...what about adding white glue to the mix?
From Mordor to Montana...or was it Wyoming? Pretty cool showing the step by step.
Galen
:thumb: Steven, Josh
I don't want anyone to be disappointed when they use this stuff for the first time and it turns out lousy! ops: My first attempts did!
 Like everything else...It takes time to get the hang of it. However, as far as scenery products go...sculptamold is really easy to use. In fact, shaping the sculptamold will probably be the easy part...coloring it may prove more difficult...remember this:
http://www.the-gauge.com/showpost.php?p=201621&postcount=138
ouch!!! I did that with a brush...I don't advise that WS pigments may be a way to go...haven't tried it....has anyone?. My bottom line is this...the coloring is what is going to really make it work:thumb: ....one last thing... sculptamold can be "carved" when dry so if you need more detail...you can add it after...see.....easy!tooth1 Yeah right!
Galen
all good points. I will say that once I painted the foam the sm had no prob "sticking":thumb:
I wonder when using sm in a rock mold if you would lose a lot of the detail that you used the mold for in the first place...maybe thinned out? or aluminum foil? Anybody?
there's a bunch of ways to do it..that's for sure:thumb::thumb:
Decided to do one last video using the passenger cars:
http://s147.photobucket.com/albums/r310/nazgul-np/?action=view¤t=IMGP0706.flv&refPage=&imgAnch=imgAnch1
I like that one the best...probably the angle
My Micro-Engineering viaduct has shipped today....yea!!!!


I don't want anyone to be disappointed when they use this stuff for the first time and it turns out lousy!
http://www.the-gauge.com/showpost.php?p=201621&postcount=138
ouch!!! I did that with a brush...I don't advise that
Galen
all good points. I will say that once I painted the foam the sm had no prob "sticking":thumb:
I wonder when using sm in a rock mold if you would lose a lot of the detail that you used the mold for in the first place...maybe thinned out? or aluminum foil? Anybody?
there's a bunch of ways to do it..that's for sure:thumb::thumb:
Decided to do one last video using the passenger cars:
http://s147.photobucket.com/albums/r310/nazgul-np/?action=view¤t=IMGP0706.flv&refPage=&imgAnch=imgAnch1
I like that one the best...probably the angle
My Micro-Engineering viaduct has shipped today....yea!!!!
Holey smokims Steve what a busy summer you've had your doing a fantastic job :thumb: Last I was in this thread you were working on the waterfalls and guess what I'm about to do ? thats right a waterfall. I've learned a great amount reading through your thread let me see I started at 11:30 and its now 12:50 wow one of them books you just don't wanna put down. Ah did you ever find the NMRA guage? I hate when that happens , I guess thats why I eventually got wise and put a small nail on the wall and hung it up. I'm glad you mentioned the colors for the river bottom .:thumb:
gottaBreal
Thank you....been seeing your track plans popping up...GREAT work!:thumb: wish I had the know how to design them but I can't seem to wrap my mind around it......yet.
Lynn
Can't believe you read that long!
I think the NMRA gauge must be at the bottom of the river ....Good luck with the waterfall:thumb: ...post the pics!
I have two projects I'm going to be working on:
1. building the steel viaduct
2. Re-lettering and weathering my dcc sound equipped P2k 0-8-0. I know what your thinking..."Steve don't you think you should practice on some cheap locos first?" My answer: Yes I do.......will I?.......Nosign1.......I hate practice! Which is why I can't play the piano...but that's another story.....
I have to wait for the viaduct to arrive....so I started on the loco
My method may seem unconventional, but bear with me...It will all make sense.
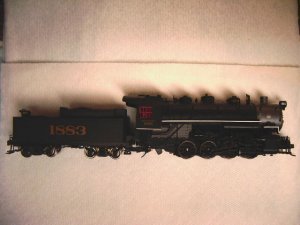
First...the 0-8-0 ( it is lettered for the Southern...I model Northern Pacific)
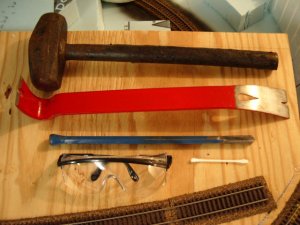
Now the tools I'll need: heavy hammer, pry bar, star tipped chisel, safety glasses (very important...never model without them), and Q-tip (optional).
The work in progress:
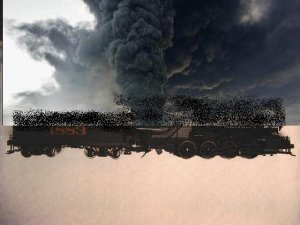
Letters are off!
I thought about doing a step-by-step tutorial...but I'm sure after seeing the tools...It's self explanatory how I did it....If any of you try this method post your before and after pics here:thumb:
now I need to buy some paint (don't want to use my cheap-o craft stuff)
I'm leaning towards Sears weather-beater...although that may actually hinder my weathering efforts..... Oh well, there's always Dutch Boy!
Thank you....been seeing your track plans popping up...GREAT work!:thumb: wish I had the know how to design them but I can't seem to wrap my mind around it......yet.
Lynn
Can't believe you read that long!
I think the NMRA gauge must be at the bottom of the river
I have two projects I'm going to be working on:
1. building the steel viaduct
2. Re-lettering and weathering my dcc sound equipped P2k 0-8-0. I know what your thinking..."Steve don't you think you should practice on some cheap locos first?" My answer: Yes I do.......will I?.......Nosign1.......I hate practice! Which is why I can't play the piano...but that's another story.....
I have to wait for the viaduct to arrive....so I started on the loco
My method may seem unconventional, but bear with me...It will all make sense.
First...the 0-8-0 ( it is lettered for the Southern...I model Northern Pacific)

Now the tools I'll need: heavy hammer, pry bar, star tipped chisel, safety glasses (very important...never model without them), and Q-tip (optional).

The work in progress:

Letters are off!

I thought about doing a step-by-step tutorial...but I'm sure after seeing the tools...It's self explanatory how I did it....If any of you try this method post your before and after pics here:thumb:
now I need to buy some paint (don't want to use my cheap-o craft stuff)
I'm leaning towards Sears weather-beater...although that may actually hinder my weathering efforts..... Oh well, there's always Dutch Boy!
i dont know mate, it seems to me you cut it a little fine with that hammer , personally i would have gone a little bigger on the head weight just to make things easier on the shoulder and elbow...  ....
.... 

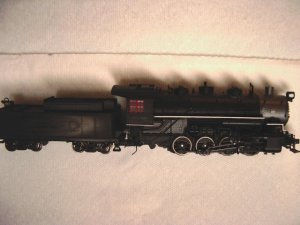
I painted and lightly weathered the loco
Before:
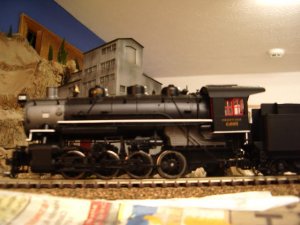
After: (I still have tape on the window and bell)
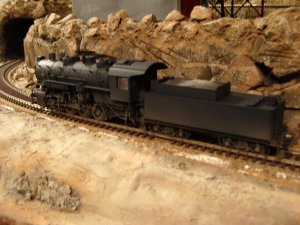
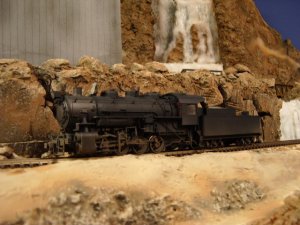
Phase 2: I painted the loco and tender a very dark gray and then added road dirt. I had every intention of very heavily weathering it ....but decided I like it as a "well maintained and hard working" locomotive
 I still have to add decals (still waiting for them)
 But I'm open for suggestions

I want to paint some of the little details by hand as well:thumb:
Before:

After: (I still have tape on the window and bell)


Phase 2: I painted the loco and tender a very dark gray and then added road dirt. I had every intention of very heavily weathering it ....but decided I like it as a "well maintained and hard working" locomotive


I want to paint some of the little details by hand as well:thumb:

