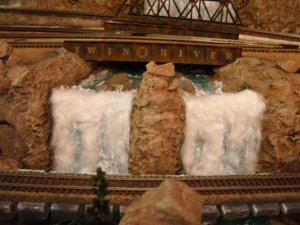
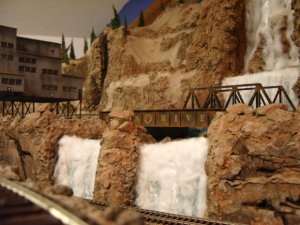
Don't laugh too hard...It's my first attempt!

Nazgul

Active Member
Jan 22, 2006
992
0
36
63
Ohio
thanks Chris,
I think I'm done with the pics for a while...until the bridge work at least begins. But that should keep me busy for quite a while. I'll start the "demolition" for the deep ravine while I wait. And of course I need ground cover...and....
 

Nazgul

Active Member
Jan 22, 2006
992
0
36
63
Ohio
Thanks guys
there are 3 vids there now. just hit the "NEXT" button for the others. You can see them here:

http://s147.photobucket.com/albums/r310/nazgul-np/?action=view&current=IMGP0646.flv

I did them on my digital camera because our camcorder was dropped and no longer works:cry: But the good news is...I didn't do it!:D I won't do anymore until I get a new one.

I remember reading a little debate somewhere about whether or not modeling anything but still or extremely slow moving water would take away from the realism of a layout. Now, obviously in still pics...it's not an issue, but in person and on video, it is a legitimate question (an an interesting one). I guess the gist of the argument was this: you're already asking the viewer of the layout to suspend a certain amount of disbelief already (size, distances, people and vehicles not moving... most of the time) and now you'd be adding moving water that is "frozen" in time. So, I guess it becomes a question of, where to draw the line.

My take is this: most of us will never have the type of layout (for various reasons) that will really ever make the viewer FORGET that he or she is looking at a model (no matter how well done it is)...I know I certainly don't! Seeing a well done waterfall or fast moving water doesn't take away anything from the experience and in still pictures it can actually be a huge plus. Having said that, in videos.......it doesn't work. In the video I did, where the river and waterfall are in plain view...it just looks "wrong" and really points out the fact that "this is all fake". That, I guess, is the real drawback. In person...not an issue (for me)...on video...not something I want to show. There are plenty of other parts of the layout to show on video but the water doesn't work.

If any one cares to share their opinion I would love to hear from you
take care:thumb:
 

ocalicreek

Member
May 4, 2005
824
0
16
48
Puyallup, WA
groups.yahoo.com
Okay...let's talk realism

Steve,

Great vids! I enjoyed watching them.

Realism is in the eye of the beholder (despite our democratic tendancies to follow the will of the many and assume it is right).

But if you want a standard for comparison then check out the MAG at www.magnoliaroute.com . Cliff has done some fine modeling and put together some great videos. Just make sure your sound is turned up.

You've opened up a whole can of philosophical model railroad issues with this latest post...but interesting discussion topics nonetheless.

Okay...my kiddo wants daddy to help with his wooden trains...

Galen
 

viperman

Active Member
Mar 13, 2006
959
0
36
41
Carol Stream, IL
Steve, while not the BEST videos, they aren't as bad as you make them sound. I did enjoy them, and don't care that the water isn't falling, or rushing down the river. I think you might be just a little too hard on yourself sometimes. In the meantime, I'm looking forward to more progress
 

Nazgul

Active Member
Jan 22, 2006
992
0
36
63
Ohio
Galen
I went to the site you mentioned and......jawdrop WOW! that is one impressive layout. The videos were awesome and really give a good perspective on the entire layout, not to mention just being fun to watch! Thanks for sharing:thumb:

Steven
Thanks for the encouragement. I know I'm a little rough on my work sometimes...but overall I'm very satisfied with it and I don't want to sound otherwise. When I said they were poor quality, I was mostly talking about the fuzziness and slight choppiness of the frame rate. Those issues aside...I thought for first videos...they were good. The camera placement was decent and I just wanted to give you guys who have seen nothing but still pics of the layout....some movement. When I get a new camcorder, I'll try being a "Director" againannounce1 :D
 

UP SD40-2

Senior Member
Apr 29, 2006
2,709
0
36
58
Steve, as far as the water goes, LEAVE IT!!!:thumb: DON'T CHANGE IT!!:D your water is one of the things i like best about the layout(amongst MANY other things;) ):thumb: . as far as how it looks in a vid, CRIPES, lets NOT get that picky:rolleyes: . you have to find a happy medium, and i think YOU have found it!:thumb: now lets have NO MORE of this talk about changing the water to look better in vids;) . BTW, AWESOME VIDS!:thumb: VERY nicely done.:D THANKS! :D -Deano
 

Nazgul

Active Member
Jan 22, 2006
992
0
36
63
Ohio
Deano
I don't have any intention of changing any water feature on this layout. I like them.:) Quite frankly...It took too long to get a color (I mixed colors and tested them for days) I was satisfied with and trying to get rapids that looked like rapids and not white smudges on the water:rolleyes:

I was just saying that I would try and keep them out or limit their appearance in a video:eek:ops:

And besides....If you like them....that's good enough for me!;)
 

TrainNut

Ditat Deus
Sep 15, 2004
1,731
0
36
54
AZ
Nazgul said:
But all was not lost. I happened to spy this little beauty:
And what do you know...It's already green! There was no plant name on the tag, but it said:
Mediterranean Garden
D03 328185
US $4.99
Thank you very much for the tip. I went to Michaels the other night, found the same stuff and bought a bunch. Brought it home and planted some in my blue foam :D and they look absolutely fantastic. Your right - they are a nice bright shade of flourescent green but nothing a little spray paint won't cure. Thanks again! :thumb:
 

Nazgul

Active Member
Jan 22, 2006
992
0
36
63
Ohio
Miles
You are too kind:eek:ops:
I haven't done anything different than many others have. If you go to page 11 or 12 of this thread you can see how it was done. I put down a bed of joint compound with a putty knife. Because I was modeling a fast moving river with white water, I didn't bother sanding. For a calm water surface...smooth it out. Color...I'll have to check on that one (can't remember the exact color name) I'll find it. Obviously it is an aqua-like color. I air brushed it on and then added a little white to lighten it up to make "shallow" areas and then a little more white for the very shallow edges. cover with a few coats of gloss medium and your almost done. I used WS water effects for the whitecaps ( but I believe Tacky glue would work just as good and is much cheaper:D ). Put a squiggly line of it sideways on the river and "Tease it" with a tooth pick in the direction your water is flowing and then paint it white when it is dry. A couple of more coats of the medium and you are done. hope that helps anyone who didn't know how I did it. Is it the only way?...no. Is it the best way?...probably not. It just worked for me.:thumb:
 

Nazgul

Active Member
Jan 22, 2006
992
0
36
63
Ohio
TrainNut
glad I could help:thumb: I'm also glad you weren't disappointed in the look of the "trees" once you got them home. I was very hesitant to post the suggestion because what I think looks real and what others think looks real, can be very different things.
By the way...I just found your thread:
http://www.the-gauge.com/showthread.php?t=22333
Awesome job! I think your most remarkable feat was getting your wife to let you put your layout in the dining room! YOU ARE MY HERO and an inspiration for all married men!sign1
If anyone hasn't seen it...please check it out. It will be well worth your time. In fact, I'm going there now!:wave:
 

fsm1000

Member
Jun 4, 2006
467
0
16
63
Coquitlam BC
fsm1000.googlepages.com
Ok now let us stop and consider the following.
This thread was started on 01-30-2006, 10:28 PM
That was ten almost 11 months ago. The title of this thread is
Don't laugh too hard...It's my first attempt!
Steve has now posted 335 times.
HEY STEVE, you are no longer a beginner guy.

I think the title is ironic actually.

Looks really good by the way. As for the videos I look at it this way.
We are all modeling MODELS not the real thing. For the rivet counters, get over it.
I am a model railroader. I do models, I like them. I know next to nothing about the real thing. I couldn't start, stoke, or run a steam engine to save my life.

Anyhow, enough ranting. Great layout and videos and I wouldn't mind seeing more myself:)
 

Nazgul

Active Member
Jan 22, 2006
992
0
36
63
Ohio
Stephen (fsm1000)
thank you for your kind words...means a lot:thumb:


Quote:
I know next to nothing about the real thing. I couldn't start, stoke, or run a steam engine to save my life.
That may be true, and no discredit for it..........but wouldn't that be an exciting learning curve to be on !!!!!

Yes it would be!...I'm probably different from most people who get into this hobby because I never cared a lick about real trains. They were just something that inconvenienced you at RR crossings!:D Now however, as I get more and more into model railroading...I'm finding myself drawn to the prototype far beyond just trying to see if something looks right. I think Deano's thread and the pics and talk down there have had a lot to do with it, but just learning slowly over these last months has opened my eyes to all that went, and still goes, into "real" railroads. As sumpter said: It's "an exciting learning curve to be on !!!!!"
 

Nazgul

Active Member
Jan 22, 2006
992
0
36
63
Ohio
ok lets finish this water thing once and for all

For anyone interested....the color I used for the rivers is "Craft Smart" aqua 23647. I used it right out of the bottle to paint the whole river and then added white to lighten it up for the shallows....that takes care of that....
To close out the water chapter, I went back through this thread and saw that I never explained what I used to make the lower waterfall.....

Here's a close up, head on, shot:
Scenery 159 small.jpg

I used ordinary white latex chalk, spread on a non-stick cookie sheet (bought one for the purpose, on sale for $4.00). I spread it about a half inch bigger all the way around than the actual finished size (to allow for shrinkage). As it was setting up, I worked it with plastic knife and later, a toothpick to create ripples and texture to simulate "rough" water. Always working from the "top'" down. After it dried, it was painted a very light gray and later a very light blue was added in places for color. The last step in painting was highlighting many of the raised areas white. When it dried I cut it to fit.
The "water" was glued on with WS water effects but tacky glue should work as well.
To simulate foam and spray, I used cotton balls that my wife had in the closet (shhhhhh....don't tell her!). I pulled them (keeping them in one piece) into long thin strands and glued on where appropriate. They do pick up dust...so after I'm done spraying paint and plastering on the rest of the layout I will re-do the cotton and spray it with scenic cement or hair spray.

Here's a shot I took today:
Scenery 158 small.jpg

I just want to emphasise that......this is what I did. There are as many ways to do this as there are modelers. What I did lends itself to higher, fast moving falls with plenty of spray and foam.....now that wasn't so bad was it?........was it?:rolleyes:
Alright it was! lets never mention water again!sign1