HOn3 locomotive shops

Bill Nelson

Well-Known Member
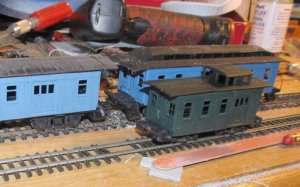
ASL tstng trks.jpg Test fitting trucks

I'm test fitting some trucks, I have some old Central Valley archbar trucks , and I'm going to try them. they roll very well. I have had some trouble with ancient HOP Central valley trucks, that I believe result from unequal spring tension. they worked fine 45 years ago, but derail a lot now. hopefully these Hon3 trucks won't have that issue.


KD HOn3 coupler height gauges have this neat feature, that lets you test the correct floor height for mounting couplers. Until recently all Hon3 cars were craftsman kits, and most came without trucks and couplers, and getting the coupler height right was hell.


so the KD coupler height gauge had this bar that projected from the other side, If the bar would just barely slide under the floor the coupler height will be right.
 
Last edited:

Bill Nelson

Well-Known Member
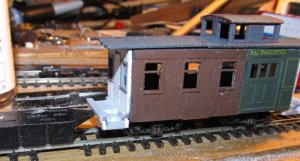
ASL a pntd cboose.jpg Paint!

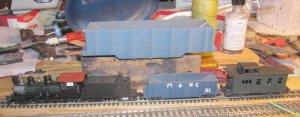
I got home from work this morning at about seven thirty, and shot both sides of the caboose body roof and frame with black spray paint. when that had dried, I sprayed the body Hunter Green, once from the bottom, and once from the top to get even coverage and minimize paint shadows around details.


Having painted it black first, darkens the color some, and ensures that if the green misses a spot, it comes out black, where it can present itself as a shadow, rather than a color lighter than the green, where it is obviously a paint error.

I'm going to have to vacuum off my work table the styrene "snow" gets on everything. I have to be double sure my paint is dry before I bring the pieces in from outside, ot the finish would be ruined.
 
Last edited:

gbwdude

General Manager, W.R.Ry.
Bill,

I was just cruising through some geared lokie websites when I saw this contraption and imagined you at the helm of this: http://www.gearedsteam.com/other/images/monte_cristo_wash-kinsey_willam.jpg

What my real motive was is to figure out which of the three main types of geared locomotives were the most economical as far as operation and maintenance. For whatever reason, I can't find any comparisons. If anything, I might have to email Cass Scenic Railways and get their opinion.

Tyler
 

Bill Nelson

Well-Known Member
Tyler, that appears to be a homemade creature, There was a chain drive locomotive that was commercially produced , but they were not many of them. I'm not familiar with them but my old cohort Rick Perry , down in Hurtsbourough Alabama is building a 3 foot gauge reproduction of one using a boiler and steam engine salvaged from a steam shovel.

The advantage of the Shay, maintenance wise was the bevel gears and universals were on the outside of the locomotive, so they could be lubricated without getting under the locomotive. They were the most produced, so parts and used locomotives were easy to find.

The biggest disadvantage of the shay was with track maintenance. the cylinders were on one side of the locomotivem mounted vertically, so the pounding of the clyinders was directly over one rail. In operations where the locomotive was not turned, this would result in one rail taking a greater beating than the other. I have a photo of a piece of track like that over my desk.

The climax had the universals and bevel gears down the center of the locomotive, harder to get to for maintenance, probably easier on the track.

The Heisler with the V cylinders, had universals and bevel gears down the center. They had the bevel gears in a housing though, so they could run in oil, and you would only have to go under there to lube the universals and the slip joints. also using side rods to power the 2nd axle on each side, reduced the number of Bevel gears, which kept manufacturing cost down.


I think one of my dad's books covers this subject, I'll Have to look around.

I have heard that some crews on modern outfits have not been fond of some of the climaxes, as they sometimes hop. I have seen photos of Heslers with a distinctive hop as well.

Bill
 

Bill Nelson

Well-Known Member
ASL twtseehppers.jpg ASL C-19 & Caboose.jpg I am studying my Twetesee (ET&WNC) Hoppers I have scratch built four, and have the wood cut for another four.

Tyler has been playing with a casting kit, and I have one as well. I think I may build three of them and use the parts for the fourth, as masters to make a mold so I can make lots in resin.


I had plans from a Narrow gauge and short line Gazzette in On3. I built two cars in ON3, to match the plans, so I would have a good understanding of the car, before I made the compromises I wanted to d to make a sturdier, more easily mass produced car in HOn3
 
Last edited:
Z

Zathros

I wonder if any of youguys now of a simple steam engine that could be built (planswise). I have a milling machine, 9" SouthBend Lathe, Mig/Tig welder etc. I don't want to reinvent the wheel, but I would like to build a steam engine. I have read of Briggs and Stratton lawn mower engines being converted. I would like something with a 3" diameter piston, something usable. A not so complicated Sterling engine would be even better. Has to be horizontal shaft. Just thought I'd ask. Answers through P.M.'s would be best, to not upset the thread. Thanks! )
 

Bill Nelson

Well-Known Member
ASL #4.jpg simple steam.

probably the simplest design would be the class a climax.


they had a wooden chassis, which resembled a flatcar, with a vertical or horizontal boiler on one end and a water tank on the other . In the center they had a two cylinder marine steam engine.

some early units had a rigid frame and two axles driven by bevel gears. moat of them had two trucks in which each axle was powered by bevel gears, powered via centrally located driveshafts with universal joints and a slip joint similar to the driveshaft in a traditional rear wheel drive car or truck.

here is a link to a page with some images.

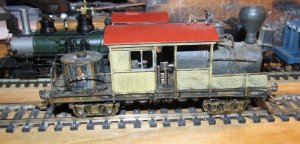
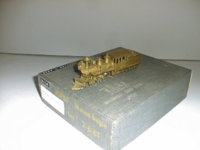
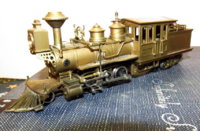
http://www.gearedsteam.com/climax/climax.htm, and I will attach a photo of an Ho gauge unit, This Ho model was imported by Westside Models back in the early 1970's. It was my second geared locomotive. it has about a 44-1 gear ratio. the factory motor had a plastic end block that held the brushes. I used mine for a road engine on a big layout, and with the low gear ratio, it ran for long periods wide open, which caused the motors to overheat, which would cause the brush holders to distort. Westside provided me with a couple replacement motors for free. This was my first remotor. I put a can motor in it, and it has been good since. Now that I have lots of geared locomotives it doesn't get near as much hard use, as it did originally. In any case it's weathering accurately depicts a lifetime of hard use.


Bill Nelson
 
Last edited:

Bill Nelson

Well-Known Member
I have just gone through this thread editing the posts to show the photos full size. The thumbnails don't show well on my old mac, and when opened, are not viable at the same time as the test. I have no idea how this looks on other platforms, but wanted to present the material in the best mode possible for instructional purposes making connections between references to the photos in the text challenging. not gotten much done on Hon3 equipment in the last year am rebuilding the standard gauge section of my RR, and the narrow gauge is cut in half. the narrow gauge main will eventually be three times longer and have gentler grades. I have acquired a mini Tsunami to put DCC and sound into my west side C-16, so it can double head with the Blackstone C-19. That will probably be my next narrow gauge project.
 

Bill Nelson

Well-Known Member
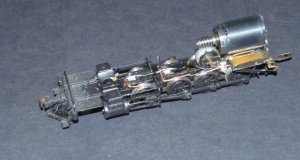
a Westside C-16 guts.JPG

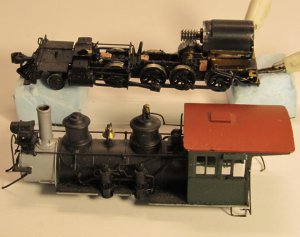
Working on my Westside C-16 again. previously I put a Locodoc conversion motor in it. I'm considering a Tsunami install, but in the mean time time I am working to put electrical pick ups on the insulated side of the drivers. I have cut little tabs out of printed circuit board material, and glued two on top of the locomotive frame. I will solder thin phosphor bronze wires , bent to shape, to those two pads to make electrical wipers for the front two drivers. another pad is glued to the insulated side of the firebox with JB Qwick. that pad has been sanded on the back side, till it is about 1/3rd it's original thickness. the third pad will have a wire soldered to it that will pick up electricity from the back two insulated drive wheels. here is a link to a video of this mechanism, which was good, when it was stock, but with this loco-doc conversion motor is awesome!


you tube ate my video!!
 
Last edited:

zathros

*****SENIOR ADMINISTRATOR*****
Staff member
Administrator
Moderator
Wow! The last 5 post or so were incredible! That "Simple Steam" train is incredible. :)
 

Bill Nelson

Well-Known Member
a C-16 extra pickups.JPG


Here are the electrical pick ups on the insulated drives. I will have to re locate the boiler weight retaining screw, as it contacts the middle pcb board. I still need to solder a wire to one of the boards, that will lead to the motor, if the locomotive remains a DC locomotive, or to the tender if I decide to install a Tsunami in this critter.

When I solder the wheel wipers on to the tabs, it is impossible to get the right amount of tension on them, so I just get them located on the center of the tread. Then I remove the drivers and bend the wires downward for good contact. This is very finicky work in HON3. easier in HO, and much easier in ON3.
 

Bill Nelson

Well-Known Member
I was able to grind enough off of the boiler weight screw to get the needed clearance, and yet have just enough screw slot left to get a grip for removal or tightening. I was able to drill out the headlight, and to drill a hole through the boiler shell , under the headlight bracket, from underneath, with the smokebox front removed. Can't find my grain of rice 12v bulbs. have a bag with about 20 somewhere, can only find bulbs that are too big, or 1.5 volt bulbs. threading the wires from the back of the headlight under the headlight bracket, and through the small hole in the boiler will be a *******. on an unpainted model, one would unsolder the headlight and bracket, modify them on the work bench, and then solder them back on. I bought this one used, and a previous owner got a great paint job on it. I don't want to mess up the paint job, so soldering is out of the question. Likely I won't find those bulbs until after I have bought more; I'm cleaning and organizing my workbench, the antique chestnut wardrobe I store hobby supplies in, and a closet that is similarly used. If it did not turn up yesterday, I'm not finding it until I'm looking for something else. So I need to proceed with the rest of the Tsunami install, perhaps wiring in a micro plug so the headlight could be unplugged allowing the superstructure to be removed from the frame without headlight wires tethering them together.
 

Bill Nelson

Well-Known Member
Zathros, that little class A Climax punches well above it's weight. With the 88-1 gear ratio it is a torquey little critter. One of it's factory universals died, and I put NWSL Cardigan shafts in it as a replacement. I had to limit it to pushing three cars up my old 8.5 grade, as it would break the plastic balls on the cardigan shafts before it would get to full slip. Eventually I got tired of replacing the balls on the cardigan shafts every time a car would derail, so I build replacement cardigan shafts out of brass to fit the NWSL cups. This one is standard gauged. Westside imported them in 3 foot gauge as well, but they are mighty big for a 3 foot gauge Class A Climax.

Nelson
 

Bill Nelson

Well-Known Member
I was on the Weisman model services ordering parts for my ON3 Americans, while there I picked up some HON3 flatcar kits for an ET&WNC prototype, and a kit for the ET&WNC hopper, like my scratchbuilt cars. I need a boat load more. WANt to build a kit to se if there is another way I Can go around simplifying the production process.
 
Man, it has been awhile since I've been here. Been quite ill really, but on the rocky road to recovery. I'm looking for one (1) HOn3 70 ton conversion RTR. My dexterity won't let me build the bugger myself. I have HO for trade if you like, or plain old cash. As long as the body shell is any color but green (it needs to be visible working here in Appalachia), LOL. Red, yellow, you get the picture. If you can help out, drop me a line.

WV Midland Man
 

Bill Nelson

Well-Known Member
WV M Man,


I've seen the Bachamn units on sale recently, up to around $70.00 now. I'll have to check into the availability of the conversion wheels before I make any kind of commitment. I'm in the midst of a massive rebuild on my home railroad; which has blown my to do list through the roof; but last year the wife found a deal on a cabin on Kentucky lake that was too good to pass up, so I'm spending a lot of weekends at the cabin, and it may be possible I could work on one once the weather warms up, and we get the cabin opened up. It's sad that the green does not appeal to you, as I built that critter for our local club's HOn3 trackage. we lost our lease, and have moved into a smaller, but nicer space. the HOn3 branch was one of the things sacrificed in the move, so the little GE 70 ton is orphaned right now. I need to disassemble and clean the truck gears. the conversion has no cover plate, and it has collected some ground foam from some of the places where some of my cohorts did not glue the ground foam down well enough. Perhaps I could shop it, to get it running back to my specifications (and perhaps fabricate some cover plates , if I can figure out how to secure them) and paint it. I have started a private message for negotiation purposes, Sorry your health slowed you down, and hope you have a full recovery,
 

Bill Nelson

Well-Known Member
All this time, and the C-16 is still on the work bench. I'll need to get it together, and clear it off the workbench. my rebuild is reaching narrow gauge territory, and I have an incoming unit that will likely need some upgrades and paint. have a deal in the works for this locomotive an PFM import from the 70's a Denver South Park and Pacific 2-6-6T Mason Bogie. one individual I have corresponded with says his will go around a 12 inch radius (the frame is articulated). I have always liked the looks of these. not sure what kinfd of service it will end up with, but if it can do a 12 inch radius, I might have to make a sub min layout for it and the PSC 0-6-0T.


rl27001.jpg
 
Top