HOn3 locomotive shops

Bill Nelson

Well-Known Member
Dec 14, 2008
2,680
467
78
Clarksville Tn
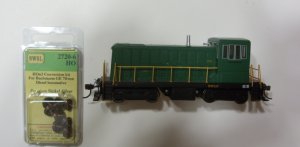
SMl Bach GE 70 tonner  for  HON3.jpg My name is Bill Nelson, and I mainly live over in the logging , mining, and industrial railroads section. My DG, CC, & W RR in Ho gauge standard, and up on top of Iron Mountain , there is a Narrow gauge feeder line that delivers Iron ore and logs to a reload @ the standard gauge .

We also have an HOn3 section @ the train Club in Clarksville Tn.


I have two Hon3 projects getting ready for the engine shops, and I thought I'd open up a locomotive shops thread over here in the narrow gauge section. Anyone doing HOn3 engine work, feel free to post here.

I have a FED 4-4-0 I am getting ready to improve the electrical pick up on, and paint. Later it will get the Locodoc remotor kit, which with the improved electrical pick up, will make it a very fine running, if somewhat plain locomotive.

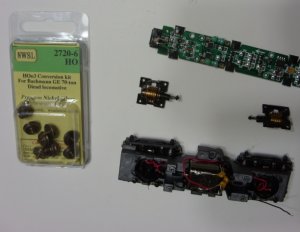
I also have a Bachman HO GE 70 ton diesel which I am about to narrow with NWSL wheel set, following the article by the Hauf brothers in the August 2008 RMC . @ our the Club I have been keeping a MDC 2-8-0 on the narrow gauge at the club , as none of us want to leave any of our shays there. The top end of the grade is too steep for the consolidation, so I'm building the diesel, so we have a resident locomotive that can make the grade


I will post photos as I make progress. I love the narrow gauge, but I don't model Colorado, and don't want anything as big as the D & R G W mikados,


Bill Nelson
 
Last edited:

Bill Nelson

Well-Known Member
Dec 14, 2008
2,680
467
78
Clarksville Tn
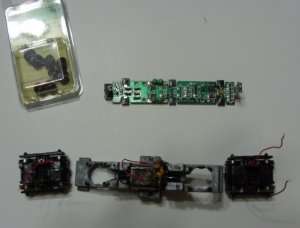
SML GE 70 Ton diss #1.jpg SML GE 70 Tonner diss #2.jpg With the article as a guide, this is going pretty quick, and isn't as scary as it would be other wise.


I got the trucks off and chopped up. tomorrow , or the next time I get back to the engine shops I need to make the modifications to the wiper plates, trim down the spacer bars on the truck side frames, and make styrene spacers to fit between the trucks frames and the wiper plates.


so far it has been easier than I thought, a fun project.

Bill Nelson
 
Last edited:

Bill Nelson

Well-Known Member
Dec 14, 2008
2,680
467
78
Clarksville Tn
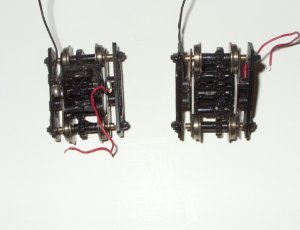
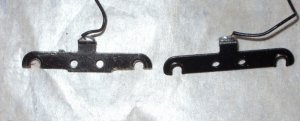
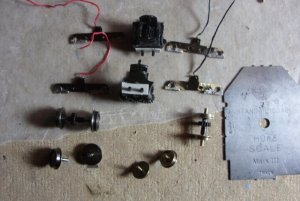
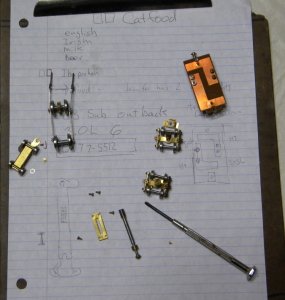
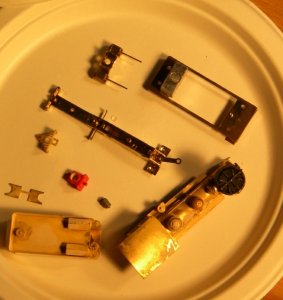
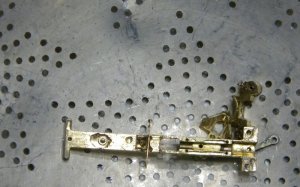
SML nrw gua trks.jpg SML pickups.jpg SML trk pieces.jpg work on the trucks

The way the truck is set up on the unmodified locomotive, is the axles are cradled in the truck frame with a brass contact strip with u shaped openings on the outside of the frame, and the axles retained by a clip on cover.

The modifications involve cutting off the end of the truck part of the contact strip is cut down and a brass bar is soldered on so that the contact strip has axle holes instead of U slots. Plastic shims are added onto the pins that hold the contact strip and the side frames on the truck, pushing the contact strips outward, making them the outside frame for the wheel sets made out of the factory gears and the Nwsl wheel set.

The top picture shows the assembled Hon3 trucks. the one on the left is right side up and the one on the right is upside down, sorry that black plastic sucks up the light so the detail on these photos is not as good as I would like.

The second photo shows two of the contact strips. The one on the right is unmodified and the one on the left has been notched for the brass bar than encloses the axle hole.

The bottom photo shows most of the truck components ready for assembly, one standard gauge axle , one narrow gauge axle and a set each of the factory wheel, and the NWSL replacements.

The locomotive will be ready to reassemble after I do a thorough cleaning of the truck mechanisms, to be sure some plastic or metal debris din't land it the grease around the gears. perhaps I can get it ready to go to the club tomorrow night.

Bill Nelson
 
Last edited:

Bill Nelson

Well-Known Member
Dec 14, 2008
2,680
467
78
Clarksville Tn
test runs fine

I got the chassis up to the top pf Iron Mountain for a test. It seems to run fine, even though I washed all of the grease off the gears. I need to re lube it, get it back together, and get couplers on it.

Bill Nelson
 

Bill Nelson

Well-Known Member
Dec 14, 2008
2,680
467
78
Clarksville Tn
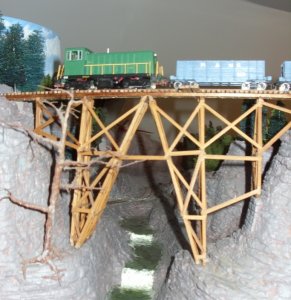
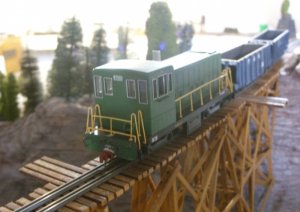
SML GE  70 tn.jpg SML on the nrw ga..jpg It is together! putting couplers on it was as hard as narrow gauging it bit KD 714's are a challenge even with the jig.

here are some pictures of it now. I'm calling it finnished, although it may go to the paint shops at some time.

here are some pictures of it up on the narrowgauge
. the lower photo was taken without a flash, but is somewhat washed out anyway. the rail head @ this location is about six feet two inches above the floor, and way to close to the tracklights for photography at that angle, but that is the angle that shows that this thing actually sits on the narrow gauge.

work will proceed on the FED 4-4-0 next
Bill Nelson
 
Last edited:

pgandw

Active Member
Jul 9, 2005
1,002
0
36
Bill

Due to the limited space, the HOn3 portion has come to dominate my planned layout. The Port Orford & Elk River is a Southern Oregon logging line serving a doghole harbor where the lumber is shipped south to San Francisco and San Diego. The sawmill is located on the Elk River which is over some hills from Port Orford. The mouth of the Elk is too shallow and rough and exposed to be even a doghole harbor. Further upstream the Elk River are magnificent stands of Port Orford cedar, some redwood, and some Douglas Fir. The valued Port Orford cedar justifies the doghole schooners coming this far north. The California competition has only redwood to offer.

About 10 years ago, the town elders in Lebanon were dying to get rail service for their town. They were playing off the standard gauge Picture Gorge & Western, which was looking for a route to Roseburg from Charleston (Coos Bay), and the PO&ER, which was looking for a rail connection to import coal, ice, meat, vegetables, fruit, machinery, etc., instead of depending on the schooners bringing up the supplies from San Francisco. The elders were at 1st surprised, then happily agreed to have both railroads serve Lebanon. In return for free prime land grants in downtown and along the river, both railroads had to agree to use only Lebanon labor to transload the freight between the railroads. With the Alaska gold strikes, a lot of the Lebanon boys that knew anything about railroading have headed north to Skagway to help build the WP&Y.

History aside, the areas on the PO&ER I wanted to feature are the sawmill, a log landing area, the doghole port and dock, and the interchange at Lebanon. To get over the cliffs from the dock at Port Orford required a set of switchbacks.

Motive power at Port Orford is to be 2 Keystone Shays to pull short trains over the switchbacks. I have the NWSL motorizing kits for them - just have to start construction. I am deciding whether to make or have made new frame pieces of brass - the Keystone pieces are a little soft for my liking.

Passenger service after the switchbacks will eventually be a 4-4-0 - either FED or MMI (if it's ever made!) or scratchbuilt. In the meantime, an FED 2-6-0 is awaiting installation of a LocoDoc remotor kit (on hand) to enter service as the rod freight/mixed service engine for through traffic to Lebanon.

Finally, the line's original (Kidder) Porter 0-4-0T awaits modification into a logging 2-4-2T or 0-4-4T for duties at the sawmill and in the woods.

There is also a Roundhouse C-19 (sort of) inside frame 2-8-0 kit that I haven't decided what to do with. Most likely parts will be used in conjunction with conversion of the Kidder Porter.

yours in having HOn3 fun
 

Bill Nelson

Well-Known Member
Dec 14, 2008
2,680
467
78
Clarksville Tn
Fred,


My Narrow gauge is limited to the two top shelves of my 5 level layout. I messed around with HOn3 back in the 1970's, but the equipment I had ran so poorly I didn't do much with it.

I have built a Keystone/NWSL shay, and while it was a difficult project , I am very satisfied with the results. The only place I deviated from the instructions is I replaced the ball on the truck frame, (for the ball and socket which I could not satisfactorily attach to the truck frame.

I took KD derilin screws and turned the heads ti the shape of ball and screwed them into the truck frame which worked much better for me than my attempts to heat weld the balls onto the frames.

I haven't had a problem with the truck sideframes, but I am very careful of them when handling the locomotive. A real bonus is the Keystone will doublehead nicely with a PFM 25 ton shay


I have built two MDC consolidations. the first was an early kit with brass tires on the drivers. It was a bear to set up, but I finally got it working well. the other was a later kit with Nickel silver tires, and It was much easier to tune into a good running locomotive.


I don't think MMI will make the HOn3 4-4-0, I gave up and got the FED, and will call Wayne (locodoc) @ the Salida roundhouse for the remotor kit, which will help a lot, but the biggest issue with the FED's is electrical pickup. I have some other old brass small Hon3 locomotives, but they still have issues after many years of work.

Bill Nelson
 

S class

Member
Jun 9, 2009
88
0
16
That loco's looking good bill and Fred do you have any pics up of your layout anywhere?
 

Bill Nelson

Well-Known Member
Dec 14, 2008
2,680
467
78
Clarksville Tn
http://www.zealot.com/forum/showthread.php?t=164383


this might work, otherwise It is the DG CC & W RR thread in the logging and mining section

also some of my work is shown in the your uniniqe logging and mining equipment thread, and in Bill and Tom's excellent adventure.


Tom is alias DR G, who's old C&S operation is heavily documented, and the adventure is the thread he started to follow our exploits at our model railroad club in Clarksville Tn .


so check out the logging , mining , and industrial section!

My railroad is mostly standard gauge, but would I start over the mix would be more heavily narrow gauge. Dr Tom is now all narrow gauge at home where he is playing with 1:22.5 outside and on30 inside.

I'm fooling a little with On3, having traded some of my Dad's G scale stuff for a On3 CN 60 shay. I haven't done a micro layout like I was planning since I determined it really wants a 20-21 inch radius.


Bill Nelson
 

pgandw

Active Member
Jul 9, 2005
1,002
0
36
That loco's looking good bill and Fred do you have any pics up of your layout anywhere?

Benchwork for the 1st phase (portable and test ovals) has been started but not completed as of today. Weather has not been conducive to sawing and gluing benchwork - has to be done outside on days off after honey do work is reasonably complete - here on the Palmer Divide in Colorado for the last few weeks. We don't get rain - only snow - from November through April at our house.
 

Bill Nelson

Well-Known Member
Dec 14, 2008
2,680
467
78
Clarksville Tn
Sawing outside

Fred, I can relate to the travails of having to do your carpentry outside.

My wife and I live in a 130 year old farmhouse on 21 acres. for years I just had a small railroad in the guest bedroom. Years ago we added two bedrooms for the kids, and in doing so we raised the roof of a previous addition to make an attic room for the railroad 15x21 with knee walls, so most of the roof is sloped at an angles.

we also added a garage, which was all construction tools and work shop for years. After the kids grew up enough where My wife didn't have to have a kid bus, she started driving red sports cars, and wants them in the garage. The big table saw has been banished to out in the driveway, where it sits out forlornly under a heavy tarp. My little 4 inch saw for cutting scale lumber is in the garage, but I can't use it there unless the Miata is out of the garage. Most of the time I use the saw outside, because if I move the car outside, and a bird is disrespectful, I will have to go and wash the car.

I have been doing a complete rebuild of our main floor bathroom, which was originally a back porch , and work associated with that has allowed me to temporarily set up a carpentry shop in my guest bedroom; but I am almost done, and soon will have to take the sawhorses out of there, sweep and vacuum the sawdust off of the hardwood floor and furniture, and I will be back outside if I have to do any carpentry.

I have very little carpentry left to do though. I added a 5th level on a shelf hanging from the ceiling, about six feet two inches above the floor, to have a place for the Narrow gauge to go to. I'm toying with adding a narrow gauge return loop to the end of that shelf , but if I do that; it will probably be made of foam and removable, as it is just too hard to work a foot and a half or closer to the ceiling. The lowest level is my staging yard for the Southern Railway interchange, and is below my knee level. There is only one lap of helix between level one and level two, and the rest of the height gain comes from twisting around the mountainous scenery.

In the photos of the little GE unit, it has the glare on it because it is just too close to the track lighting to make photography easy.

Bill Nelson
 

Bill Nelson

Well-Known Member
Dec 14, 2008
2,680
467
78
Clarksville Tn
The little ge is at the club. I tested it on the steep part of the grade, and it could handle five hopper cars and a caboose, I ws going to add a flat car or a coach, but the power went out. I took my camera, but it was out of batteries. maybe I will add photos next week.


Bill Nelson
 

Bill Nelson

Well-Known Member
Dec 14, 2008
2,680
467
78
Clarksville Tn
correction

I thought my camera had low batteries, sa it beeps twice when I push the button, which is similar to what it does when it doesn't have enough power to light it's screen, but batteries don't resolve the issue. my camera is dead, and I will be shopping for one.


Bill Nelson
 

Bill Nelson

Well-Known Member
Dec 14, 2008
2,680
467
78
Clarksville Tn
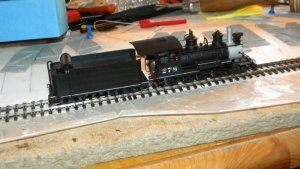
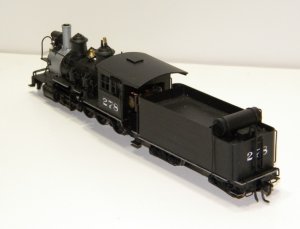
SML 278.jpg not much of a project!

I have acquired a Westside C-16 #268. I was surprised, as it ran ok right out of the box, and after it had had the brushes on it's open frame motor splashed with contact cleaner, it ran quite well.

This locomotive has a quite nice paint job. Luckily the tender wasn't lettered as if it had it would have had to be redone anyway. It is numbered, and 278 might look slightly out of place on a railroad which has only single digit numbers so far. For the State Line I usually paint the cabs green with a red roof.

With HON3 locomotives I almost always add extra electrical pick up right away, but I may wait a while with this one, as it seems to run OK as is.

Locodoc makes a remotor kit for these that turns them into fantastic runners. this one runs well enough right now so that I don't have to make that step right now. The Locodoc kit for my FED will take prority.

Time to light the fire to burn some chickens, and maybe I can get couplers on this critter while the fire gets ready to BBQ.

Train club tonight, and I have a camera that works now, altough I have a big learning curve for it.


Bill Nelson


Here it is on the test track getting a light work out to get the oil spread around,.
 
Last edited:

Bill Nelson

Well-Known Member
Dec 14, 2008
2,680
467
78
Clarksville Tn
I have been playing with my new camera. it is a very good tool, but I'm not proficient with it yet, and it takes more work to get good pictures of modelsm which my last camera did pretty much on it's own.


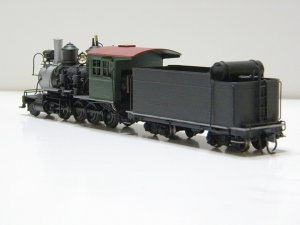
I got a picture of the GE 70 tonner with a train @ the club, and here is a better picture of my C-16. it is going into the paint shops to get a green cab with a red roof, and to get the 278 on the tender obscured, as so far, all of the State Line Railroad's locomotives have single digit numbers. I have already gotten a KD 714 on the tender. the pilot is in scale, without provision for a working coupler. I'll have to study it for a dummy, I don't think there is room for a KD 714 draft gear over the pilot wheel, and if I'm right about that, I can't cut the brass cowcatcher of and make a freight pilot with a working coupler anyway.


I will be less prolific with my modeling, as I am training for a Job. This gig won't have overtime, which I used to always have too much of, so once I get used to it, I may have more train time than I have had over the years, but much less than I have had this last year.


Bill Nelson
 

Bill Nelson

Well-Known Member
Dec 14, 2008
2,680
467
78
Clarksville Tn
SML 278 #2.jpg SML  #278 no more..jpg SML GE W trn.jpg here is a photo of the GE unit on the switchback at the club, and a photo of my C-16 before and after the cab painting (acrylic craft paints via brush), and the obscuring of the 278 on the tender and smokebox number plate.


I often change the details on a brass locomotive to obscure it's origin , but 278 is one of my favorate locomotives ever, as well as being the single most identifiable C-16, since it had a sand dome that was altered to give it more capacity, making the sand dome taller than usual. The green cab with a red roof will help give it a "family resemblance" with other State Line Railroads .

Besides lettering and numbering it for the State Line Railroad, I will probably give the smokebox the #2 pencil treatment to make the smoke box less silver and more graphite .

It runs very well as is, but I plan to pull it down to add electrical pick up to the insulated side of the locomotive, and to add a hardwired connection from the locomotive to the tender, and I will consider adding pick up to the insulated side of the tender trucks as well. When the budget allows it will get a remotor kit from Locodoc, but the FED 4-4-0 will probably need that more I will have to complete the electrical pick up modifications to both locomotives, and the one that runs best will get it's Locodoc motor last.


Bill Nelson

Tomorrow perhaps , after cutting wood, and cleaning house, I can do some painting and electrical pick up work to the FED, and start to show pictures of it.


Bill Nelson - still cold in Clarksville Tn. but it is supposed to be up in the 40's by Monday
 
Last edited:

Bill Nelson

Well-Known Member
Dec 14, 2008
2,680
467
78
Clarksville Tn
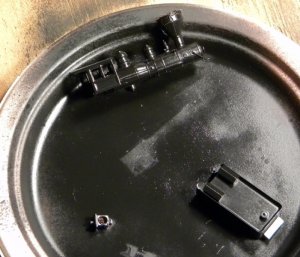
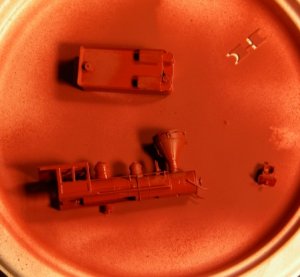
SML prts in the strainer.jpg SML prts nt pnted.jpg SML undr th hlgns.jpg SML wht mtl prts.jpg paint shops!

The C-16 looks good, and a little less "Colorado". with couplers, it can go into service for now. later it will need improved electrical pick up ( a good idea on all brass, and on all but the best engineered locomotives).

Before the C-16 showed up the next project on my list was my little FED 4-4-0 .

These were imported in the late 70's by Far East Distributors, which was a division of NWSL made to sell inexpensive products, without diluting the excellent NWSL. FED imported HON3 2-6-0s and 4-4-0s

They cost about $38.00 new, about a third of the going rate for brass at that time. They are tender drive, and have no pick up on the locomotive, and this made them horrible runners as the tender rock from the torque of the tender drive would break the electrical conduct making the operation very jerky. Due to this they got horrible reviews, and they just sat on hobby shop shelves
Years later it was figured out that you could add electrical pick up, and a better motor and make an exceptional running if somewhat plain locomotive out of them, and with some extra brass castings they could be made into stunning models. Boone Morrison wrote some articles in the Narrow gauge and shortline Gazette, and they disappeared off of the shelves.


When they came out I was planning on buying one a week until I had lots until I read a review. I wish I hadn't seen the review, cause at that time I was routinely adding pick up to brass locomotives. Now 35 years I have one each of the 2-6-0, and 4-4-0. the 2-6-0 is already painted , reworked with better electrical pick up. and equipped with a Loco-doc remotoring kit. I'm painting the 4-4-0 right now, will add the electrical pick up as it gets put together, and the locodoc remotoring kit will follow as funds for it become available.

I have several steps to painting brass. the first step, which I left out this time, and if it bites me in the *** I will deserve it, is to take the parts of the disassembled (excluding the motor gears and axles & wheels) locomotive. and soak them in paint striper to remove varnish that was sprayed on the locomotive to keep the brass from tarnishing (some brass models were sprayed with brass colored paint, to hide differences in color between various brass parts). after they have been soaked I scrub them with a decommissioned tooth brish to remove any remaining varnish or paint.

Then I boil those same part (still excluding the motor ect) in soapy water to remove any grease, or remains of flux. after bathing in boiling saopy water for ten to fifteen minutes, and then put them in a colander, and rinse them in hot water. (after they have been boiled, rubber glove go on so the brass does not get contaminated by oil from my skin)

from there they go into a pan full of vinegar, placed on the stove and heated for another 15 minutes, then it is back into the colander, another long rinse, and then I put the pieces on paper plates, and put them under my halogen work lights, and leave them under the lights for a half hour or more which will dry all the remaining water, and get the brass warm so the paint will dry fast and bake on .

I spray them with red or grey auto body primer first, let them sit under the lights until the paint set's up. and then turn the pieces over and hit the other side. after both sides are primed, and the primer is set up hard, I spay it with a high quality spray paint can. I used to believe in flat black, but now I do satin black (years of excellent management has made my railroads much more profitable, and thus the amount of maintenance that can be afforded has been increased greatly.

I pulled the locomotive frame and cowcatcher out of the vinegar quick, as I don't have much experience with the vinegar on pot metal so I pulled the pot metal locomotive frame, cylinder saddle, and cowcatcher quicklt from the hot vineger.

Bill nelson

more later.
 
Last edited:

Bill Nelson

Well-Known Member
Dec 14, 2008
2,680
467
78
Clarksville Tn
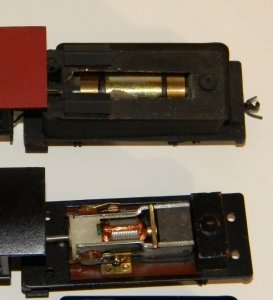
SML 2 FEDs.jpg SML blk spry pnt.jpg SML mtr comp .jpg SML rd prmr.jpg well the 4-4-0 is black now. I have photos of it with the 2-6-0. the 2-6-0 had the cowcatcher removed (it will fet a freight pilot when I can figure out how to do it), and the stack and bell replaced. The 4-4-O got a new headlamp and stack. both locomotives got a numberplate for the smoke box with their # on it, which is a nice touch.

I took a picture of the 4-4-0s tender with the shell off next to the 2-6-0, so you can see the difference between the Locodoc remotor kit's motor and the factory motor. The locodoc motor is just slightly too wide to fit in the tender shell, thus the slot, which will eventually get covered up by a wood load. The locodoc motor, besides the twin flywheels, as a lower start speed and top speed, and is very much worth the pricey price.

Next thing to do is to give the 4-4-0 a red roofed cab, and to paint both cabs green; and do the #2 pencil trick to the smoke box for the authentic graphite look. Then it will be time to start adding electrical pick up to the 4-4-0. lettering the C-16 , and these two for the state line RR will be a bear, but it must be done sometime.

Bill Nelson
 
Last edited:

Doctor G

Well-Known Member
Sep 1, 2008
1,415
298
78
Clarksville, Tennessee
Hi Bill,

I am enjoying this thread. The engines look great! Your treatment of the brass before painting shows a lot of knowledge of basic chemistry and metallurgy. Very impressive!

How many HOn3 lokies you got now?? Will any go to the club?? Perhaps they could briefly make appearances?? Any more work on a HOn3 mini/micro??

I will try to get to the club tomm. barring any unforseen problems with this very cold weather.

Dr Tom:thumb: