Building Yoav Hozmis Kfir C-2

McTschegsn

Active Member
Feb 24, 2015
234
493
40
50
Dietzenbach, Germany
www.jet-connection.de
Finally some progress
smile.gif

On this hot day I started building the fin. The formers are glued to cardboard (nope the ordered stock has not arrived yet
wink.gif
) and the fin ist glued together at the trailing edge.
The test fit shows a slight gap at the bottom of the trailing edge. I hope I can cover that up with the brake chute housing, otherwise I have to trim the fin a bit. No parts are glued to the fuse yet.


Kfir79.jpg Kfir80.jpg Kfir81.jpg
 

zathros

*****SENIOR ADMINISTRATOR*****
Staff member
Administrator
Moderator
Apr 5, 2013
13,496
9,548
228
I remember when I ran an F.B.O. at Danbury Airport (DXR) for a couple of years. These craft are not as smooth as you may think, 98 percent of them are rather bumpy. The air
boundary layer allows for access panels to be not so flush. The skins overlap each other, always working from the front overlapping the one behind it, and the rivets are where they connect, and where the bulkhead is. To do a model in this manner would mean making one like yours, then printing on very thing paper, and cutting the individual sections, and building up the secondary outer layer, which would give the final detail. Here access panels could be made the size they should be at that scale. It is much the same with battleships, destroyers, frigate, and General Aviation aircraft as well depending on the time of year they were made, they can look pretty rippled up, and at other times, tight as a balloon.

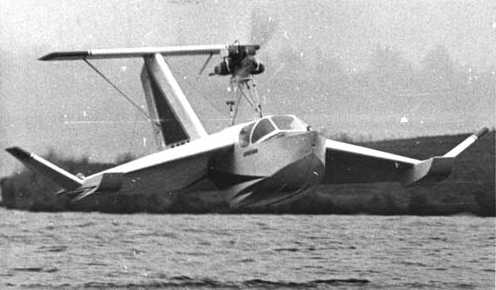
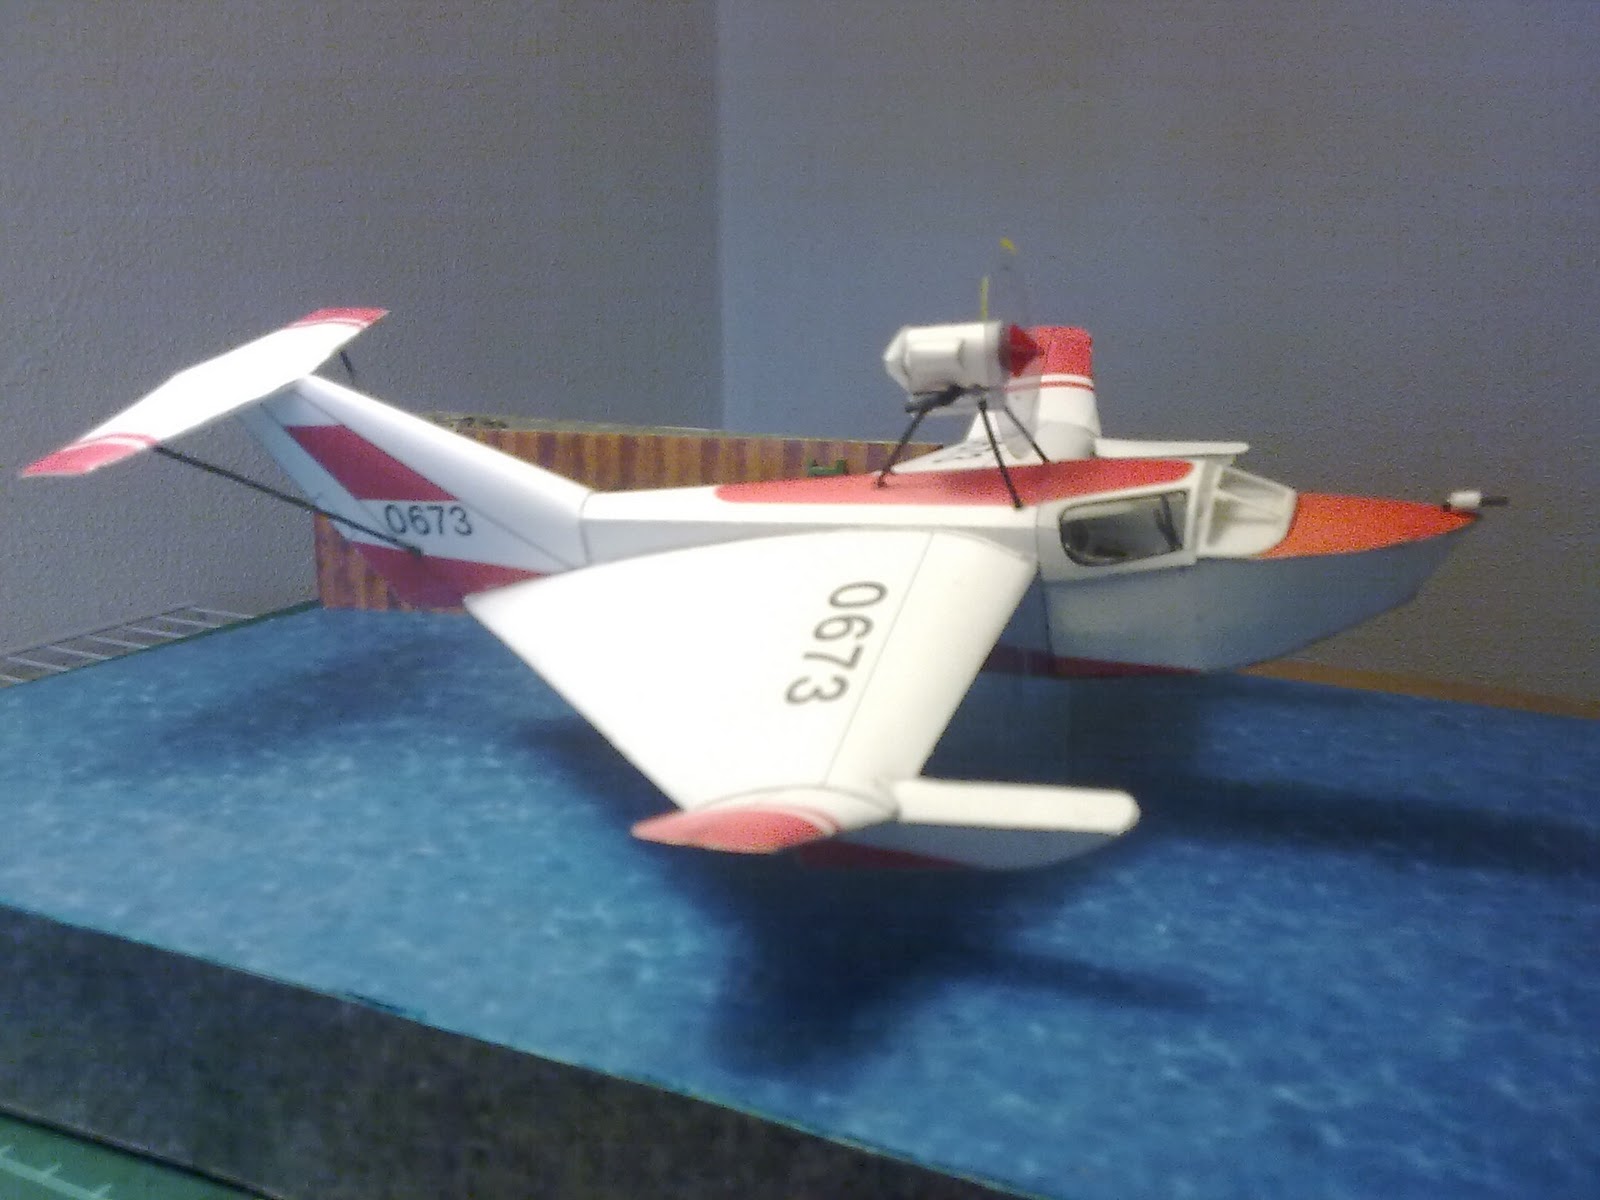
This is a level of realism I have yet to see on any model of any genre. On the A90 Orlyonok model I designed, I realized it was the only way that model could be released. Otherwise, the potential for so much detail to be lost, I just cannot release it like that. It is something I have to sort out, then build, to show. How many people would want to build a model twice to get one model? :) boundary layer allows for access panels to be not so flush. The skins overlap each other, always working from the front overlapping the one behind it, and the rivets are where they connect, and where the bulkhead is. To do a model in this manner would mean making one like yours, then printing on very thing paper, and cutting the individual sections, and building up the secondary outer layer, which would give the final detail. Here access panels could be made the size they should be at that scale. It is much the same with battleships, destroyers, frigate, and General Aviation aircraft as well depending on the time of year they were made, they can look pretty rippled up, and at other times, tight as a balloon.

There is an error a the base of the rudder. I have corrected it, just not in this file. :)

A90-1.jpg A90-2.jpg
 
  • Like
Reactions: McTschegsn

McTschegsn

Active Member
Feb 24, 2015
234
493
40
50
Dietzenbach, Germany
www.jet-connection.de
Hi Zathros,
well the shipbuilders mostly build double Hulls to get the contour right :) Why not the Airplane guys :D I thought of that but trashed the idea due to some other models I want to build :) So I decided to build this plane "out of the box" with few to no changes and I am happy with it. I spoke to Yoav recently and the brake chute housing will cover up the gap so everything is fine :)
 

zathros

*****SENIOR ADMINISTRATOR*****
Staff member
Administrator
Moderator
Apr 5, 2013
13,496
9,548
228
Your model needs nothing. It is an inspiration! It's usually general aviation at are kind of beat up, not jets. You should see the F14 at the New England Air museum. It was flown there, brought inside, "pickled', certain instruments taken out, but since they blacked out the cockpit from the inside, you can't see a thing. This Jet s so perfect, it looks fake, I've even heard people say that same thing. Same with the very perfect Corsair they have. I should ha specified the class of aircraft I was addressing, sorry if I came off wrong. I am so impressed by your work.

You comment about ship builders has me thinking, because the A90 is classified as a ship, by it's displacement!! Crazy, Eh?:)


  • Like
Reactions: McTschegsn

McTschegsn

Active Member
Feb 24, 2015
234
493
40
50
Dietzenbach, Germany
www.jet-connection.de
Well... Russian stuff seems to be... different :D
A small update... Just glued the fin (and the auxiliary air intake) to the fuselage. Glue is drying, work will continue when dry
cool.gif
Next step is the Rudder activator and the brake chute housing to cover up the gap :) Next step will be the rudder actuator rod and the brake chute housing to cover up the gap.
No magic here, the parts fit just perfectly...
Kfir82.jpg Kfir83.jpg Kfir84.jpg
 

zathros

*****SENIOR ADMINISTRATOR*****
Staff member
Administrator
Moderator
Apr 5, 2013
13,496
9,548
228
Just a question, because I see no traces of it. What kind of glue are you using? Oh, and yeah, the Russians do think different. That A90 cruises at 35 feet over the water, carrying 2250 men, and a couple of BTR's. It can carry at least twice as much of a payload of a jet the same sized, as it flies in ground effect. It also gets almost a 75% increase in fuel efficiency because if stays in ground effect, ad the wing tip vortices go right back into the slipstream, as well as the rest of the turbulence. The U.S. (we) had no idea this thing existed, and just before the Soviet Union collapsed, they were about to build a fleet or 80 or so to start off. The carry ASW equipment but no sub could attack it. It goes onto beaches, and by vectoring the thrust of the front engines under the main wing, the whole aircraft picks up around 11: inches. This would have posed a great danger. When in flight, the forward jet engines shut off, and the contra rotating props pull it along. I have seen videos of this thing landing on a beach, the whole cockpit area opens, like a door the it fires the front jet engines, and turns 270 degrees right in the same spot, and heads out to sea. With all three engines running, it can reach almost 10,000 feet in altitude, those it now becomes a fuel hog, but that would allow it to get into and out of some tight spots. I have another model I have designed and built of these. This one flew for 10 years up and down the Volga as part of the Fisheries and pollution. It could land on water, ice, and snow.

That one is called ESKA, my personal favorite. I have the actual blueprints sent to me by a friend in Russian! They're not hard to get. This thing does around 110 mph on 63 h.p, and can"hop" up to 250 feet using it stored, kinetic injury. The paper model you see below in in our downloads section! These things come in different ratings ,based on the heights they can achieve. I find the video blow very relaxing. The IVolga carries 6 people, and routinely flies up on the tundra. It is a workhorse of a vehicle. I intend to model it but reliable drawings and blueprints have been hard to come by. I included a couple of Renders of the ESKA model I designed, the two seat version. Iran copied this designed, putting 180 horse power engines, and they probably have the ability to fire small rockets. They call it the Bavar". Theirs can fly like an airplane quite easily.

All meshes you see in the computer Renders have been created by me. They are not copies of someone else's work. Sorry for clogging up your excellent build thread. :)
ESKA-1-a.jpg
Foto1317.jpg


eska-2-jpg.119894
r2-jpg.132631
r3-jpg.132632
 
  • Like
Reactions: McTschegsn

McTschegsn

Active Member
Feb 24, 2015
234
493
40
50
Dietzenbach, Germany
www.jet-connection.de
Hi Zathros, thank you for the glance over the horizon :) Feel free to clog the thread with interesting information about the (maybe) next build :D

I am using "Kittifix Kartonkleber" which is a product used here in germany. It can be compared to straight PVA glue.
You do not see any traces because I tend to thin the glue with water (in a bottle cap you might have seen on the bottom right corner of my pics ;)) to the point it has the same consistency as condensed milk (maybe a bit thinner) I apply the glue with a toothpick, therefore a very little amount of glue is used. Plus I try to wipe the excess glue (if there is any) right after glueing with a paper towel or my fingers (or the mentioned toothpick ;) )
Will try to keep the glueing process in some pics if it may help...
 

zathros

*****SENIOR ADMINISTRATOR*****
Staff member
Administrator
Moderator
Apr 5, 2013
13,496
9,548
228
I think it would be of great help. Maybe you could post a picture of the product, there may be an equivalent product sold in the U.S. You gluing is probably the best I haven't seen! :)
 
  • Like
Reactions: McTschegsn

McTschegsn

Active Member
Feb 24, 2015
234
493
40
50
Dietzenbach, Germany
www.jet-connection.de
Hi Zathros,
maybe a link to the product would help ;) (Attention... german papercrafting vendor, do not know if he is shipping to the states):
http://www.kartonmodellbau.de/epages/63481486.sf/de_DE/?ObjectPath=/Shops/63481486/Products/109013
This is PVA (white) glue basically. I think the trick is to thin the glue and work smart with it. Next glueing session I will take some pics to illustrate (hopefully :) )

Kittifix produces more than one type of glue... I was trapped by this ordering the wrong product ;) I looked up on amazon.com (not .de) and there is one kittifix glue but the wrong type...

This one is called kittifix Kartonkleber (Karton means cardboard)
 

zathros

*****SENIOR ADMINISTRATOR*****
Staff member
Administrator
Moderator
Apr 5, 2013
13,496
9,548
228
I have to check our local Crafts store. Thanks for posting the info. Very helpful. :)
 
  • Like
Reactions: McTschegsn

McTschegsn

Active Member
Feb 24, 2015
234
493
40
50
Dietzenbach, Germany
www.jet-connection.de
Thank you buddies for the kind words. I hope you enjoy the pictures and text as much as I do enjoy the building.
Happy day today... Why? The gap at the fin has been closed with the brake chute housing
smile.gif
I also glued the cover unter the nose to the fuselage. Next parts will be the Servo rod at the fin and some small fuselage parts. Maybe I will finish the nose assembly without the long extending tube (to not harm the model in any way).
Sadly I am still waiting for the cardboard to arrive so I can continue with the wing assembly.
Kfir85.jpg Kfir86.jpg Kfir87.jpg

Zathros: I also attached a picture of my "PVA glue mixing"
smile.gif
I tend to thin the white glue with a small drip of water. Approximalety two parts glue and one part water so the consistency is like condensed milk. This glue mixery I apply with a toothpick. I hope the small amount of water can be recognized on the picture.
Viper56.jpg
 

zathros

*****SENIOR ADMINISTRATOR*****
Staff member
Administrator
Moderator
Apr 5, 2013
13,496
9,548
228
How long before this mixture grabs the parts? Do you need to hold them together externally, until it dries, or gets tacky enough? Whatever you're doing, it works! :)
 
  • Like
Reactions: McTschegsn

McTschegsn

Active Member
Feb 24, 2015
234
493
40
50
Dietzenbach, Germany
www.jet-connection.de
Well if the parts are rolled and folded almost exactly the glue almost tacks instantly. Normally I hold the parts for a mere 5 to 10 seconds. To be true almostr all white glues seem to have this "feature". The thinner you make them the better they tend to tack but the border between "tacky" and "too watery to glue" is narrow. I tried several things until I found the product I am content with.
If I do petals such as nose cones I tend to make the glue a bit thicker, then the holding time slightly increases.
 

DanBKing

Dan the Man
Feb 29, 2012
1,817
1,587
113
Netherlands
I'm constantly looking at that photo and trying to find a seam, or anything to indicate that it is made from paper......
Not one glue mark, not one smudge or fingerprint, nothing. :)

I think you are having us on, McT...... That is a photo of the real thing, photoshopped onto a picture of your work bench ...... :):);)thumbsup
 
  • Like
Reactions: McTschegsn

Tonino

Well-Known Member
Apr 15, 2004
791
1,775
83
61
Republic of San Marino
www.facebook.com
I didn't receive notification for several days so I thought you was holding on waiting for the cardstock... I was wrong: the build has continued and I lost some passages. :realmad:
Perhaps I didn't open the thread after last notify received and the system didn't notify me for further postings. Better to know for the future: take a look everyday if you don't want to miss something!

Thank for the glue tricks! I recently turned from UHU extra to PVC glue and I'm enjoing this choice a lot. White glue is much less visible once dried and, for little joins, you can add more glue being sure that, once dried, it will disappear almost completely as it turns transparent. I keep UHU only for laminating because water based glue tends to warp big surfaces (see first steps of my LM build).
I used to thin white glue with water only to reinforce little pieces with very small contact areas (see this one e.g.) just to be sure that the assembly doesn't fall under his own weight.
I didn't imagine that a little amount of water, and the search for the right thickness level, could even shorten holding time. I'll give some tries to this. Your seams, no - I should say virtual-seams, speak for yourself. :)
 
  • Like
Reactions: McTschegsn

McTschegsn

Active Member
Feb 24, 2015
234
493
40
50
Dietzenbach, Germany
www.jet-connection.de
Hey Tonino, do not worry, the internet remembers almost everything :) Just a small correction... White Glue is PVA ;) Sorry to be picky but I did the mistake hunting for the right glues.
The kittifix product I use is sold by almost all german papercrafting shops. It is almost the perfect glue fpr cardstock and paper because it dries almost crystal clear :)
Updates soon. Cardstock has arrived and the formers are already glueing :D
For glueing formers to Think cardboard I also use the UHU glue because of the less warping or the other method to bond some papersheets together is cling flim (the stuff used to wrap foods to keep fresh)...
Take two sheets of paper with one or thwo sheets of cling film between them. Cover the stack up with another (waste) paper and iron the pieces together on a hard surface. The cling film melts and sticks the paper together...
Voila... No warping :D Works also with paper to cardstock if you take the paper layer on top ;) I mostly use the wool temperature setting on the iron but that depends on what iron you use :)

Just a small ascii art:

IRON
-------------------------------------- waste paper
----------------------------------- paper sheet
............................................. cling film
----------------------------------- paper sheet or card stock
======================= Hard surface

I hope everything is clear. Try this one out and have great fun producing flat laminated sheets ;)
 
  • Like
Reactions: Tonino and DanBKing

zathros

*****SENIOR ADMINISTRATOR*****
Staff member
Administrator
Moderator
Apr 5, 2013
13,496
9,548
228
When I was flying, we would stick our hands in those little cowlings to make sure the nuts had not come loose. The ones on the tail end of Piper Warriors are called "Oh My God" bolts, because if that bolts loosens and falls out while your flying, you no longer have control over the elevator, and the first, or last thing you say is "Oh my God!". :)
 
  • Like
Reactions: McTschegsn

DanBKing

Dan the Man
Feb 29, 2012
1,817
1,587
113
Netherlands
@McTschegsn Nice idea with the cling film thumbsup

But, a question.... How well does the cling film bond?
What I mean is, if I laminated two sheets of paper/card in this fashion, and then cut out small parts from the resulting laminated sheet, does the cling film hold strong enough so that the small part wont de-laminate when cutting or folding ??

I generally use 3M spray mount glue for laminating larger areas. That works very well. But can be a little 'hit and miss' when lining the sheets up. Once its stuck, it is stuck!! ;)

I guess, using your method of laminating, may be of benefit, for lining up back to back textures. You could use a light table to line up the textures and then iron it into place without having to move the sheets to apply glue.
 
  • Like
Reactions: McTschegsn