a new mini HON3 layout started

Bill Nelson

Well-Known Member
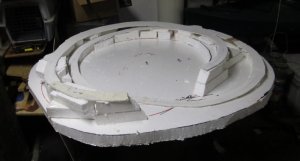
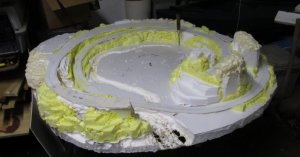
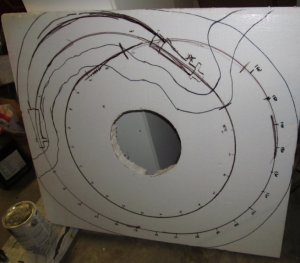
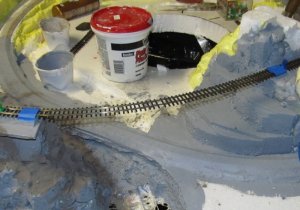
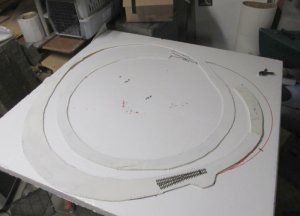
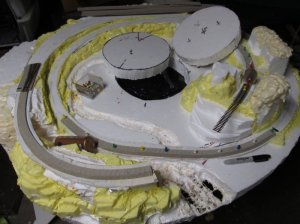
SMLA-1   PNTD SBRDBD.jpg I have started a mini hon3 layout, two loops , with an simple over and under. mostly 16 inch radius , with some 18 inch radius on the outside of the passing siding, which uses Micro engineering #5 switches.


The base is 2 inch foam. I have some 1/8 plywood salvaged from an old soffit from some kitchen cabinets. I usually don't like thin sub roadbed; but I'm going for light weight here. I will prbably make a cut out in the center that will fit a christmass tree stand , and make a Styrofoam scenery plug to fill it when it is not in use.


I had some exterior paint out today, panting a door to fit an opening in a gable that allows exterior access to part of my attic. my house has aluminum siding, but it is over 30 years old, and has faded and discolored in several ways, so painting this door, which has some of the old aluminum siding can be a test case for painting the house. since I had the paint open, I painted both sides of the thin plywood sub roadbed, which hopefully will help prevent any warping. I will try to support it with foam risers pretty much every where.

I will wire it up relatively simply, but in such a way I can hook it up to a DC power pack, or to the NCE power cab I got so I could have DCC on my workbench to test DCC locomotives. I have two DCC Hon3 locomotives. the most fun to play with will be my Blackstone C-19 with sound, the other is a Bachman GE 70 tonner that I converted to HON3. it came from the factory with a dual mode decoder in it.. I will be able to hook up a DC power pack If I want to run any of my DC locomotives


Bill Nelson
 
Last edited:

Doctor G

Well-Known Member
Looking good Bill. I am glad you got a start on this.

It has been so hot out that I have put my On30 mini in the train shed (air conditioned) to begin some more work on it after a 1 year hiatus.

THis thread will provide some inspiration and motivation.

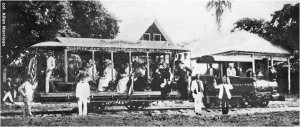
Here is the prototype sugar hauler in Haiti I continue to try and model.

Tom
 

Attachments

  • Porter in Haiti.jpg
    Porter in Haiti.jpg
    88.3 KB · Views: 44

Doctor G

Well-Known Member
I'm thinking of calling this Buggtussle Loop


I like the name.

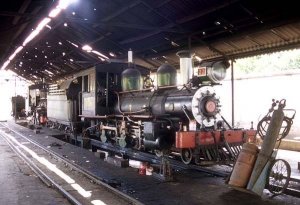
Where in the HOn3 world are you going to place this interesting RR? Tennessee, out west, or way down south??? (Cuban RR pictured below)

Looking forward to its further creation.

Tom
 

Attachments

  • nice loco and engine house.jpg
    nice loco and engine house.jpg
    56.1 KB · Views: 43

Bill Nelson

Well-Known Member
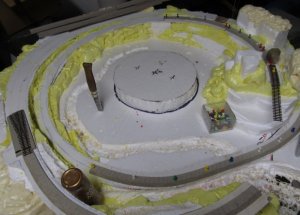
SMLA-1Bugtustle loop #3.jpg SMLA-1 Bugtustle loop #4.jpg SMLA-1Bugtustle loop #3.jpg SMLA-1 Bugtustle loop #4.jpg Where is Bugtstle Loop?

Bugtustle Loop will utilize equipment from the Marietta and North Georgia, and the State Line Railroad.

While this project is happening without much thought; as the Car Guys say " unencumbered by the thought process . " The equipment will tend to place this in my normal HO world, of North Georgia, Eastern TN. or Western North Carolina. I don't envision picking up any extra HOn3 stuff for this project, If a Sumpter Valley 2-6-6-2 should come available I would consider it, but that would be for my larger Hon3 world as well (I have not seen one for sale in the last 20 years), I guess thems as have them are hoarding them, as well they should as most of the big Hon3 rod power are D & R G W Mikados, that are ugly as homemade sin.

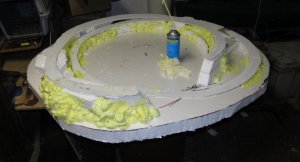
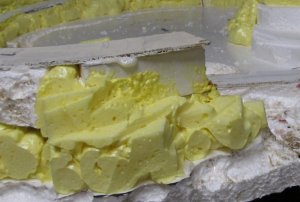
so far the construction techniques seem to be producing a strong and lightweight platform. anyone doing something similar to this should remember to use rubber gloves when building like this, Gorilla glue will not come off of the skin without sanding, and leaves patches that look surprisingly like leprosy . The foam insulation stuff is about the same way.

I need several more cans of the lightly expanding foam for use around the roadbed. and possible a can of the regular stuff for use on land masses


I have a hot knife I will experiment with shaping the foam with, and I will probably cut a couple short sections of road bed out for some more bridges, as this project will need at least two creeks.

IN the N gauge section of Zealot, there is a micro layout, built on a Japanese theme, and the builder used modeling clay on a foam base, to make some extraordinary rocks. I think this will be one of several techniques I will play with, to try to see what can be done in the lightweight division.


Soon I will work to cut the Christmas tree holder hole, so I can make a plug for it, and try to get an idea of what the center will look like.
 
Last edited:
Z

Zathros

This is really cool! It is a great way to show you to make an appealing layout, and to show it does not have to be massive. Great Instructions too! Thanks for the tip about "Gorilla Glue". I have been tempted to use it, but did not know about that side effect. :)
 

Bill Nelson

Well-Known Member
Gorilla glue is very strong. I haven't been tempted to use it much in model projects, because it foams and expands. This is great when making a structural joint, as the expanding glue gets into all the nooks and cranies.

It is tricky using it on furniture repairs, as the glue will oose out of the joint, and make a mess, so when I have used it on furnature, I mask the areas near the joint, so I can remove the excess.


I repaired a broken antique table with Gorrila glue @ our family's beach house on my last visit there. a year later, Hurricane Ivan broke the pilings on the house, moved the house across the street, and the house broke in two. My sisters followed the debris field, and found the pieces of the table I had fixed. the only pieces that were still together were the ones I had fixed with gorilla glue.


Bill Nelson
 

Bill Nelson

Well-Known Member
I have the little layout pretty much foamed in, I have not yet cut the Christmas tree holder hole, or made the plug that will fill it when it isn't under the tree. I will post some more photographs when I have my next round of carving the foam to approximate rock formations.


My biggest conundrum was what roadbed to use. I have some ho cork on hand and 1/2 a strip will support the rails of Hon3 track, letting the ends of the ties stick out into the air. another possibility would be ordering some HON3 homabed (homasote milled to roadbed size. That would allow me to replace the flex track with handlaid track at a later date were I so inclined. the downside would be I would have to wait for the homabed to get delivered, and sometimes he doesn't have particular scale/gauge combinations in stock, and then I'd have to wait for production and shipping.


I have some Ho homeabed on hand though, and I think I will alter some of that , and that would allow me to proceed now, with flex track, and have the option to replace it bit by bit with Hand lay at another date should I be inclined. the hand lay looks so good, and on a small layout can be done relatively quickly.
 

Bill Nelson

Well-Known Member
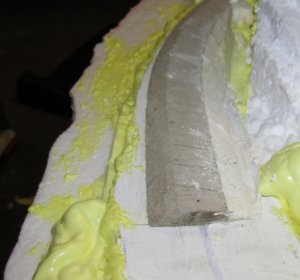
SMLa-1 Bgtsl LP #5.jpg SMLA-1 prtly crvd rks #1.jpg a little progress

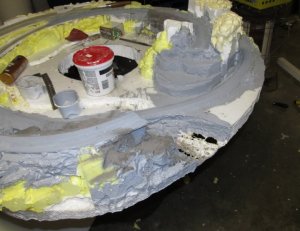
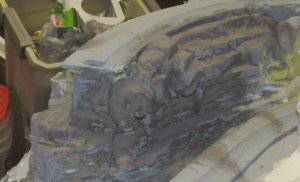
I have been busy, and have had little time to play, but I have made some progress with foam landforms, and a beginning to carve on the land masses.

Carving the foam is much like carving plaster, but must be done with a very sharp knife. The foam seems to dull the knife a lot faster than one would guess.


I'm thinking I will use some acrylic spackling to fill in some of the spaces, and possibly some acrylic modeling compound ( an art supply, intended for use with acrylic paints, to build up texture to simulate the textures you can get with oil paints, by laying it on thick ) I use acrylic modeling compound mainly in doing rapids and waterfalls, but it may be a good way to add texture onto foam.


I'm thinking of going to the paint store and getting some latex paint mixed to a shade of gray that will form the base color for the scenery. I am also going to check out some of the colors available in grout for tile floors, and get some in gray and brown to use as rock and dirt.


I want to try putting a thick coat of the house paint on the foam rocks, and then dusting them with grout, to see what that effect looks like.


I have yet to cut the hole for the Christmas tree holder It is stowed in a crawl space, and there is a lot of stuff stowed in front of the access hole in my garage.


I will start with the roadbed soon, and once I get some of that done the temptation to get some track down will be strong, but some of the basic scenery work might go a lot faster if the track is not put down yet.


Bill Nelson
 
Last edited:
gbwdude

General Manager, W.R.Ry.
Since this is going to be something used at Christmas time, you should consider making it a snow scene. Then that gives you an excuse to build or buy a snowplow!

That is all.

Tyler
 

Bill Nelson

Well-Known Member
There will be a plug cut, that will fill the Christmas tree stand hole, so the Christmas tree use will be an option, but not the sole focus.


I have thought it would be interesting to model a winter scene, I saw a series in RMC years ago on modeling winter, in my favorite mountain scenery, the Cumberland Plateau, water seeps from the sandstone cliffs, just enough to keep them damp in the summer, but in the winter, they form massive icicles, looking like frozen waterfalls.


I scratched a snowplow for my G scale goose #2 so it would be easy it shrink the pattern, and make one for my HOn3 goose #4, the problem is I want to use this to play with my HOn3 equipment, and once you have a good winter scene, it would require snow on any unheated car roof . It would make a cool concept, and would probably be a lot of fun , but it would end up needing it's own rolling stock, and I'm not sure I want to go there yet.


Bill
 

Bill Nelson

Well-Known Member
SMLA_1 rdbd  #1.jpg SMLA_1 rdbd  #2.jpg SMLA_1 rdbd  #3.jpg some roadbed going in.

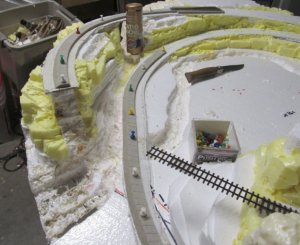
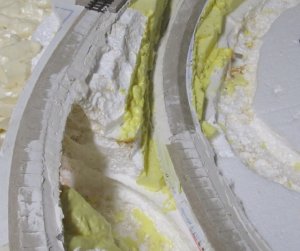
I have started installing some roadbed. I'm too impatient to order some HOn3 homabed, so I'm installing 1 strip of ho homabed, which is just wide enough to put hon3 track on. I will build up the missing slope on one side with acrylic spackling. that will be tedious, but I'm making progress now.

as I position the roadbed I'm using my NMRA standards gauge to insure proper clearance.


One of the guys from the club , looking at these pictures was annoyed with me, (as I had counseled him against using foam for roadbed). I still believe that foam doesn't support the track well enough, and if you need to tweak the alignment, you are done for, as the foam won't help you move the track. While most of this layout is foam, there is thin plywood down in there, and homasote is going on top of it, so the track will have a solid foundation, even if the rest of the layout is kind of squishy.


a another couple hours worth of work, and I'll have the roadbed down. Then I will need to run by the building supply store, and get some acrylic spackling compound to build the missing shoulder of the roadbed, and to experiment with scenery uses as well. I also want to get some colored grout mix to experiment with as a ballast and scenery material.


Once the roadbed is properly profiled I will have a strong temptation to start putting track down, but it might make sense to go to work on the scenery first, in order to do the messiest stuff before the track goes down, so I don't have to shield the track from the mess. after doing some basic carving, I think I will get some house paint mixed to a shade of gray I like, and paint all of the foam gray, experimenting with throwing grout at the still wet paint to texture the foam.
 
Last edited:

Bill Nelson

Well-Known Member
SMLA-1 hole detail .jpg SMLA-1 hole#1.jpg SMLA-1 hole#2.jpg SMLA-1 hole#3.jpg making the center hole

I went down to the garage to move stuff piled up in front of the access hole to the crawlspace that contains the storage bag with the Christmas tree and stand. In the stuff that was in the way I found the other half of the foam 4x8 that I used as the base for the Bugtustle loop project.

I had drawn out an earlier design on the other 4 x 4 . When I rebuilt my Westside c-16, putting in the locodoc conversion motor ( see My Hon3 engine shops thread in this narrow gauge section. I had tested it for a minimum radius, and had found it would go around a 15 inch radius. This first design for a loop similar to the Bugtustle design ( the passing siding is at the bottom, under the bridge, rather than being close to the top, as in the current design), was drawn with a 15 inch radius.


Later when I was working on my layout adding my return loop in Gegokayoosa (see logging in eastern TN on the dg cc and w rr in 1928 in the logging mining and industrial section - if you start looking in the page 45 area, you might not bee too far off, but look at the entire thread, so see the full extent of my madness; ok - you will have to look through the my unique logging equipment thread, and hunt through the scratchbuilding section as well) I tested some of my other equipment, and found that my kitbashed con coor goose needed a 16 inch radius, and at 16 inches the passenger body touched the freight body, making it waddle even more than usual (the waddle is what gave them the name, and the con cor goose's mechanism reproduces it remarkably).


My Gegokayoosa return loop was built at 16 inch radius, and all my Hon3 power except a Keystone/NWSL shay will negotiate it. the Loop I am constructing @ may Georgia staging on level 5 of my home layout is bieng built with a 17 inch radius, and I don't know if the Keystone\NWSL shay will be able to negotiate it.


I almost started this project on the first $x4, but fortunately I was doing some measurements, and remembered that it was not drawn with a 16 inch radius, so I started over on the other foam 4x4.

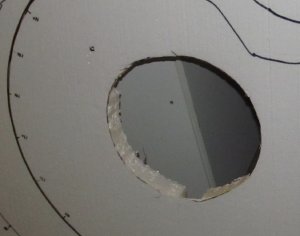
In any case, moving stuff to get to the crawl space I not only found the 4x4 with the false start drawing, but I found the foam cut out for the Christmas tree hole, which I used as a template to cut out the hole in The Bugtustle loop layout. I will still need to cut out the leg recesses form the back side, (see the detail photo ) of but that can easily be done later. what is important now is I have my hole, and can use the plug to fix the alignment of a center removable section that will fill the Christmas tree stand hole when the layout is not filling the Christmas tree layout function.

Bill Nelson
 
Last edited:
Bill Nelson

Well-Known Member
SMLA-1 rdbd prfle#1.jpg SMLA-1 rdbd prfle#2.jpg SMLA-1 rdbd xx3.jpg SMLA-1 rdbd xx4.jpg impatience is the theme

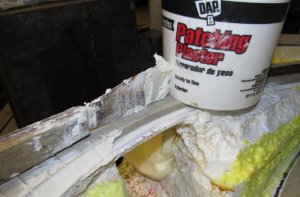
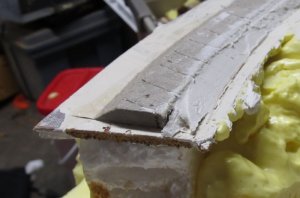
I went looking up in the train room for some acrylic spackling compound, and did not find any, I did find a container of DAP patching plaster. My work schedule has been screwy, and I was not sure when I would have time to do some shopping for supplies, so , being impatient again, I used the patching plaster instead of the acrylic spackling . The acrylic spackling is lighter, and more flexible, but I had the plaster on hand. I don't think the amount used will make a noticeable difference to the weight of the whole project, and the plywood, and the two or three coats of latex paint I intend to cover anything with, as well as the ballast and it's glue, should keep the whole mess in place.

these photos show how the plaster is used to build up the missing shoulder for the roadbed. I'm using the plaster cause I couldn't wait to get the acrylic spackling, and if I could have waited for HON3 homabed, then I would not have needed to use anything; but once again impatience is the theme.
 
Last edited:

Bill Nelson

Well-Known Member
THANKS TOM,


It has been fun to work fast for a change, I love the result I can get when I do things my old way, but it takes forever. If I had built my traditional way, this thing would still be at the benchwork level, As it is I have the roadbed down (some cosmetic work to do on it.


MY schedule @ my new Job has been vaporized, due to conditions out of anyone's control; as a result I worked Friday Morning 10p to 6a , Sat morning 10a to 6 p, and last night 4 to midnight.


It has been too wet to mow, after several weeks of being too dry to mow, which has given me some extra time; and it has been fun to have a project that I can treat experimentally, and just go and do things to see what happens. I tore out the section of track from Bumpas down to Harlow not long after we met, and that was the last tome I had a circle of track, so It will be nice to have a circle of track, and a way to run in narrow gauge locomotives. I'm hoping doing some quick and dirty work will get me in the grove of doing stuff, and perhaps give me the push needed to start tearing out sections of my railroad, having faith that what I do with the space will work, even though I have not finalized my plans. I'm thinking that "SIMPLIFY" needs to be my watchword. If I can simplify the Harlow switching oportunities, I think I could fit the expanded interchange opportunities. Likewise if I can simplify the log and iron ore transfers @ Ridgemont, I could fit the longer narrow gauge, lessening the grade on the narrow gauge.

So I'm hoping to leverage progress on this project into action on my big railroad.


My work schedule hasn't shown up yet, so I may try to get to home depot or Lowe's, and get some colored grout, and a couple tubs of vinyl spacle; and go by Sherman Williams, and get some gray paint. I have already done some sanding on the plaster roadbed shoulders. so I can start painting the roadbed, and areas of the foam that I have already carved, and places I'm not going to carve and fill on planning on I'm going to try to get basic scenery done in the places closest to the track before the track goes on, and That will save me time being careful around the track, and save me time cleaning up the track.


I'll post photos as I make more progress. I am very seriously considering adding a Tsunami sound decoder to my Westside C-16. The Blackstone C-19 runs reasonably well in DC with the dual mode feature turned on, and If I learned speed match them, in the decoder programing , doubleheading them on Bugtustle loop could be a lot of fun to listen to.


Also now I have the roadbed in on each side of the big bridge I can start planning the bridge deck. If I start on it soon, perhaps I can have it built and some rail spiked to it before I have the basic scenery done around the track area, so the bridge deck could go in with the first track.
 

Doctor G

Well-Known Member
These little layouts are a lot of fun. Looks like I will not be at RR club tonight. I have to do paperwork at the Health Department after our 2 week break and visit with family.

Tom
 

Bill Nelson

Well-Known Member
SMLA-1 pnt #a1.jpg SMLA-1 pnt #a2.jpg experimentation

While out running my errands, I picked up a can of medium dark gray housepaint, and a bag of dark gray grout to play with. the paint shows two colors in the photos, as it darkens some when drying.


when I throw the grout at cliffs to texture and darken the paint, I can get a better effect if I have the layout sideways so the surface covered is closer to horizontal. since the layout is round I can roll it around to get the best angles to work on stuff.


here are the early views, I'll see what it looks like when everything is dry.


I also got a tub of vinyl spackiling, so I can start filling in hile in the foam, texturing some of the plainer styrofoam rock faces, and filling in the remaining missing shoulders of the road bed, then I will need to do a little more rock carving on some of the foam surfaces that are two rounded. then I can paint everything, and after that I might be close to putting track down.
 
Last edited:

Bill Nelson

Well-Known Member
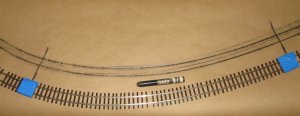
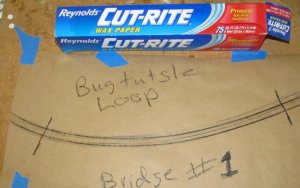
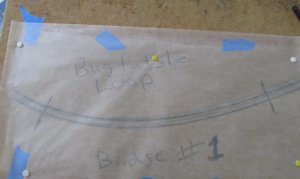
SMLA-1 brdge plng #1.jpg SMLA-1 brdge plng #2.jpg SMLA-1 brdge plng #3.jpg SMLA-1 brdge plng #4.jpg SMLA-1 brdge plng #5.jpg bridgedeck design 101

I wrote a long detailed piece on the design of a bridgedeck, by using a piece of stiff flex track to bend to the needed shape, using masking tape to mark the ends of the bridge deck, making a crayon rubbing with a crayon on kraft paper, which marks the exact locations of the rails, which is also the exact location of the stringers. Then I fasten the paper to a work board and cover it with wax paper, so the bridgedeck wont stick to the plan


By the time I wrote the long piece and loaded the photos, the log on on zealot had timed out (It often does that for long detailed pieces). I backed up the browser cut and pasted the text, and uploaded the photos again, and firefox crashed (quite rare.)


I re wrote the text copied it, logged on again, pasted in the text and was uploading the photos the third time when the power went out.

Here are the photos if there are any questions I will answer them but I'm not writing down the whole process a third time
 
Last edited:
Z

Zathros

The grout really worked out well on an already excellent base. I look forward to seeing this develop and evolve. :)
 
Top