Model Of The Month: Daishi's Frost Dragon by DanBKing
- Thread starter DanBKing
- Start date
You are using an out of date browser. It may not display this or other websites correctly.
You should upgrade or use an alternative browser.
You should upgrade or use an alternative browser.
Congrats! One more and your are part of the 501st ! :mrgreen::mrgreen::mrgreen:
Thanks! I therefore take the opportunity.....:mrgreen:
It feels so good...
500? Been there, done that... got the t-shirt! sign1 sign1
Naaahhh, just kidding, man! It DOES feel great, it's a milestone reached! You have every reason in the world to party, do it!
BTW, Teletubbies, man? I know because when my older son was very young, he loved that thing, ehr, show, and cried his lungs out if it wasn't on TV all day long (AAAAAAARRRRRRRRRRGGGGGGGGHHHHHHH!!!!!!!!!!!! :cry: :cry: :cry: ).
So, thanks to the miracles of modern technology, I taped a lot of shows, and he was happy as he could be watching it. Phew! :mrgreen: :thumb:
Once again, congrats on reaching that milestone!
Rogério
Thanks Rogerio.
Revell-Fan wanted an example of a NO-NO..... And the Teletubbies version was the first one that came to mind .......sign1
Here are a few more ........ :mrgreen: (And if anyone drove up to this junction, they would definately be in a state of Automobile Limbo!!!! )
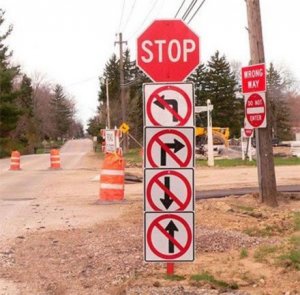
sign1sign1sign1sign1sign1
Revell-Fan wanted an example of a NO-NO..... And the Teletubbies version was the first one that came to mind .......sign1
Here are a few more ........ :mrgreen: (And if anyone drove up to this junction, they would definately be in a state of Automobile Limbo!!!! )

sign1sign1sign1sign1sign1
I think I've been to that intersection....
http://nooooooooooooooo.com/
The NO of all NO-NOS.
:mrgreen::mrgreen::mrgreen:
... And now back to the dragon. :thumb:
micahI think I've been to that intersection....
Welcome to the club, man... :cry: :cry: :cry: And the worst thing is that I've been to that intersection awhole bunch o' times...:curse: wall1 wall1
Man, it made me laughed so hard!!! :mrgreen: :thumb:
Grrrrr!
Rogerio, laugh my friend!
I want to CRY right now!:- cry::curse:
The extent of the damage to my model has gone too far........
The more I try to fix the damage, the worse it becomes.
This is the upper arm section of the left wing where it attaches to the body...
What a bloody mess!!!!!!
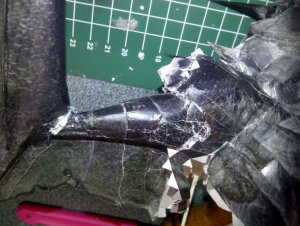
The main problem now is the armature and the cured expanding foam. The armature, of course, keeps everything in shape, the expanding foam holds it in shape, for good! It is solid!
When I attempt to repair the damaged parts, I need to move things slightly to get all the parts to line up again. But, because of the solidity of the model, it is almost impossible to move anything, because the stresses of bending and moving are transferred through the armature to other connected parts of the model, thereby damaging that as well.:curse:wall1
To add to that, the upper arm section of the left wing, did not get much foam in it, so it did not fill as solidly as I would of liked. And due to the back of the body cavity now being filled with solid cured foam, I had no access up the inside of the arm, so I had nothing to push against while re-gluing.:cry: The more I tried to fix it, the weaker and softer the paper became.
Ideally, I need to remove the left wing and rebuild the damaged section. But now, the wing to main armature attachment point is now buried in cured foam deep in the body. So how the heck do I detach the wing from the body??????? wall1wall1wall1
At this point somewhere, I think my girlfriend left the room, due to the large amounts of grumbling, swearing, cursing, and her fear of a potential lightning strike from the thunder clouds hanging above my head......:curse:
There was only one answer. I could just see part of the wing armature as it entered the body. So, out with the cutters, and SNIP!
I carefully removed all the damaged sections from the wing and the body.
In this picture, you can see the body section stripped. You can also see the extent of the cured foam inside.
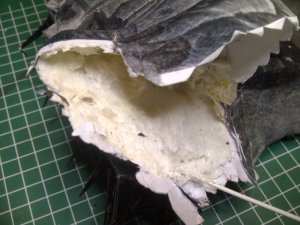
I now have to wait until Tuesday to get the new parts printed. I also need to think how I am going to reattach the cut armature. But, until then, this is where we are now. What a sorry state of affairs.
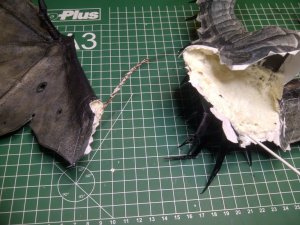
If all goes well, the next time I see you all, I will have less depressing photos to show, and I will be in a better mood!:cry:
I WILL NOT LET IT BEAT ME!!!!!!!!!!!!!!!!

Man, it made me laughed so hard!!! :mrgreen: :thumb:
Rogerio, laugh my friend!
I want to CRY right now!:-
The extent of the damage to my model has gone too far........
The more I try to fix the damage, the worse it becomes.
This is the upper arm section of the left wing where it attaches to the body...
What a bloody mess!!!!!!

The main problem now is the armature and the cured expanding foam. The armature, of course, keeps everything in shape, the expanding foam holds it in shape, for good! It is solid!
When I attempt to repair the damaged parts, I need to move things slightly to get all the parts to line up again. But, because of the solidity of the model, it is almost impossible to move anything, because the stresses of bending and moving are transferred through the armature to other connected parts of the model, thereby damaging that as well.:curse:wall1
To add to that, the upper arm section of the left wing, did not get much foam in it, so it did not fill as solidly as I would of liked. And due to the back of the body cavity now being filled with solid cured foam, I had no access up the inside of the arm, so I had nothing to push against while re-gluing.:cry: The more I tried to fix it, the weaker and softer the paper became.
Ideally, I need to remove the left wing and rebuild the damaged section. But now, the wing to main armature attachment point is now buried in cured foam deep in the body. So how the heck do I detach the wing from the body??????? wall1wall1wall1
At this point somewhere, I think my girlfriend left the room, due to the large amounts of grumbling, swearing, cursing, and her fear of a potential lightning strike from the thunder clouds hanging above my head......:curse:
There was only one answer. I could just see part of the wing armature as it entered the body. So, out with the cutters, and SNIP!
I carefully removed all the damaged sections from the wing and the body.
In this picture, you can see the body section stripped. You can also see the extent of the cured foam inside.

I now have to wait until Tuesday to get the new parts printed. I also need to think how I am going to reattach the cut armature. But, until then, this is where we are now. What a sorry state of affairs.

If all goes well, the next time I see you all, I will have less depressing photos to show, and I will be in a better mood!:cry:
I WILL NOT LET IT BEAT ME!!!!!!!!!!!!!!!!

That's awful, man (I am serious again now). Salvaging anything you can and replacing the destroyed areas with new parts seems the only option here. This is really a
MEGA-FRAK!
This is really a
MEGA-FRAK!
That is the understatement of the month!!!sign1
Understatement? Well, let's see it this way: this is the first time I ever used this expression on this forum..!

However, it's good to see that you are not giving up.


However, it's good to see that you are not giving up.

I would have to say that this is a TOTAL FUBAR!!!
I hope that you are successful in fixing this problem.
I hope that you are successful in fixing this problem.
2nd and hopeful!
Second that, and add that I know that you're gonna make it. If I may suggest it, think about making a small pause, think of something else, go smoewhere else.
If I were you and had time to act, I'd stop trying to fix it. Unless time is of essence in your situation, your state of mind won't help. At least, take a deep breath, man, and look away from the cutting board for a few seconds.
I think I can say that we are all hoping for the best! :thumb: :thumb: :thumb:
Rogério
I would have to say that this is a TOTAL FUBAR!!!
I hope that you are successful in fixing this problem.
Second that, and add that I know that you're gonna make it. If I may suggest it, think about making a small pause, think of something else, go smoewhere else.
If I were you and had time to act, I'd stop trying to fix it. Unless time is of essence in your situation, your state of mind won't help. At least, take a deep breath, man, and look away from the cutting board for a few seconds.
I think I can say that we are all hoping for the best! :thumb: :thumb: :thumb:
Rogério
Foundation
I took Rogerio's advice and had a breather from the dragon itself. I was frustrated and annoyed at myself, and needed to 'walk away' for a while. But, as things turned out, I did not have much choice anyway. Life has taken all my attention and time away from modelling at the moment.
So, the little time I have had, I put into another part of the model: Finishing the base.
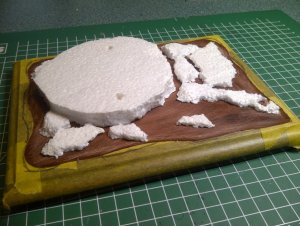
I covered the edges and sides of the base plate with masking tape and marked out where the edges of the contouring was going to be. I then cut around the line and removed the tape on the inside of the line. I then roughly sanded the exposed grain finish to give a good 'key' for the next stage.
I wanted a raised relief up to the rock, so I first cut a piece of polystyrene sheet to the shape of the base and glued this and other broken off pieces of polystyrene to the base board. I then melted the edges to smooth them out by careful use of a heat-gun.
I then spread a layer of wall filler over this. This is the first coat (still wet).
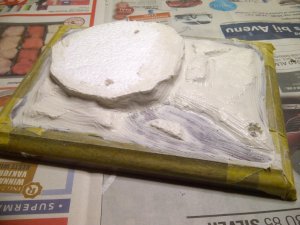
Followed by the second .... (The reason for the hole in the lower right corner, will become evident later.... )
)
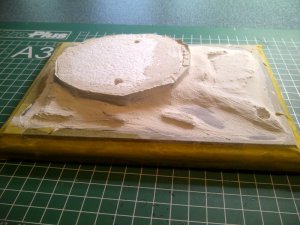
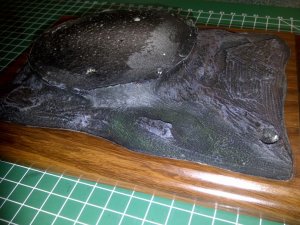
Once all this had dried for a few days, I sprayed it all matt black.
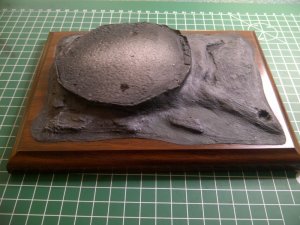
Once this had dried, I then dry-brushed water colour paint to highlight the contours. I used dark brown first, followed by burnt sienna and finally a medium grey. I used the flash for the photo to enhance the colours. In reality they are more subtle. I will try to get a more natural photo later.
The green hue that you see, I will explain in a minute...
The rock itself seems to be depicted as a source of water, as water marks are shown clearly on the model.
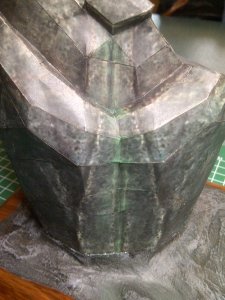
So, I modelled a water effect! I wanted the show the water source as almost dried up, and just a trickle of water remains. (The landscape in my dragon model world, is barren and scorched.)
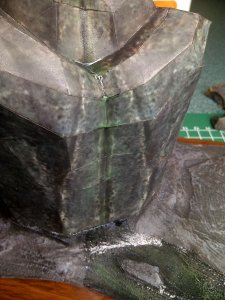
I used the acrylic floor polish mentioned earlier in the thread and trickled many layers of it down the centre of the water marks on the model. I think I must of used about 30 layers, all trickled from the top of the rock at the source!!! This all ran onto the preformed (almost) dried up stream bed. As long as each coat dries first, you can actually create small, clear pools of the stuff. I dry brushed a very light coat of green paint onto the stream bed and the rock first, before the 'trickle attack', to represent algae....
This is after about 12 trickles!
Once I was happy with the water effect, I used silicone to attach all the stones I had collected earlier. Once this was done the bottom base plate was attached to the assembly to finish it off.
So, after a disasterless build of this section, I can now present the completed base. (Oh, and now you can see what the hole was for.. :mrgreen
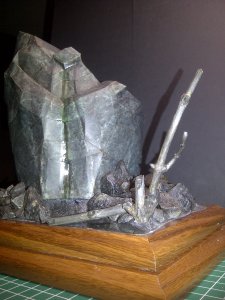
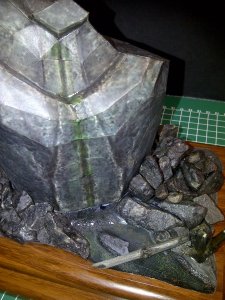
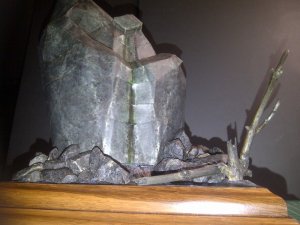
Now that the base is finished, I am itching to see the dragon on it!!!!!
So, I had better 'get my finger out', as my father would say, and get it finished!!
See you when I can!

I took Rogerio's advice and had a breather from the dragon itself. I was frustrated and annoyed at myself, and needed to 'walk away' for a while. But, as things turned out, I did not have much choice anyway. Life has taken all my attention and time away from modelling at the moment.
So, the little time I have had, I put into another part of the model: Finishing the base.
I covered the edges and sides of the base plate with masking tape and marked out where the edges of the contouring was going to be. I then cut around the line and removed the tape on the inside of the line. I then roughly sanded the exposed grain finish to give a good 'key' for the next stage.
I wanted a raised relief up to the rock, so I first cut a piece of polystyrene sheet to the shape of the base and glued this and other broken off pieces of polystyrene to the base board. I then melted the edges to smooth them out by careful use of a heat-gun.

I then spread a layer of wall filler over this. This is the first coat (still wet).

Followed by the second .... (The reason for the hole in the lower right corner, will become evident later....

Once all this had dried for a few days, I sprayed it all matt black.

Once this had dried, I then dry-brushed water colour paint to highlight the contours. I used dark brown first, followed by burnt sienna and finally a medium grey. I used the flash for the photo to enhance the colours. In reality they are more subtle. I will try to get a more natural photo later.
The green hue that you see, I will explain in a minute...

The rock itself seems to be depicted as a source of water, as water marks are shown clearly on the model.

So, I modelled a water effect! I wanted the show the water source as almost dried up, and just a trickle of water remains. (The landscape in my dragon model world, is barren and scorched.)
I used the acrylic floor polish mentioned earlier in the thread and trickled many layers of it down the centre of the water marks on the model. I think I must of used about 30 layers, all trickled from the top of the rock at the source!!!
This is after about 12 trickles!

Once I was happy with the water effect, I used silicone to attach all the stones I had collected earlier. Once this was done the bottom base plate was attached to the assembly to finish it off.
So, after a disasterless build of this section, I can now present the completed base. (Oh, and now you can see what the hole was for.. :mrgreen


Now that the base is finished, I am itching to see the dragon on it!!!!!
So, I had better 'get my finger out', as my father would say, and get it finished!!
See you when I can!


