

"Flying Dutchman" - Ghost Ship - OREL Russian Paper Model Build
- Thread starter mtrappett
- Start date
You are using an out of date browser. It may not display this or other websites correctly.
You should upgrade or use an alternative browser.
You should upgrade or use an alternative browser.

- Apr 5, 2013
- 13,876
- 10,215
- 228
The sails look good. I would only add this because of your incredible skill. Adding thread to the drawn in patches would add a 3D effect that would be just incredible. Now, I know that is asking for a lot. It looks fantastic, but the printed patches distract. You did too good of a job!! ")
Yes, me too! I like the torn sail look, so that's the one I will useIncredible work.
I like the look of the ratty, torn sail. It fits this ship, but too much is a thin line and once crossed...
Thank you too for the kind words Micah.Incredible work.
I like the look of the ratty, torn sail. It fits this ship, but too much is a thin line and once crossed...
Thank you Rhaven! Much appreciated!The sail looks perfect with the ship!
Glad you like them sir! I think I see light at the end of the tunnel nowThose sails are looking amazing.

That's a great idea Zathros. I have shifted course a bit and gone with the torn sails and furled up but I will see if I could still add that to the mix. I appreciate any feedback. I must say that the rigging is VERY challengingThe sails look good. I would only add this because of your incredible skill. Adding thread to the drawn in patches would add a 3D effect that would be just incredible. Now, I know that is asking for a lot. It looks fantastic, but the printed patches distract. You did too good of a job!!


I wasn't too sure how to handle the sails on the stays, so I referred to my book
 Obviously, robands are not used for these guys.
These are the robands. They answer that old question of how are sails held to the yards. I decided to use single robands tied at each point. I used a little CA glue on each of the knots to ensure they stay in place. CA glue is ESSENTIAL!!! It makes life so much easier and does things that really make it worth while for paper models. Such as strengthening, and of course the instant hold.

I like these sails. I like the worn look.

This is one of the yards ready to be installed.

So. the sails are slowly taking shape. We have to remember that the ship was supposed to be under-water for a very long time

 I got ropes everywhere LOL.
I discovered the order in which I like to rig this model. Its as follows:
- Bowsprit
- Fore mast
- Fitting Sails:
- Lower
- Upper
- Top Gallant
- Ships Bell
- Rigging:
- Lower
- Upper
- Top Gallant
- Main mast
- Fitting Sails:
- Lower
- Upper
- Top Gallant
- Rigging:
- Lower
- Upper
- Top Gallant
- Mizzen mast
- Fitting Sails:
- Lower
- Upper
- Top Gallant
- Rigging:
- Lower
- Upper
- Top Gallant
- Anchors
- Basically, work from the center of the ship, radiating outwards.

This is how I designed and built the "furled" sail for the top gallant.

I brushed a little white glue along the edge and then used a pin to make the holes for the robands. I used the original sails as a guide for the spacings.

Now, time to sew the robands in place. This is a bit tedious, but if that bothers a person, don't attempt rigging. Rigging a model ship has proved to be the most challenging experience ever, and I love it LOL.

Lets get those lovely gaskets installed to hold up the sail. The shape of the sail gives a good form for the shape of the furled sail. Good job there was plenty of spare linen available! I used 8 gaskets as a standard. Note that the length of the sail is much shorter than the regular sail. Its about 1/3 of the length otherwise it will look to plumped out.

I used a small nail to hold each of the sails while I fitted additional bracing to the yard and mast.

Starting to look like the good old Dutchman ship


I have found that you really need great if not strong daylight that comes in from all angles. This is a huge help especially with the rigging. Also, eye glasses and magnifying head gear are other essential items. I switch between eyeglasses and magnifying all the time. I also use a chair that can be easily raised and lowered. Any amount of different tools like multiple pairs of straight and angled tweezers and a plethora of other tools are really needed. They don't tell you that either in the instructions

The pin rails are all full at the bow. These are for the foremast related sails, and supports.

It gets VERY busy with all the rigging lines! I tried marking the lines with little bits of tape and numbering and even color-coding the ropes. None work very well. The tape falls off, the color codes fade as it dries and so on. I found the best way is to just focus on ONE line! and one line only. Examine the start and all the intermediate places it will touch on the way to its destination. Then, start at the most difficult end first. Like for example, the fife rail, bitts, or railing. Then, move through to the last location being careful NOT to cross the lines or you will need to start again. Don't try to do too much in one day! Spend time thinking about the quest. You may need to use a new technique to get the job done that will not be immediately apparent to you. Have a coffee! If you feel like you are losing patience or sanity. Stop! Step back from it. Work on something else for the ship other than igging, and then come back to this rigging problem. Remember, one slip of the wrist can destroy all your work!!


For those awkward areas that you just can't get any kind of ruler in there, I use post-its that have been either marked, folded or cut to the desired length. I keep them in a cup next to me and re-use them as needed.

Attachments
Last edited:

No, it's not finished yet  (TIME)
I had to remove the rubber/neoprene ship-vice clamps as they split the other day, and almost caused the ship to fall over. That would have REALLY been a bummer :exploding_head:

Just a few pics to keep me going.

I was reading, and it made me realize, there is no ships bell. Well, I want one!

Seems like all the ships had them back then. It had many uses.

This is the smallest one I could get hold of.

It fits pretty good in the belfry. It was a belfry without a bell. Hey, even spirits need bells

Also, the ubiquitous pirate flag. This is a nice one I found perfectly in scale, and is made of material.

Just had to trim it to shape.

This is where it will go eventually! On the top of the main mast.


Another sail ready to fit.

In between all the rigging, I take breaks, and paint these guys. This is them all after cleaning in soap and water and getting rid of any flashing.

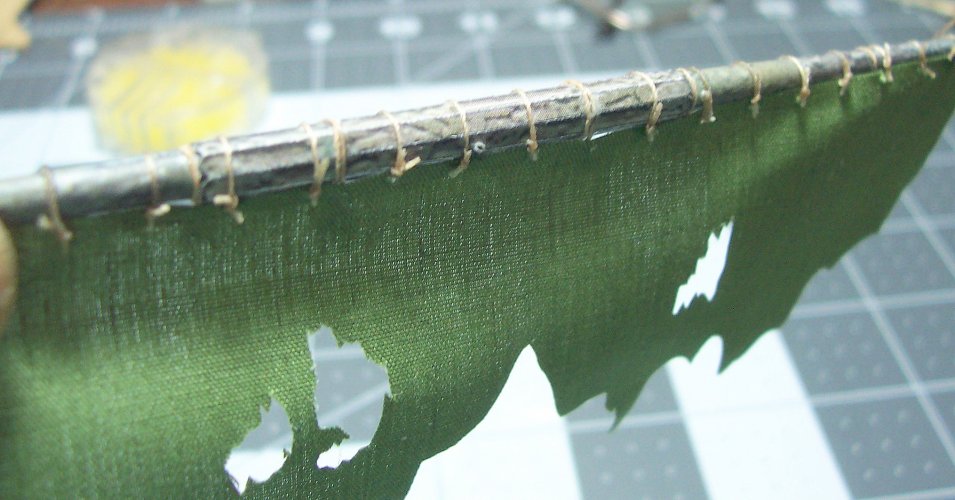
Look at the rest of the ship showing through those holes! Ha! Looks good to me!

This is a "blurry" view of the ties. I fit them to all the yards.

Just brush some white glue to make it so you can cut the sail to the shape needed. Without the glue, its a terrible process.

Nice and clean material/linen cuts.

holes punched ready for the thread.

Lots of knots for the separate robands.

Wow, so zoomed in you can see the weave of the linen.


(TIME)I had to remove the rubber/neoprene ship-vice clamps as they split the other day, and almost caused the ship to fall over. That would have REALLY been a bummer :exploding_head:
Just a few pics to keep me going.
I was reading, and it made me realize, there is no ships bell. Well, I want one!
Seems like all the ships had them back then. It had many uses.
This is the smallest one I could get hold of.
It fits pretty good in the belfry. It was a belfry without a bell. Hey, even spirits need bells
Also, the ubiquitous pirate flag. This is a nice one I found perfectly in scale, and is made of material.
Just had to trim it to shape.
This is where it will go eventually! On the top of the main mast.
Another sail ready to fit.
In between all the rigging, I take breaks, and paint these guys. This is them all after cleaning in soap and water and getting rid of any flashing.
Look at the rest of the ship showing through those holes! Ha! Looks good to me!
This is a "blurry" view of the ties. I fit them to all the yards.
Just brush some white glue to make it so you can cut the sail to the shape needed. Without the glue, its a terrible process.
Nice and clean material/linen cuts.
holes punched ready for the thread.
Lots of knots for the separate robands.
Wow, so zoomed in you can see the weave of the linen.
Parrals
the is the fixing for the yard to the mast. Another question that people are unsure about with tall ships. The parral
Last edited:
Parral's Continued

I bought some parrals in a kit form. They work pretty good.

This is it all built up and ready to install on my ship.


This is another furled up sail for the main mast.

The parral fitted. This was tough to get in there and install


Now onto the mizzen. This is the yard that sits at an angle on the mast. Again, I fitted it on with a small nail just to hold it in the correct position.

The crew so far! They are interesting to paint. Each character is different.

The mizzen sail ready to be fitted to the ship.

I used a different stich than I used before for the mizzen sail to the yard.

All fitted on the ship.

I found some cool looking barrels for my ship. This one contains rum for all the crew. I have more that I will be fitting onboard.

What an incredibly work you are doing. Its so complex but so well made at the same time!
Congratulations.
Congratulations.
Thank you for including the "history lesson" and showing us the research that you are conducting for the amount of detail that you are putting into this project. I have to say that this is one of the most informative build threads that I have followed.
KEEP UP THE GREAT WORK!!!
KEEP UP THE GREAT WORK!!!
- Apr 5, 2013
- 13,876
- 10,215
- 228
Except for DORIS, I haven't seen any sailing ship with the detailing you have shown. I consider DORIS to be one of (if not the) finest model ship builder in the world. She is also a High School teacher. Her ships have interiors, with Gold Leaf on the statues she makes for them.
Check out this link to see some of her work.")
Check out this link to see some of her work.
Amazing work from Doris.
Its funny that Doris its also the name of a small boat used to fish codfish.
Its funny that Doris its also the name of a small boat used to fish codfish.
Thank you so much for the kind words!I like your bel, all the items and love you put in your build makes it pop. Its amazing the amount of time you put in this model this makes the diffrents between a model and a replica.
Hi there, and thank you so much for your nice commentsWhat an incredibly work you are doing. Its so complex but so well made at the same time!
Congratulations.
That is most kind, and thank you! I have learned so much while working on this model, and I hope that it will give others inspiration to try paper modelsThank you for including the "history lesson" and showing us the research that you are conducting for the amount of detail that you are putting into this project. I have to say that this is one of the most informative build threads that I have followed.
KEEP UP THE GREAT WORK!!!
WOW!!! Doris's work is INCREDIBLE!!! Such beautiful details on those ships! Those ships that she has built are huge too! Masterful workExcept for DORIS, I haven't seen any sailing ship with the detailing you have shown. I consider DORIS to be one of (if not the) finest model ship builder in the world. She is also a High School teacher. Her ships have interiors, with Gold Leaf on the statues she makes for them.
Check out this link to see some of her work.

The most complex "rigging" or working with line prior to this project has been tying my shoelaces, honestly!
Anyway, back on the rigging, and related items. Some of the really hard to get to places for the rigging I used a fish wire. I made it simply from a 6 inch piece of soft wire. This was folded at the one end and the line tied to it. I then pushed that through the crows nests, rails, or anything where it was near impossible to get the line through. It was like a long, flexible sewing needle.


I painted all 12 of the undead pirates. I gave them a wash of stain at the end to normalize all the colors and to subdue any that were too jarring and bright. They have to "fit in" with the rest of the ship after all.


I spent some time arranging them around the ship in as best positions as I could. I used some heatsink tubing over my large tweezers to place them to avoid damaging the paint. I also used some blue putty in a very miniscule amount on the base of each to hold them in place temporarily. That way I can move them around o my heart's content.

Anchors
Last on the list is the anchors completion and fitting on the ship. I needed to make some loops of steel wire to go in each of the anchors at the tops.

I used a couple of triple-sheave blocks modified with a small hook attached at the end.

Had to dip the pieces in acid to get them in the black patina.

Wash off the acid carefully to stop them corroding uncontrollably over time.

This is anchor and eyelet ready for placement.

From left to right, pair of pliers with rounded nose that is great for creating larger loops. Next along is a pair of smooth angled pliers for flattening and smoothing. Next is a pair of sharp side-cutters.

One hook for each anchor.

Close up of the triple block with hook and lines.

Hard to see, but I drilled a tiny pilot hole for a nail to go through on each of the catheads.

Here the block is hooked up and the lines are threaded through the catheads.

Both anchors installed successfully. I also added a few barrels and a bucket to the mix.

Just a quick shot of some of the pirates below. Maybe there could a competition for who can find all 12 pirates? The winner gets a barrel of rum maybe

Anyway, back on the rigging, and related items. Some of the really hard to get to places for the rigging I used a fish wire. I made it simply from a 6 inch piece of soft wire. This was folded at the one end and the line tied to it. I then pushed that through the crows nests, rails, or anything where it was near impossible to get the line through. It was like a long, flexible sewing needle.
I painted all 12 of the undead pirates. I gave them a wash of stain at the end to normalize all the colors and to subdue any that were too jarring and bright. They have to "fit in" with the rest of the ship after all.
I spent some time arranging them around the ship in as best positions as I could. I used some heatsink tubing over my large tweezers to place them to avoid damaging the paint. I also used some blue putty in a very miniscule amount on the base of each to hold them in place temporarily. That way I can move them around o my heart's content.
Anchors
Last on the list is the anchors completion and fitting on the ship. I needed to make some loops of steel wire to go in each of the anchors at the tops.
I used a couple of triple-sheave blocks modified with a small hook attached at the end.
Had to dip the pieces in acid to get them in the black patina.
Wash off the acid carefully to stop them corroding uncontrollably over time.
This is anchor and eyelet ready for placement.
From left to right, pair of pliers with rounded nose that is great for creating larger loops. Next along is a pair of smooth angled pliers for flattening and smoothing. Next is a pair of sharp side-cutters.
One hook for each anchor.
Close up of the triple block with hook and lines.
Hard to see, but I drilled a tiny pilot hole for a nail to go through on each of the catheads.
Here the block is hooked up and the lines are threaded through the catheads.
Both anchors installed successfully. I also added a few barrels and a bucket to the mix.
Just a quick shot of some of the pirates below. Maybe there could a competition for who can find all 12 pirates? The winner gets a barrel of rum maybe
