B5 - Project Centauri Vorchan

zathros

*****SENIOR ADMINISTRATOR*****
Staff member
Administrator
Moderator
Apr 5, 2013
13,502
9,559
228
Gandolf,


Here's a link for some inspirational music - Rush - Mission from the album Hold Your Fire


That's it for now. I really appreciate someone of your caliber on this project. Thanks for taking the time to work on this.

Sky Seeker
:tank:

I had to fix your post. When highlighting the share code from YouTube, use the whole code! Then use the FilmStrip Icon to embed it. Do not use just the numbers, that works only on YouTube, not for embedding videos. Thanks.
 

zathros

*****SENIOR ADMINISTRATOR*****
Staff member
Administrator
Moderator
Apr 5, 2013
13,502
9,559
228
I'd like to see this model developed not using Pepakura as it cannot make true curves without an extremely high Polygon count. Rhino would be the program of choice. Pepakura models always look like Pepakura models. If Gandolf can unfold that nose, which isn't really too difficult if you "Extract" the Wireframe, then use the mesh lines the you need (then immediately pull the yellow wireframe away from the model!!!!. You can then get the shape very close to what you want. If you made a plug out of paper, by making formers and filling that in with two part epoxy, you could water form the top and bottom surface, and reproduce the mesh. Just make sure you printer uses Pigment ink. :)
 

Gandolf50

Researcher of obscure between war vehicles...
Staff member
Moderator
Jan 28, 2013
1,327
1,576
96
New Mexico USA
I unfolded my nose!... ( ok Ok ) Enough Kids! )
Got things to work the way I wanted..no help from any Rhino boards or the like..I know..others do this..as every time the question is asked on what to unfold a mesh with..people say Rhino..has a function to do that! Yet the tutorials and such..are basically only for stuff made with Rhino!

So after a lot of trial and error got something I can work with..still have to re-arrange things..rotate some stuff..took a full day to figure out how to cut a mesh apart ( didn't want to explode it, but ended up doing so..and found how to put it back together again...) the unfold is NOTHING like pepakura!!
as you can see..and of course as only as good as the mesh..but stuff is not scattered all over creation....

Start-OverMesh.jpg
I already have been working on it as when unfolded it is ONE SINGLE mesh...what you see above is 1/2 of the Vorchan Head .
I need to figure out how to get to paper, as soon as I finish up getting things organized...and some notes...then will pass on a copy to Beta test!!!
 

bigpetr

Designer/Master Modeler
Jan 27, 2016
922
1,461
75
Czech Republic
Gandolf50, did you ask here for help with Rhino? I did not noticeed it. I would be happy to help. As you learned the hard way, ufolding denser mesh in Rhino can be pain. Rhino is surface modeler so there are only basic functions for meshes. I personaly would not unfold mesh in Rhino (somebody say to unfold mesh in Rhino? Can you point me to that discusion? I would like to read it). Pepakura, as dedicated tool for that, seem better and quicker tool of choice for me. Typical workflow in Rhino is to use mesh as a reference and recreate it again from surfaces (for paper modeling purpose from developable/unrolable surfaces). It is usualy done by hand.
 
  • Like
Reactions: Sky Seeker

Gandolf50

Researcher of obscure between war vehicles...
Staff member
Moderator
Jan 28, 2013
1,327
1,576
96
New Mexico USA
Gandolf50, did you ask here for help with Rhino? I did not noticeed it. I would be happy to help. As you learned the hard way, ufolding denser mesh in Rhino can be pain. Rhino is surface modeler so there are only basic functions for meshes. I personaly would not unfold mesh in Rhino (somebody say to unfold mesh in Rhino? Can you point me to that discusion? I would like to read it). Pepakura, as dedicated tool for that, seem better and quicker tool of choice for me. Typical workflow in Rhino is to use mesh as a reference and recreate it again from surfaces (for paper modeling purpose from developable/unrolable surfaces). It is usualy done by hand.

As far as discussions on unfolding in Rhino...just do a Google search on how to unfold a mesh...Rhino is mentioned in virtually every one...
I have only worked with this for a few days so..of course it will take some time to get used to it..It is a lot like in Autocad, when you ask the same question..how do I unfold a mesh for papercrafting..you get a thousand different responses..and then are referred to a H/AC duct work program costing upwards of 600$...and still haven't recieved an answer to your question. I think that those that figure out how to do these things in various programs outside of Pepakura, hoard that knowledge like gold!

( Sorry..just noticed how snarky this was starting to read! )

I have help whenever I ask, but I work a different way then 99.9% of most people..and there is a lot of difference in reading and doing! As well as tutorials and the like..when everyone has their layout setup that matches nothing on my own screen!..I have used pepakura for a very long time..( as well as every other chunk of software out there ) and in this case NO...it is far better to convert this area to nurbs and quads then use rhino to unroll then use a mesh in pepakura and have every triangle scattered all over creation! It destroys this mesh ( it was not created by any of us ),,,What I Am doing is making an almost impossible mesh--- possible to be created in paper.. and Pep ..just won't cut it in this case..and it won't function with quads! It is only this one section that is the most important, that has to be right,, once it is flattened..the rest is a piece of cake...or rather a ton of little bits of cake! But all boxes or tubes!
I do appreciate the offer of help...I assure you!!

I think I was feeling a bit possessive of this for a bit there, but this is not a private project...All HELP/SUGGESTIONS and the LIKE ARE REQUESTED and WELCOME!!!

If I run into any real problems..I will PM you to be sure!!
;)
 
  • Like
Reactions: bigpetr

spaceagent-9

Right Hand Man and Confidant
Moderator
Jul 10, 2013
3,116
3,480
143
62
pheonix
I lived in japan, you know the artists struggle so deeply for absolute perfection there about things. So I admire your work here, keep going on this, somehow, someway you will find the answer, and part of it might be the path along the way to it!
 

Sky Seeker

Well Established Member
Jun 1, 2015
1,178
1,083
95
Additional pics. Fuselage assembly.

New template. The piece on the far left is the fuselage spacer and lower left is the nose support. The nose support should be able to slid within the curved nose portion that Gandolf is working on. Note the cut out portion of the front of the fuselage for the nose support.
upload_2016-12-10_9-57-1.jpeg

Originally a larger rectangular fuselage was built. The size was too big when slid into the wing. At this point a redesign was required.
upload_2016-12-10_9-57-16.jpeg

Instead of the large rectangular fuselage. I reduced the main fuselage in size and created a space for the smaller fuselage to fit within to act as a support and to line up the fuselage with the main wing. Additionally, it will act as a support and guide for the front plate for the turrets. Note also the inside of the main wing. The excess cardstock was folded in the back and glued. The result was a very strong support in the back behind the engine assembly.
upload_2016-12-10_9-57-38.jpeg

Pre fit of main fuselage and fuselage spacer.
upload_2016-12-10_9-57-51.jpeg

Fuselage space glued in place with main fuselage.
upload_2016-12-10_9-58-4.jpeg

As you can see on the side view the front trapezoidal section needs some work. It actually angled down somewhat.
upload_2016-12-10_9-58-29.jpeg

Current template fuselage and fuselage spacer.
upload_2016-12-10_10-12-59.jpeg

Please feel free to modify as desired. The rest of the fuselage seems to be to scale with the main wings.

That's it for now.

Sky Seeker
:tank:
 

Attachments

  • upload_2016-12-10_10-16-38.png
    upload_2016-12-10_10-16-38.png
    40.8 KB · Views: 2
Last edited:

Sky Seeker

Well Established Member
Jun 1, 2015
1,178
1,083
95
upload_2016-12-10_10-29-56.png

The front section need to be modified. The side rectangles on either side of the trapezoid don't line up well (i.e. they are too big and are not 90 degrees from the hypotenuse of the triangles). Please feel free to modify.

Sky Seeker
:tank:
 
  • Like
Reactions: Rhaven Blaack

zathros

*****SENIOR ADMINISTRATOR*****
Staff member
Administrator
Moderator
Apr 5, 2013
13,502
9,559
228
In Rhino, you can split the MESH by the lines on the MESH itself using the commands given in Rhino. This allows you to break up a mesh into unfoldable pieces. There are so many different ways to break up a mesh, it's almost impossible to get into it, or say which one is right. Unfolding in Rhino is extremely easy. Take a MESH and start playing with the commands. You could turn "OSNAP" on and make a curve following a mesh line, then use that line to cut the MESH, one of many ways. I try to stay in one program and move into others when necessary, but I find Rhino has most of model making wrapped up, it's a matter of learning the controls and manipulating them to do what you want them to do. Making shapes to use as cutting tools is another way to break up a Mesh. Extruding the line made by the aforementioned method will give you an excellent cutting tool. Rather than making every part, I tend to think of cutting up shapes to get the shape I want, if I am sing an existing MESH. By "Locking the piece, you can then draw over the mesh in the proper Viewport, and create the unfoldable shape you wish.

You can split Mesh's by their Isocurves. This makes working with MESHes easy. The first thing you have to do is "Extract Wireframe" from the MESH if the MESH was made in another program, as Rhino cannot see the MESH. Once the wireframe is Extracted, you slide the highlighted part away, you will see the original mesh, and the new one, made of "Curves" next to it, which is what Rhino works with, "Curves". At this point, you start deleting the lines you don't need, like most of those horrific triangles, and and keep the edges. I usually group the stuff I don't want first, then delete the group, as I go along.

I tend to make my own meshes, but since I work primarily with Rhino, you just see the basic shape of the part, or the whole part, depending on what type of view you are using. There is a lot of help with Rhino, though I tend to go to you tube and gather bits and pieces, and come up with my own method. I would gladly help anyone if they just asked me. No guarantee I know how, just an offer. :)
 

Gandolf50

Researcher of obscure between war vehicles...
Staff member
Moderator
Jan 28, 2013
1,327
1,576
96
New Mexico USA
Took and deleted everything I don't know how many times..as things just were not quite right...and had to many files between too many programs and computers..to keep track of anymore..Finally did my own thing ...may not be the way others would do it but if it turns to paper..who cares!!
re-split the nose in half down the length..merged/deleted all the tiny protrusions..( can be greebled on if someone wants to... ) sliced the thing like vegetables going into soup...15 separate slices..and several of those had to be sliced again to rearrange due to overlaps... I have it with some textures but they will be dumped.... Spent a long time trying to figure out why the uv maps were destroyed when it was flattened..but it seems lots of people have the same problem with Rhino since version 4 at least...with solutions that verge on the absurd... haven't even looked at the internal texturing options in Rhino as yet.. but here are some pix...

VorchanBeta30.jpgSection Layout

VorchanBeta31.jpgPattern work

VorchanBeta32.jpgNosecone (?) thing is actually all 15 pieces..just arranged them for the view

VorchanBeta33.jpghaven't got this far..started from the back to front...

VorchanBeta34.jpg went back to old design..can have the option of extra texture elements or not..

VorchanBeta35.jpg top area to slot into head openning..

VorchanBeta36.jpg Transition neck piece to fit around support structure...

VorchanBeta37.jpg command doodad on top...

till l8ters
 
  • Like
Reactions: Sky Seeker

Gandolf50

Researcher of obscure between war vehicles...
Staff member
Moderator
Jan 28, 2013
1,327
1,576
96
New Mexico USA
Additional pics. Fuselage assembly.

New template. The piece on the far left is the fuselage spacer and lower left is the nose support. The nose support should be able to slid within the curved nose portion that Gandolf is working on. Note the cut out portion of the front of the fuselage for the nose support.
View attachment 155723

Originally a larger rectangular fuselage was built. The size was too big when slid into the wing. At this point a redesign was required.
View attachment 155724

Instead of the large rectangular fuselage. I reduced the main fuselage in size and created a space for the smaller fuselage to fit within to act as a support and to line up the fuselage with the main wing. Additionally, it will act as a support and guide for the front plate for the turrets. Note also the inside of the main wing. The excess cardstock was folded in the back and glued. The result was a very strong support in the back behind the engine assembly.
View attachment 155725

Pre fit of main fuselage and fuselage spacer.
View attachment 155726

Fuselage space glued in place with main fuselage.
View attachment 155727

As you can see on the side view the front trapezoidal section needs some work. It actually angled down somewhat.
View attachment 155728

Current template fuselage and fuselage spacer.
View attachment 155729

Please feel free to modify as desired. The rest of the fuselage seems to be to scale with the main wings.

That's it for now.

Sky Seeker
:tank:

You will be done before I get things flattened / arranged to my liking!!
 

Sky Seeker

Well Established Member
Jun 1, 2015
1,178
1,083
95
You will be done before I get things flattened / arranged to my liking!!

Gandolf,

Maybe maybe NOT. Your work thus far has inspired me to do more. I have finally (I think) finished the design for the wing plates with the boxes for the wing turrets. Also have finished the main body nacelles. Working on the designs for the ridges on top of the main body nacelles as well as some turret designs. Most of the work done has not been colored or textured yet as I'm not sure of the textures that are going to be used and on what areas.

Most of the focus right now is getting the parts assembled and assembly steps. Once the major parts are done, texturing might be done by me, but you look like you would do a better job. If you would like to please feel free to texture the templates completed to date.

Here are some templates. They are labelled Pg. 2 - Pg. 4 respectively. Pg. 1 is your wing design which was the original inspiration and rosetta stone I have been working off of in addition to Jaybat's Omega Destroyer for scale reference.

Pg. 2- main fuselage - This is an update posted on this site. Modifications have been made to the front end by Revell Fan and some lines have been cleaned up. The main fuselage guide (the part that says cut here) has been moved down due to finding out when the nacelles were being designed that the center section was too far up. Some lines have been left in for guide purposes. Some lines should probably be put in to figure out how far the the fuselage is to be put into the guide. A hint is where the middle tab is for the fuselage where the front edge of the tab starts to go up. That's where the line should be for alignment.
upload_2016-12-18_18-1-26.jpeg

Pg. 3 - wing turret front plates. The number designations indicate where the boxes go on the plates.
upload_2016-12-18_18-7-48.jpeg
Pg. 4 - Upper and Lower Nacelles - main fuselage - still modifying. Missing the 9 ridges that go on top of the nacelles. The small pieces that are in front of the the main nacelles (big pieces) go in the front. The nacelles (big pieces) have been test fitted and are fine. Small pieces have not been test fitted yet. The small mini marks near the front portion of the nacelles line up with the big vertical line on Pg. 2 of the main fuselage.
upload_2016-12-18_18-10-44.jpeg
Here's some photos from the original series for reference purposes.
Vorchan Back
upload_2016-12-18_18-18-54.png

upload_2016-12-18_18-19-37.png

Vorchan Bottom

upload_2016-12-18_18-20-5.png

Vorchan front
upload_2016-12-18_18-20-54.png

upload_2016-12-18_18-21-22.png

upload_2016-12-18_18-21-54.png

Vorchan side

upload_2016-12-18_18-23-45.png

When done adding some of the new pieces to the model I'll post the pics.

I hope this helps whoever else is building this ship.

Merry Christmas!

Sky Seeker
:tank:
 

Gandolf50

Researcher of obscure between war vehicles...
Staff member
Moderator
Jan 28, 2013
1,327
1,576
96
New Mexico USA
OK...well I have been busy....major problems with the mesh..and Rhino...and unfolding...some parts work great..some not at all..the simplest parts turn out looking worse than pepakura disasters on their worst days..the most impossible of parts..unfold..like The Shroud of Turin... and here is the reason...when made the original mesh was made for a rendering..meaning..no thought to joining boxes, corners,edges, meshes any of those things paper modelers think of! As I was trying to unfold a simple curved piece, I kept getting splinters of mesh scattered all over, no matter what I tried..so started looking closer at the mesh...1> the original, every edge of every box is filleted which in Rhino..leads to big problems..it can be done..but I don't have the time or experience to deal with the mesh as it is.. I can do it..but it will take far too much time than I am willing to spend...( I got models waiting to be finished...I hear them calling to me in my sleep !!) so...I am going a different route...and going to dump a ton of stuff on the beta builder !!!! Sky Seeker ( check your messages!! ) Right now like the ones posted they are not textured..but that is eye-candy..need to get the bones done first...

Engine Pod 1 of 2 ...page 1 of 3... THIS FILE IS ONLY AN EXAMPLE !!!!
body-engine-pods_page1.png Kept the fillets as double folds, details on engine pods can be cut-outs or eye-candy..I hate doing tabs but they need to be at least dotted in for those that use them...and such... I have just finished the 36th page of stuff like this one...virtually all the main components I think!?! time to check/Figure and re-do stuff...I have some of the details as well, just to test things...

Engine Doo-Dads 1 of 6... THIS FILE IS ONLY AN EXAMPLE!!!
g252.png again simple eye-candy or can go full tilt and do the cut-outs!

Beta..Build is on its way!
 

Sky Seeker

Well Established Member
Jun 1, 2015
1,178
1,083
95
OK...well I have been busy....major problems with the mesh..and Rhino...and unfolding...some parts work great..some not at all..the simplest parts turn out looking worse than pepakura disasters on their worst days..the most impossible of parts..unfold..like The Shroud of Turin... and here is the reason...when made the original mesh was made for a rendering..meaning..no thought to joining boxes, corners,edges, meshes any of those things paper modelers think of! As I was trying to unfold a simple curved piece, I kept getting splinters of mesh scattered all over, no matter what I tried..so started looking closer at the mesh...1> the original, every edge of every box is filleted which in Rhino..leads to big problems..it can be done..but I don't have the time or experience to deal with the mesh as it is.. I can do it..but it will take far too much time than I am willing to spend...( I got models waiting to be finished...I hear them calling to me in my sleep !!) so...I am going a different route...and going to dump a ton of stuff on the beta builder !!!! Sky Seeker ( check your messages!! ) Right now like the ones posted they are not textured..but that is eye-candy..need to get the bones done first...

Engine Pod 1 of 2 ...page 1 of 3... THIS FILE IS ONLY AN EXAMPLE !!!!
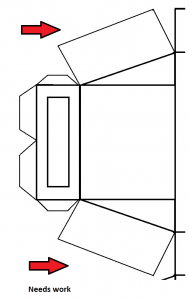
View attachment 156049 Kept the fillets as double folds, details on engine pods can be cut-outs or eye-candy..I hate doing tabs but they need to be at least dotted in for those that use them...and such... I have just finished the 36th page of stuff like this one...virtually all the main components I think!?! time to check/Figure and re-do stuff...I have some of the details as well, just to test things...

Engine Doo-Dads 1 of 6... THIS FILE IS ONLY AN EXAMPLE!!!
View attachment 156050 again simple eye-candy or can go full tilt and do the cut-outs!

Beta..Build is on its way!

Gandolf,

Am ready to go. Working on the turret plates tonight. I believe that there might be additional modifications to it. If so I'll share with everyone. Trying to get an idea where your bottom pics will go. Feeling like this is becoming a 3d puzzle. It'll be F-U-N.

Sky Seeker
:tank: