

You are using an out of date browser. It may not display this or other websites correctly.
You should upgrade or use an alternative browser.
You should upgrade or use an alternative browser.
- Status
- Not open for further replies.
 )...
)...
Make 'Em Run Better
Jon posted about an Athearn switcher that he couldn't identify. Here's a tip on how to get these locos and other Athearn's using the same electrical scheme to run much better than they already do. The drawbacks in the loco are the rivets that attach the post(s) to the trucks,the friction fit between the truck and the frame and the contact strip that uses only friction to maintain contact between motor and the trucks. By "jumpering" the truck body to the posts and the posts to the motor performance will be vastly improved especially at slow speeds. You'll need to use some real flexible wire....the leads from a couple of burned out GOW bulbs will work just fine. Be sure to remove the brush clip from the motor before soldering to it so you don't melt the motor's plastic frame.
Jon posted about an Athearn switcher that he couldn't identify. Here's a tip on how to get these locos and other Athearn's using the same electrical scheme to run much better than they already do. The drawbacks in the loco are the rivets that attach the post(s) to the trucks,the friction fit between the truck and the frame and the contact strip that uses only friction to maintain contact between motor and the trucks. By "jumpering" the truck body to the posts and the posts to the motor performance will be vastly improved especially at slow speeds. You'll need to use some real flexible wire....the leads from a couple of burned out GOW bulbs will work just fine. Be sure to remove the brush clip from the motor before soldering to it so you don't melt the motor's plastic frame.
Attachments
I don't know if this is a valid suggestion or not because the only "test program" was done by me! However, while I like my MDC express refers (N gauge), I've had troubles keeping those knuckle couplers coupled. Quite by accident, after having painted the couplers with Floquil "rust", both inside and outside the knuckle, I've found that my unwanted uncouplings were reduced significantly. It's quite possible that the paint takes away the slipperiness and provides more friction for them to "grab" each other. Just an observation.
Dick
Dick
Ok here is an idea I tried after reading about it years ago in one of the model Railroad mags. on sidings where you have a grade (and yes I have a few of them) you can stop cars from rolling by taking the bristles of a stiff brush and glueing a few sticking up from the ties to a height of just higher than your wheel axles. your loco can still easily push the cars past them but the cars will only roll back to the bristles. I make mine look like small brush growing up in the siding.
Making Grab Irons
I've always had problems finding straight grab irons for Hon3 in the correct size. Here's a way to make as many as you want and quickly too. This will work in any scale.
Parts Needed:
1. File Handle
2. Square Brass Tubing
3. Brass Wire
First determine the length of the grab irons needed. Obtain a piece of square brass tubing of the same size. In my case its 3/16X3/16. Don't worry if you can't find the exact size. Just use the closest size tubing. They look better if they are slightly undersize anyway.
Insert the brass tube into the file handle and secure it with epoxy or super glue.
Determine the size of the wire to be used to make the grabs and drill a hole in the tubing just slightly larger than the wire size. (See diagram)
Insert the wire in the hole and wind it tightly around the tubing. Pull it tight so you get good sharp square corners.
Slide the wire off the tubing and what you'll have is something that looks like a square spring. Just use your wire cutters to trim out as many grab irons as you need.
Attachments

Came upon an interesting way of previewing buildings before you place them on the layout and what they may look like if you are doing some kitbashing. Take the parts of the building that you are in putting together, photocopy the four sides, cut these copies out and glue them onto scrap pieces of styrofoam. This way you have a good idea how the building will look at its proposed location, how much room it will take. If you do several up this way, as you build one you will still have a few of the photocopy ones near be so the area will not look too vacant.
For kitbashing, photocopy the parts that you wish to add or alter and do the adding/altering on the photocopies.
Have done a few design preservation building this way and looks good on the layout, fills up the spaces until the real one is built and detailed. With the photocopies glued to the styrofoam they are light and easily moved around to their best advantage. Just a thought. Ron..
This is my first tip, but since I'm a newbie it's probably already known. Also, this gives me a chance to attempt an image upload.
I was trying to find a wood glue bottle with a small enough tip for good accuracy (I know most people probably use tooth picks for small areas) on small parts.
In the picture (I hope), are some glue tips. "A" is the standard wide tip that came on the carpenters glue bottle. Too wide for fine gluing.
"B & C" are tips sold at Wal-Mart in the craft section. They both come in the same package, but I actually didn't realize it until I got it home and opened it. The metal tip (C) is screwed onto the tip of the narrow plastic one (D). The result is a fine, pencil-thin, bead of glue wherever you want. Be sure to keep a pin in the tip when not using it though as it tends to clog easily.
In addition to this tip, I also found that the tip of an old mechanical pencil is basically the same as the metal one sold in the package. I tried this and it worked just as good
Cheap 'n Easy Car Cradle
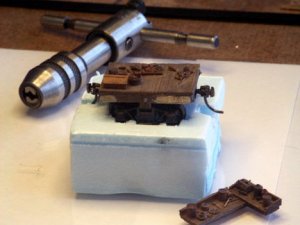
Here is a very cheap and easy-to-make car cradle. It took me all of 3 minutes to carve the small block of foam. It keeps the car from rolling around on my work tray while I'm trying to detail it or work on another part.
Obviously, for a two-trucker, a longer piece of foam would be needed.
Here is a very cheap and easy-to-make car cradle. It took me all of 3 minutes to carve the small block of foam. It keeps the car from rolling around on my work tray while I'm trying to detail it or work on another part.
Obviously, for a two-trucker, a longer piece of foam would be needed.
Attachments

Code 70 Rail Joiners
For anyone who might want to use code 70 rail for trackage either for narrow or standard gauge....don't buy those expensive code 70 rail joiners. Get some Atlas N scale rail joiners. They fit just as well, hold tighter and are easy to solder. Plus if you flatten one end they make an excellent transition joiner from code 70 to code 55.
For anyone who might want to use code 70 rail for trackage either for narrow or standard gauge....don't buy those expensive code 70 rail joiners. Get some Atlas N scale rail joiners. They fit just as well, hold tighter and are easy to solder. Plus if you flatten one end they make an excellent transition joiner from code 70 to code 55.
Free up the old track for next track plan
Hi Guys,
We talked about salvaging your track/switch`s ect for your new plan.") in a differant post.
in a differant post.
But here it is again")
Windex window cleaner applied to a section at time, in a few minute`s you will be able to lift out the track. If you leave it alone it will harden back in.
One of our friends thought car window washer fluid might work as well, but I haven`t tried that.
Hi Guys,
We talked about salvaging your track/switch`s ect for your new plan.
in a differant post.But here it is again
Windex window cleaner applied to a section at time, in a few minute`s you will be able to lift out the track. If you leave it alone it will harden back in.
One of our friends thought car window washer fluid might work as well, but I haven`t tried that.
Rope for Tea Totallers
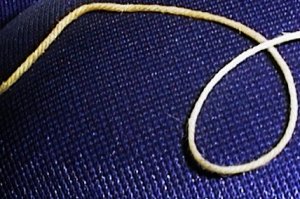
Scale rope is not very expensive, but this is free if you drink tea, and you don't need any long pieces. If you drop the whole bag into the tea, string and all, it comes pre weathered. It has, as you can see, the twisted appearance of real rope and not a lot of "fuzzies" like in cotton thread.
Scale rope is not very expensive, but this is free if you drink tea, and you don't need any long pieces. If you drop the whole bag into the tea, string and all, it comes pre weathered. It has, as you can see, the twisted appearance of real rope and not a lot of "fuzzies" like in cotton thread.
Attachments
Chris:
I saw some commercial windows recently; not sure where.
I think that one way would be to put pictures of them on transparency and light the inside. But if you look at them from the outside, they usually don't show up at all; all the detail and colour is lost.
I've got a Superquick kit with a few on paper; any interest in a copy?
Being a newbie this thread is great!!!!!
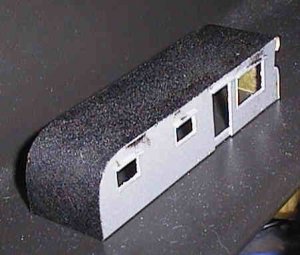
I have found that being on a limited layout budget has helped my imagination when it comes to building things from scratch. I bought a foam cutter from Michael's craft store for $6.00 and have learned how to use that bad boy as if it were a scalpel... your options are almost limitless as you can contruct tunnel portals, retaining walls... and many other things on your layout. you can cut brick patters, random stone, currogated steel, concrete, and wooden timber patterns right into the blue foam. With a little painting and weathering you can't even tell it is foam!!
I have found that being on a limited layout budget has helped my imagination when it comes to building things from scratch. I bought a foam cutter from Michael's craft store for $6.00 and have learned how to use that bad boy as if it were a scalpel... your options are almost limitless as you can contruct tunnel portals, retaining walls... and many other things on your layout. you can cut brick patters, random stone, currogated steel, concrete, and wooden timber patterns right into the blue foam. With a little painting and weathering you can't even tell it is foam!!
Stained Glass Windows
Hi Chris ...Here's a "down and dirty" way to make stained glass windows. The pic is self explanatory. I didn't try it but I think you could take the "master" drawing to a copyshop that has a color laser copier and have them copy it on to a transparancy sheet. That would eliminate having to "sandwich" the paper and you could just cut out what you needed. Hope this helps
Hi Chris ...Here's a "down and dirty" way to make stained glass windows. The pic is self explanatory. I didn't try it but I think you could take the "master" drawing to a copyshop that has a color laser copier and have them copy it on to a transparancy sheet. That would eliminate having to "sandwich" the paper and you could just cut out what you needed. Hope this helps
Attachments
P
philip
my two cents
Ladies and Gentlemen: For roofing material I use copper foil. Copper foil can be purchased at any stained glass art supplier. It comes in a large roll and is sticky on one side. About 8 bucks per roll.
philip
Ladies and Gentlemen: For roofing material I use copper foil. Copper foil can be purchased at any stained glass art supplier. It comes in a large roll and is sticky on one side. About 8 bucks per roll.
philip
Getting those kit chimney to look right
Trying to get the chimney that comes in the kits to sit right and look good on a pitched roof is a pain.
What I do is measure the chimney width and mark it on the roof. With a file notch down through the peak, checking the fit every once in awhile.
It looks like its coming through the roof, insted of "just sitting" on it.
Dullcote
Hi Gang....Here's something that you may not be aware of....Did you know that Testors packages Dullcote in two different kinds of cans and that one is far superior to the other?
The first way is Testors Dullcote in the blue and white can. This is the one that you usually find at places like Wal~Mart. These cans have a COARSE spray nozzle and can make quite a mess if you are not real careful with it.
The second way is Testors ModelMaster Dullcote in a black and silver can. You can find this one at hobby shops that sell ModelMaster Military/Automotive Paints. It has a FINE spray nozzle and will create just a light mist of the Dullcote which is excellent for the type of things we do in model railroading.
The Drawback....The ModelMaster is about $1.50 more per can and the can just isn't any bigger.
The Solution....Just buy one can of the ModelMaster and when you have used it all up pull the nozzle off. Then you can use that FINE nozzle on the regular blue and white cans (it fits) and get the same result.
HeHeHe! The Robber Barron strikes again!
Hi Gang....Here's something that you may not be aware of....Did you know that Testors packages Dullcote in two different kinds of cans and that one is far superior to the other?
The first way is Testors Dullcote in the blue and white can. This is the one that you usually find at places like Wal~Mart. These cans have a COARSE spray nozzle and can make quite a mess if you are not real careful with it.
The second way is Testors ModelMaster Dullcote in a black and silver can. You can find this one at hobby shops that sell ModelMaster Military/Automotive Paints. It has a FINE spray nozzle and will create just a light mist of the Dullcote which is excellent for the type of things we do in model railroading.
The Drawback....The ModelMaster is about $1.50 more per can and the can just isn't any bigger.
The Solution....Just buy one can of the ModelMaster and when you have used it all up pull the nozzle off. Then you can use that FINE nozzle on the regular blue and white cans (it fits) and get the same result.
HeHeHe!
The Robber Barron strikes again!
C
Catt
as suggested I'm posting this here
Here's a pic of my favorite scratchbuilding weapon.Do you know what it is?

Give up? It's a nibler,it is used to make holes in control panels(metal) to install switches and lights and meters.It also works in styrene to cut out door ways and windows.
I use this to cut out doorways and windows in any scale I'm working in (as long as the opening is larger than a 1/4".
I bought this one from Radio Shack but I understand that Micro-Mark also has them.In fact any store that sells electronics supplies should have them for under 10 bucks
Here's a pic of my favorite scratchbuilding weapon.Do you know what it is?
Give up? It's a nibler,it is used to make holes in control panels(metal) to install switches and lights and meters.It also works in styrene to cut out door ways and windows.
I use this to cut out doorways and windows in any scale I'm working in (as long as the opening is larger than a 1/4".
I bought this one from Radio Shack but I understand that Micro-Mark also has them.In fact any store that sells electronics supplies should have them for under 10 bucks
dullcote
if you put the can in some hot water for a little bit before shaking it will spray beter too rich
if you put the can in some hot water for a little bit before shaking it will spray beter too
rich- Status
- Not open for further replies.