Tips-n-Tricks

Status
Not open for further replies.
C

Catt

This is where you post your favorite tips-n-tricks you've learn while modeling.Like the rest of this forum it is multiscale:D

Some new rules to follow :(

1 This forum is for your tips and tricks ONLY.Any other posting will be deleted.

2 If you see a tip or trick that you want to know more about start a thread in the S&B forum with the tipster's name in the title.

Don't be bashful about posting your tips & tricks thinking everybody else knows this already there are new people coming into the hobby all the time.
 

jon-monon

Active Member
Dirt "wash"

I had trouble with my wash "beading up" like water on a waxed car. So when I sprayed laytex wash on my models, I was getting huge spots instead of streaks. I modified the mix by adding a few drops of dishsoap as a surfactant and shaking up the bottle. It worked great!

jon
 

jon-monon

Active Member
Tip #2

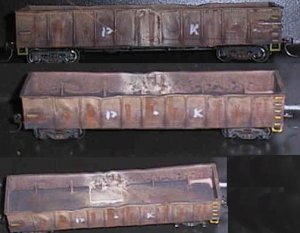
I read this one somewhere on the web, take a paperclip or very small paint brush and place a dab of your favorite rust color. Let it half dry and pull it straight down with a clean dry brush, paper towel or just your finger. The result is a rust hole with a streak coming down from it.

http://www.ultimatejeep.com/monon/P-Kgondo.html

I first tried this on the P-K gondo.

jon
 
C

Catt

This is one of the neatest things I've found for scratchbuilding.

3mtape2.jpg


It has adhesive on both sides and is transparent.

You just glue your drawing to your work surface (piece of window glass,masonite ,plywood, whatever).I use DURO all-purpose spray adhesive.Then lay the tape over your drawing ,cut and fit all of the pieces then just press them down onto the tape(they won't move).Once everything is layed out to your satisfaction apply your glue,let it set up and peel it off the tape (carefully) and start the next piece.

Depending on how much you touch the tape with your bare hands you should be able to get all the pieces you need made up with just one application of tape.
 

Vic

Active Member
To elaborate on Catt's tape trick just a bit...cover the plan or drawing after its glued down tightly with a piece of wax paper. That way the glue doesn't ruin the plan and you can use it again or you can send it to a Robber Barron who will duplicate your expensive building kit:D :D :D :p The tape will stick to the wax paper.
 
Getting back to double-sided tape.....

Probably everyone knows this, but just in case..... Double-sided tape is great for painting parts like truck side frames, etc. Stick the tape down on a scrap of wood or cardboard, and touch the parts to it. About the easiest way to hold them whether you're brushing or spraying.

Bill S
 

pcentral

Member
Easy and disposable paint tray
Cut the bottom 3/4" or so of a 2 liter soda bottle off. Put a little bit of the colors you're going to use in each dimple. Use empty dimples for mixing colors. When your done painting throw the tray away, no clean up.
 

pcentral

Member
Heres a tip I just learned. Take the twist tie strips that come in the box of garbage bags. These make nice looking corrugated tin. Cut to size for roofs, fences, etc. glue framing on the flat side. Paint it all silver and weather to your liking and install your new roof, fence or whatever else you want to use it for.
 

billk

Active Member
Sometime back the wife replaced one of the kitchen counter tops with what appears to be some kind of stone. Anyway, out of the deal I got a slab, maybe 8" x 15" by 1", polished and dead flat on top. It works great to put on top of your work bench as a working surface. Can't burn it or cut it, solder doesn't stick at all and paint does barely, etc. And of course, it is stable as a rock!
 

sumpter250

multiscale modelbuilder
rockislandmike's thread "buildings",in technical QandA, reminded me of one tip. I use "Squadron green" putty, and have found that a little Testors liquid styrene cement applied on the putty will help smooth the putty, and help it flow into some of the smaller scratches.
Pete
 

spitfire

Active Member
Here's a couple of "tips" from a novice modeller. I put it in quotes cuz I'm sure you folks already know this, but anyway here goes...

1. Waxed paper - the stuff that used to be used for wrapping sandwiches before Saran Wrap came along (oooh, I'm dating myself). Use it to cover the work surface when cementing parts together. If a little solvent leaks out the back side, your model will not stick to the wax paper.

2. Another tip involving misplaced glue. :rolleyes: I was building a bridge support out of girders and I-beams and used a little too much solvent. Oops, big nasty fingerprint at the bottom end of the I-beam where I was holding it together. Solution - cover with rust - now that nasty mistake looks like totally corroded metal. Another job well done! ;)
 

WVRR

New Member
Quick Tip

Here's a tip for anyone that lights their structures. Try gluing the negatives from your developed film in behind window panes. This especially works well for buildings that are in city or town scenes and make the buildings come alive at night with activity.
Ed
 

pcentral

Member
Here's an easy way to glue ballast. I use a eye dropper available from your local drug store. After spreading the ballast in and using a paint brush to spread it in between the ties, I use the eye dropper to put a drop or two in between each tie. The glue will seep out to the edges on its own, if not add another drop.
 

jon-monon

Active Member
If you live in a state where you can buy syringes, they also work great as a dropper, and are also useful for dispensing paints and stuff that doesn't drop so well. I usually use them without a needle. I get the plastic caps so I can also use them for storage (I keep one with a 50/50 mix of black/brown latex paint for painting the bottom of rolling stock, then I can just squirt some out when I need it rather than mixing it up each time). I use a flat tip (dull/non-imjection type) needle for stuff like oil, glues, etc. If there are kids around, I would skip the needles all together. 3 mL seems to be a nice size. Diabetic size is way too small. Med supply, pharmacy, or know someone at the hospital.

jon
 
ripping scale lumber on table saw

The width on most table saw's blade plate's are to wide to make most sizes of scale lumber . Here's a way I've found to make accurate 12"x 12", 6"x 12" etc. in HO. Using a scrape piece of plastic laminate.

Lower the blade so it's below the top surface then lay the thin piece of laminate on the table surface. next slide the table saw's fence over the laminate and set it for what ever size lumber to be run. Then turn the saw on and slowly raise the blade it will cut through the laminate making a slit only as wide as the blade.

t.
 

RI541

Member
I've got a couple tricks for roofing,

1) Most industries have sone roofs to get this effect I paint the surface with a flat black paint to simulate the rubber roof under it, then while the paint is still wet I sprinkle fine ballst over the paint libraly, gently rolling it around with my fingers. The only problem with this is I model N-Scale and the fine ballast is a little to big but I'm still happy with the effect. Larger scale would have no problems finding the right size ballast.

2) to simulate rolled roofing or felt paper I used Silkspan Which most hobbie shops will carry for their model airplanes. I cut the strips the width I need then I paint the roof with flat black and lay this down on the paint. You have to start at the bottom to get the over lap effect. then I paint the roof as I lay the silkspan. The silkpan will shrink as it dries and makes a beautiful roof. I use flat back to make the roof look aged.
 

Drew1125

Active Member
Flat Car Decks

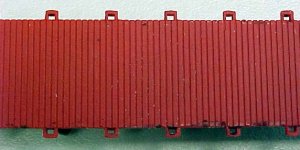
Here's one of those molded plastic flat car decks...not as realistic looking as it could be.
(cont. in the next post...)
 

Attachments

  • mvc-026f.jpg
    mvc-026f.jpg
    36.7 KB · Views: 994

Drew1125

Active Member
Flat Car Decks cont.

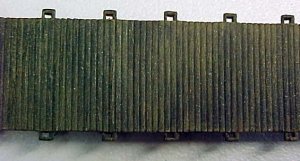
I take the point of a hobby knife, & deepen the plank separations, & also rough up the surface a little...
Then I paint the deck with some thin Floquil Engine Black...
After this dries, Y dry-brush with some acrtlic brown colors, leaving a lot of the black to show through.
It kinda looks like a wooden deck that gets used a lot.
 

Attachments

  • mvc-027f.jpg
    mvc-027f.jpg
    43.5 KB · Views: 1,180
Status
Not open for further replies.
Top