Royal Guard / Imperial Guard Tie Interceptor

mijob

Tie designer
Staff member
Moderator
Jul 5, 2020
3,159
5,366
95
54
Netherlands
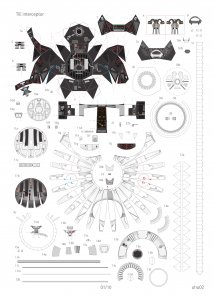
When I was browsing the internet I found this beauty.
The royal guard TIE interceptor.
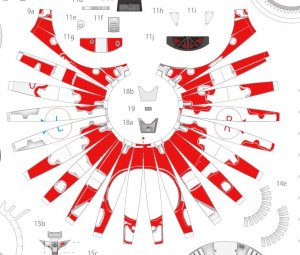
Is it possible to change the colours from the pdf files of UHU's Tie interceptor?
Royal Guard TIE interceptor.JPGRoyal Guard TIE interceptor_02.JPG

This will become the first papercraft royal guard Tie interceptor
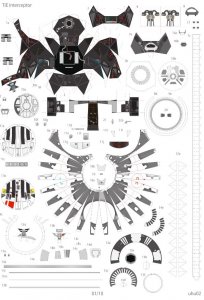
 
Last edited:

zathros

*****SENIOR ADMINISTRATOR*****
Staff member
Administrator
Moderator
Apr 5, 2013
13,496
9,548
228
That is cool looking!!! :)
 

Revell-Fan

Co-Administrator
Staff member
Administrator
Moderator
Aug 1, 2009
11,593
12,330
228
Vreden
You have run into the same issue like me. PDFill doesn't transform two layers and produces the result you have now. Gimp works better. Just drag and drop the *.pdf into the main window, choose 300 dpi for import and hit OK. This will give you the correct page with all layers transformed. I have attached the first page. ;)

Please note: Use *.png for editing because it compresses losslessly. I was forced to upload a *.jpg because I got an error message saying the file was too big (2.33 MB).
 

Attachments

  • tiein1.jpg
    tiein1.jpg
    799.3 KB · Views: 11

Revell-Fan

Co-Administrator
Staff member
Administrator
Moderator
Aug 1, 2009
11,593
12,330
228
Vreden
Not bad! :)

BTW, if you want to keep the shadings make use of the layers in Gimp.

Activate the select tool and click into the white background area of the page. Invert the selection. This will give you a quick and easy selection around the parts outline:

1600972412141.png

Create a new transparent layer in the layer dialogue box:

1600972461757.png

Choose your colour and bucket fill the selection or paint the desired parts with the paintbrush on the new layer:

1600972625310.png

Play around with the different layer modes and transparency settings till you have found a pleasing result. This is using "colour":

1600972832258.png

soft edges:

1600972876920.png

burn:

1600972967955.png

Since you are working on a new layer you may manipulate the painted areas further with the eraser and other tools without altering the base image. Then save as *.xcf file to keep all layers intact for future editing and export as *.png to flatten the image for printing.

;)
 
Last edited: