

Thanks, painting is not my forte. I look on it as a disagreeable task that keeps me from model building. Ha!
Blackadder's Scratchbuilt Thunderhawk Redux
- Thread starter Blackadder
- Start date
You are using an out of date browser. It may not display this or other websites correctly.
You should upgrade or use an alternative browser.
You should upgrade or use an alternative browser.

This image is a bit better it shows the steering yoke mechanism which is unlike any AC I ever worked on but I guess the genetically enhanced SM don't need fly by wire or hydraulic assist to steer a T'hawk

Much better image but the pudgy faced guy in the Capt'n seat seems a bit out of focus.

Cockpit seat is a bit tilted in this side view before I install mounting magnets...

And finally the cockpit flight panel before I install the video flight displays (EICAS) engine-indicating and crew-alerting system (EICAS) is an integrated system used in modern aircraft to provide aircraft crew with aircraft engines and other systems instrumentation and crew annunciations.

Seems to be a distinct minimum of instrumentation
for a re-entry vehicle but I guess those plugs in the backs of their heads provide data directly to the brain synapses.
Much better image but the pudgy faced guy in the Capt'n seat seems a bit out of focus.
Cockpit seat is a bit tilted in this side view before I install mounting magnets...
And finally the cockpit flight panel before I install the video flight displays (EICAS) engine-indicating and crew-alerting system (EICAS) is an integrated system used in modern aircraft to provide aircraft crew with aircraft engines and other systems instrumentation and crew annunciations.
Seems to be a distinct minimum of instrumentation
for a re-entry vehicle but I guess those plugs in the backs of their heads provide data directly to the brain synapses.
Thanks for the reply,
E.I.C.A.S. Instrumentation: (Engine-indicating and crew-alerting system)
As mentioned above computer monitor instrumentation was 'state of the art' when I left the aircraft field replacing the 'mechanical ribbon' instrument found in older aircraft such as the Lockheed L1011 (Gad, what a POS!)
Anyway the FAA said that the monitor displays could be used as the primary instrumentation so long as there were a discrete component instrument as a secondary back up.
In the far flung future that craven conditional; isn't, er wasn't, er won't, er will not have been necessary.
Seen below I attempted to duplicate the EICAS displays with images I downloaded from google,
printing them at greatly reduced sizes and cutting them out and pasting the instruments on the four blank displays.....

A simple yet effective way to duplicate vehicle gauge and annunciator panels.
Hey, Blackadder's using paper!
E.I.C.A.S. Instrumentation: (Engine-indicating and crew-alerting system)
As mentioned above computer monitor instrumentation was 'state of the art' when I left the aircraft field replacing the 'mechanical ribbon' instrument found in older aircraft such as the Lockheed L1011 (Gad, what a POS!)
Anyway the FAA said that the monitor displays could be used as the primary instrumentation so long as there were a discrete component instrument as a secondary back up.
In the far flung future that craven conditional; isn't, er wasn't, er won't, er will not have been necessary.
Seen below I attempted to duplicate the EICAS displays with images I downloaded from google,
printing them at greatly reduced sizes and cutting them out and pasting the instruments on the four blank displays.....
A simple yet effective way to duplicate vehicle gauge and annunciator panels.
Hey, Blackadder's using paper!
The Thunderhawk was probably my least favorite for most of five years and I devote very little of my time to it. Sometimes when I am in the doldrums after finishing a model I resume work on the T'hawk but as soon as something else takes my fancy I put it on back burner.
This time may be different as I am so close to finishing it.
The Best Laid Plans
Of mice and men ofttimes go awry. I had intended for this transport to have the capability to disgorge a Rhino but it seems the interior panels have taken up too much clearance.

Not to worry, I have an alternate plan (A 'cunning plan" mayhaps Mr. B?)

My initial intent was to have clam-shell doors à la C124 and assault ramp to accommodate the width of a slick Rhino but I put that aside until I had a good idea of the interior panels requirements. That project is still on the table.
This time may be different as I am so close to finishing it.
The Best Laid Plans
Of mice and men ofttimes go awry. I had intended for this transport to have the capability to disgorge a Rhino but it seems the interior panels have taken up too much clearance.
Not to worry, I have an alternate plan (A 'cunning plan" mayhaps Mr. B?)
My initial intent was to have clam-shell doors à la C124 and assault ramp to accommodate the width of a slick Rhino but I put that aside until I had a good idea of the interior panels requirements. That project is still on the table.
You may as well know I enjoy writing these articles. The sharing of my work especially when someone asks a technical question makes the effort worthwhile Plus I get to unleash my poor attempt at humor to a captive audience.....
Inside Out:
Or how not to build an interior.
My ambition has exceeded my good sense as when I started this project I gave little thought to so extravagant an interior. Now I am reaping the benefit of my lack of forethought.

Fortunately I have ample panels to access the interior for modification and upgrade
BTW the image above shows the basic nascent Space Marine harness device to safe transport to the planet to be modularly installed into the upper gallery rectangular receptacles shown in the background. This would in fact be the whole length of the upper gallery but for my purposes just the front hanger will be seen.
See, I'm not completely crazy................
Inside Out:
Or how not to build an interior.
My ambition has exceeded my good sense as when I started this project I gave little thought to so extravagant an interior. Now I am reaping the benefit of my lack of forethought.
Fortunately I have ample panels to access the interior for modification and upgrade
BTW the image above shows the basic nascent Space Marine harness device to safe transport to the planet to be modularly installed into the upper gallery rectangular receptacles shown in the background. This would in fact be the whole length of the upper gallery but for my purposes just the front hanger will be seen.
See, I'm not completely crazy................
There Is No Joy In Mudville:
No, I've tried quite a few different pigments and airbrush combinations on various scrap and even on the T'hawk itself 'Horrors! ' and I have found nothing I like better than powdered Aluminum and powdered Graphite hand rubbed into Flat Black Primer so after much soul searching I'm committing to Gray Knights colour scheme and an all metal finish to my Hawk.

after about fifteen minutes of of application I feel I made the correct decision, nothing brings out the detail of this model like hand rubbed Aluminium. Note the flat black front and tail still yet to have the aluminum applied.........
Pewter Thunderhawk: (Grey Knights colours still to come.)

Oh Gawd, finally for the first time completely together after six years in the making, my very own scratchbuilt version of the Thunderhawk. At 26 inches long and fully articulated; weapons, wings, and landing gear; it's most gratifying to be able to present this effort.

There are a few production glitches:
All three gears need to be lock indexed to keep from swiveling.

The rear shock struts need to be spring loaded to take the weight without collapsing.
The rear floor of the forward cargo bay needs to be locked down.

The ball turrets need mount brackets.
and of course the interior lighting.
The loading ramp needs an extension to make the disembark angle less extreme...........
but all told a most gratifying moment to see this for the first time assembled in her full glory.
Martini time; Skoal!
No, I've tried quite a few different pigments and airbrush combinations on various scrap and even on the T'hawk itself 'Horrors! ' and I have found nothing I like better than powdered Aluminum and powdered Graphite hand rubbed into Flat Black Primer so after much soul searching I'm committing to Gray Knights colour scheme and an all metal finish to my Hawk.
after about fifteen minutes of of application I feel I made the correct decision, nothing brings out the detail of this model like hand rubbed Aluminium. Note the flat black front and tail still yet to have the aluminum applied.........
Pewter Thunderhawk: (Grey Knights colours still to come.)
Oh Gawd, finally for the first time completely together after six years in the making, my very own scratchbuilt version of the Thunderhawk. At 26 inches long and fully articulated; weapons, wings, and landing gear; it's most gratifying to be able to present this effort.
There are a few production glitches:
All three gears need to be lock indexed to keep from swiveling.
The rear shock struts need to be spring loaded to take the weight without collapsing.
The rear floor of the forward cargo bay needs to be locked down.
The ball turrets need mount brackets.
and of course the interior lighting.
The loading ramp needs an extension to make the disembark angle less extreme...........
but all told a most gratifying moment to see this for the first time assembled in her full glory.
Martini time; Skoal!
Attachments
I agree with your decision of the rubbed aluminum...there is a big difference in CGI effects and real life!! and the CGI like in The Lord Inquisitor just don't work in real life...I think your version works and is VERY NICE...some strategic lighting, dark background and that baby will POP!! :Bravo:
Thanks for the reply,
Blackadder's Fun and Games
Perhaps I should stick to what I know but this was kind of fun:


Blackadder's Fun and Games
Perhaps I should stick to what I know but this was kind of fun:
Thanks for the reply,
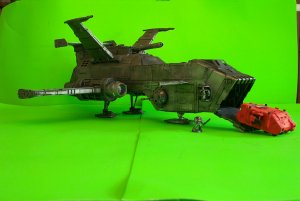
Lipstick On A Pig:
Ugly as a Warthog most definitely and I finally found my antique can of Krylon 'Rust' Primer this past week; now I can begin painting the detail.

So with the masking tape removed it's a bit of a letdown

I plan to activate my airbrush later this weekend and see what I can do to perk these images up.

Lipstick On A Pig:
Ugly as a Warthog most definitely and I finally found my antique can of Krylon 'Rust' Primer this past week; now I can begin painting the detail.
So with the masking tape removed it's a bit of a letdown
I plan to activate my airbrush later this weekend and see what I can do to perk these images up.
The Assault Door Lacks Panache:
It seems I've been too conservative embellishing the front door. Besides the ho-hum paint job the loading ramp is rather bleak so it's back to the drawing board to try to perk up this dismal effort; in point of fact the whole nose of this work is pretty bland.

Whom I kidding; I don't have a drawing board but instead....
Eureka! I've found it while contemplating my next iteration of the loading ramp I've just thought of how I can extend the ramp to make the egress more user friendly.

And the paint erosion needs to be toned down a tad as well.
It seems I've been too conservative embellishing the front door. Besides the ho-hum paint job the loading ramp is rather bleak so it's back to the drawing board to try to perk up this dismal effort; in point of fact the whole nose of this work is pretty bland.
Whom I kidding; I don't have a drawing board but instead....
Eureka! I've found it while contemplating my next iteration of the loading ramp I've just thought of how I can extend the ramp to make the egress more user friendly.
And the paint erosion needs to be toned down a tad as well.
Assault Door Redux:
Oh yes much more business like. I had to fake the sensor units on the doors as the images I have are pretty vague

and there is only one that I can discern on the left side of the nose.

The right one is a pure fabrication I put in just for artistic balance.

More painting to come but I had to see how this would look before I continue.
Oh yes much more business like. I had to fake the sensor units on the doors as the images I have are pretty vague
and there is only one that I can discern on the left side of the nose.
The right one is a pure fabrication I put in just for artistic balance.
More painting to come but I had to see how this would look before I continue.
Done! I've pretty much caught up to my other forums with regards to updates compressing the past years into a few months. This has been a long haul for me with many second thoughts on whether this project was worthy of my time when there are so many I'd prefer working on. It is a perversion of mine to flog a dead horse, my OCD won't let me quit. In this case I am glad I persisted as the results are most gratifying.........


There is a lot of bits left to do on this; beef up the main landing gear struts, finish the interior and of course add some lighting but first things first I need to make the slings for the external Land Raider mount; yeah this will have all the bells and whistles of a heavy armour transport............
So next the Land Raider must be built; see you next post and thanks for watching.
I really like how this is coming together! This is starting to look better than the "Game Works" version!
- Apr 5, 2013
- 13,876
- 10,214
- 228
I knew, that towards the end, or at the end, would be a picture of the ship flying. I expect the final picture of you in it flying off, for real, and we were snookered into watching you build a real one. ")

Years ago when I began this project in my naivete I thought the Thunderhawk was able to transport a Land Raider. I did not know the FW model was too small to have that capability. So my son and I based our model on the size of a Land Raider slung beneath the seeming cutout in the belly that ideally fit the tracked APC to the flying APC.

Today I began painting the Land Beastie after a preliminary assembly used a light gray spray primer to paint the interior which was fast and easy (took about five minutes)


I heartily recommend doing your base coating with cheap spray paint as opposed to expensive GW Citadel paints as so many are wont to do. $0.99 cents a can at Walmart, fast drying and plus it provides a durable base coat for your more expensive detailing acrylics.

So here we have the Land Raider neatly tucked up under the the Thunderhawk albeit in it's slick mode as I used most of the armament on the Thunderhawk......whoops!
Today I began painting the Land Beastie after a preliminary assembly used a light gray spray primer to paint the interior which was fast and easy (took about five minutes)
I heartily recommend doing your base coating with cheap spray paint as opposed to expensive GW Citadel paints as so many are wont to do. $0.99 cents a can at Walmart, fast drying and plus it provides a durable base coat for your more expensive detailing acrylics.
So here we have the Land Raider neatly tucked up under the the Thunderhawk albeit in it's slick mode as I used most of the armament on the Thunderhawk......whoops!
Thanks for the reply,
Yeah I know someone building a Land Raider is about as exciting as watching ice melt but I'll try to make it interesting.
After spray painting the interior gray I proceeded to apply a coat of black primer to the exterior of the hull.


I left as many parts as I could removable; I had no idea Land Raiders were so complex. Seems like they're built like a house of cards and the front loading door is a masterpiece of engineering, kudos to that. I'll have to keep that trick in mind for a future scratch project.

After the paint dried I began applying the Grey Knights Aluminum Metallic powder.


So you're telling me Blackadder, that after all that we're gray again.....
Yeah I know someone building a Land Raider is about as exciting as watching ice melt but I'll try to make it interesting.
After spray painting the interior gray I proceeded to apply a coat of black primer to the exterior of the hull.
I left as many parts as I could removable; I had no idea Land Raiders were so complex. Seems like they're built like a house of cards and the front loading door is a masterpiece of engineering, kudos to that. I'll have to keep that trick in mind for a future scratch project.
After the paint dried I began applying the Grey Knights Aluminum Metallic powder.
So you're telling me Blackadder, that after all that we're gray again.....