

Battlestar Galactica - Light Bomber "Aurora" - Viper concept by Andrew Probert
- Thread starter Revell-Fan
- Start date
You are using an out of date browser. It may not display this or other websites correctly.
You should upgrade or use an alternative browser.
You should upgrade or use an alternative browser.

These
These are beautiful! They would make for some beautiful builds. To compliment a BSG collection.
These are beautiful! They would make for some beautiful builds. To compliment a BSG collection.
It's update time, folks! ")
The next major component has been assembled and this is how it was done:

The bottom cover features three moving hatches.


This tiny triangle is a sensor array; however, it simultaneously serves as a handle to move the middle hatch up and down.") It is put through the small hole and glued to the back of the bottom piece.
It is put through the small hole and glued to the back of the bottom piece.


The next major component has been assembled and this is how it was done:
The bottom cover features three moving hatches.
This tiny triangle is a sensor array; however, it simultaneously serves as a handle to move the middle hatch up and down.
It is put through the small hole and glued to the back of the bottom piece.
Last edited:

This is the flare launcher.

The rectangular pieces are laminated to 1.5 mm card.

The frame is glued behind the middle hatch.


The assembled flare launcher

is put through the hole

and glued to the hatch. A view from the back side:

The landing gear compartments are installed:


The bottom radiators:

The rectangular pieces are laminated to 1.5 mm card.
The frame is glued behind the middle hatch.
The assembled flare launcher
is put through the hole
and glued to the hatch. A view from the back side:
The landing gear compartments are installed:
The bottom radiators:


VERY NICE!!!
I like the flare launcher. I like how it tucks away and is really not seen until it is deployed. It looks GREAT!!!
I like the flare launcher. I like how it tucks away and is really not seen until it is deployed. It looks GREAT!!!
Last edited:
The engine section is next. There are four thrusters


and four engine tubes:


and four engine tubes:
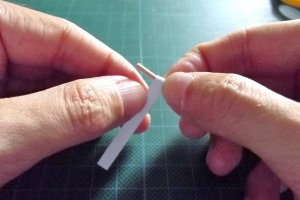
I was thinking thoroughly about the detailing of the tubes. I could have gone the easy way and made them as straight tubes without any 3D elements, but I felt that wouldn't do justice to the plane. So I decided to go the full route, add a step and attach some small tubes around the front end of the engines just like the ones found on the Viper.
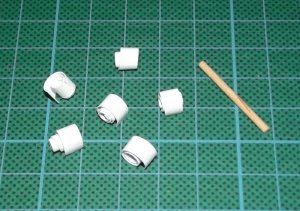
To make the job easier I chose to use some toothpicks.

There are 36 tubes in total.

Almost each of them features two small pieces of paper wrapped around.


Three ready ...

... 33 STILL TO GOOOOOOO!!!!! :nailbiting::nailbiting::nailbiting::nailbiting::nailbiting:
( )
)
To make the job easier I chose to use some toothpicks.
There are 36 tubes in total.
Almost each of them features two small pieces of paper wrapped around.
Three ready ...
... 33 STILL TO GOOOOOOO!!!!! :nailbiting::nailbiting::nailbiting::nailbiting::nailbiting:
(
)Attachments
- Apr 5, 2013
- 13,876
- 10,214
- 228
They way you spiraled those tubes is also a great way to make the inside of tires, and preventing them from collapsing, making a greater gluing area, and also, allowing for a center Rim to be made, as the rubber part of the tire would be very strong.
This model is awesome!
This model is awesome!
;-) Many people listening to Zathros;-) isn´t it true?
Wonderful build - great ship. Looks rather difficult - nevertheless - hope some time it will be available as a resource.
Congratulations to your skills Revell-Fan.
Wonderful build - great ship. Looks rather difficult - nevertheless - hope some time it will be available as a resource.
Congratulations to your skills Revell-Fan.