This is very nice! You're right, novamodel has beautiful designs, and surprisingly some are offered for free. i have in mind to build one, but i don't have decided which one yet. Could it be the ЗИЛ-130 (i don't know any russian, don't know what ЗИЛ means).
AC-30(130)-65A firetruck by NovaModel build log.
- Thread starter Boris
- Start date
You are using an out of date browser. It may not display this or other websites correctly.
You should upgrade or use an alternative browser.
You should upgrade or use an alternative browser.
Haha nice one! A while ago i learned that google translator doesn't always help me, trying to register in a russian website. No matter what i wasn't able to resolve the captchas. Long words, Ciliric (i think) characters i don't know, the captcha can't be copied and pasted (this is the key, i think what really didn't help me was the copy&paste tool). Eventually i gived up.
I see. I don't know why, i assumed that you were from America. Here in my country the schools only teach english and french in primary, and some schools (very few) in secondary teach german. Everything else has to be learned from institutes.
btw, dind't mean to go offtopic
btw, dind't mean to go offtopic
Well Russian is my mother tongue. And yes, Boris is my real name. And I also have problems with captcha in Russian
I think all Novamodel designs are free.
I don't mind off-top in my threads
Revell-fan, you should try pronouncing холодильник саморазмораживающийся. That's a real jawbreaker.


I think all Novamodel designs are free.
I don't mind off-top in my threads
Revell-fan, you should try pronouncing холодильник саморазмораживающийся. That's a real jawbreaker.
Interesting! thumbsupI see. I don't know why, i assumed that you were from America. Here in my country the schools only teach english and french in primary, and some schools (very few) in secondary teach german. Everything else has to be learned from institutes.
Now hear this (and brace yourself):
I am German and my first name is French.
:Grin:
When I was preparing for my general qualification for university entrance I had the choice between physics / chemistry and another foreign language. I was not much interested in the first but thought the latter could become useful in life later. Since I already had English and French I chose Russian. My teachers warned me because experience showed that this combination could be deadly. I noted their concerns but kept the language. Needless to say, it worked very well.
холодильник саморазмораживающийся
halladilnik samarasmarashivaiushi-icia - I think I have just gotten a new favourite term!


I won't tell anyone what it means - but I have one of those things. A pretty BIG one..!
THANK YOU!
Last edited:
Y'all Multi-Lingual people making us single language people's heads hurt. and give Google Translator a work out.
Ihr mehrsprachigen Leute macht uns die Köpfe der einsprachigen Leute weh. und geben Sie Google Übersetzer eine Arbeit.
Вы многоязычные люди, заставляющие нас болеть на одном языке. и дать Google Translator работу.
Ihr mehrsprachigen Leute macht uns die Köpfe der einsprachigen Leute weh. und geben Sie Google Übersetzer eine Arbeit.
Вы многоязычные люди, заставляющие нас болеть на одном языке. и дать Google Translator работу.
Last edited:
Estupendo.
En nu gaan we verder met de modelbouw.
(I forgot to mention, I live near the Dutch border..! )
)
En nu gaan we verder met de modelbouw.
(I forgot to mention, I live near the Dutch border..!
Slowly but steadily, this build continues. Since the parts are covered by thick Americana layer, it is almost impossible to use a white glue which I always prefer. I found a bottle of universal acrylic glue which is much stronger than white paper glue. It gives quite Glossy seam which I really didn't like, but this time the parts are glossy, so it's OK.
The rear wing parts are supposed to be edge joined, but I don't like edge gluing. So I prepared small gluing strips using some 80 gsm paper scraps.
The process is very slow since I have to allow the glue to dry completely before moving on and this glue is drying not so fast as i would like it to dry...
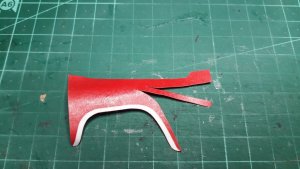
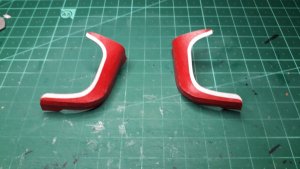
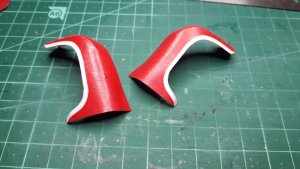
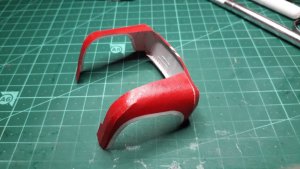
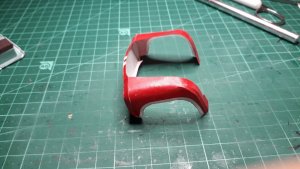
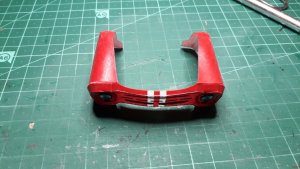
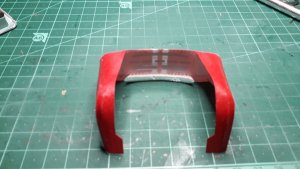


- Apr 5, 2013
- 13,876
- 10,216
- 228
Those Fenders, the whole front end, came out excellent!!
I know many people who speak many different languages, and many who speak many languages themselves. I know more people that only speak American English and are oblivious to any other language reference. They miss out on jokes, the origin or words. It's a product of our educational system, and the fact that many people spend their lives never going more than a couple of hundred miles from home, and in the U.S., that may mean never leaving your own state. Kind of sad. They lose much.
I know many people who speak many different languages, and many who speak many languages themselves. I know more people that only speak American English and are oblivious to any other language reference. They miss out on jokes, the origin or words. It's a product of our educational system, and the fact that many people spend their lives never going more than a couple of hundred miles from home, and in the U.S., that may mean never leaving your own state. Kind of sad. They lose much.
Hello all.
Continue with the wheels. Oh, boy... That took me a lot of time.
Each wheel is made from:
2 Tire side bases from cereals box
2 tire sides
1 tire thread ( the part that actually touches the ground)
1 tire bottom
1 rim (a parer ring 2 mm wide )
1 rim cone
2 rim center pieces for front wheel
1 rim center for internal rear wheel
1 rim center and 2 piece hub on the outer rear wheel.
Many edge-gluing. The threads are glued to side bases' edges. The whole rim is edge glued. A lot of small connections, hoping it will eventually becomes strong enough wheel to hold the model's weight.
View attachment 183008View attachment 183009View attachment 183010View attachment 183011View attachment 183012View attachment 183013View attachment 183014View attachment 183015View attachment 183016View attachment 183017View attachment 183018View attachment 183019View attachment 183020
The tire sides are made round to simulate the real wheel tire roundness.
There's a need to strike a circular line on the middle of the tire side. Tried to do this by my cutting compass - the result looked awful. So I made a template from cerial box cardboard to stroke a line around it with my awl. I liked this idea, maybe someone will use it. View attachment 183021View attachment 183022View attachment 183023
Yes these wheel constructions are VERY hard to do . You make it look easy. Wish I saw this first before building the wheels for the panther crane. Your cuts on your other sections and for the wheels are very well done and clean. Love the work you have done so far. GREAT JOB!
Sky Seeker
Those Fenders, the whole front end, came out excellent!!
I know many people who speak many different languages, and many who speak many languages themselves. I know more people that only speak American English and are oblivious to any other language reference. They miss out on jokes, the origin or words. It's a product of our educational system, and the fact that many people spend their lives never going more than a couple of hundred miles from home, and in the U.S., that may mean never leaving your own state. Kind of sad. They lose much.
So true indeed Z.
Hello all.
Slowly, this build continues.
I decided that I need to make the external body shiney and covered the printed pages with Americana Glossy finisher. Had to make 4-5 layers. This stiffened the paper a lot, making it quite hard to fold and build. Nothing I can't deal with, but still, I will have to fight the parts. I hope the looks will be worth the trouble.
Finished with the rear bench. Then I switched to the engine compartment. The "nose" of this car is very distinct. The smiling grill becoming wheel cowlings (are these called wings??) and the round hood are very special and quite hard to implement in paper. I have to admit I didn't understand how the engine compartment sides connect to the cowlings, to the front grill and to the windshield base and where does the firewall go. So I emailed Nova, the designer. The guy sent 100+ build pictures and some diagrams. This made the construction a bit easier.
The idea is that first the firewall (which is a laminated double sided piece) should be mounted but only the side that faces the crew compartment. Then the wheels wells should be installed. Then the windshield base is mounted. Afterwards the engine compartment sides are mounted formed to right shape with round nose and straight sides. Then laminate the insides of engine compartment so that engine bay internal walls are not white.
Then the hood (bonnet?) should come along forming the engine compartment. All this without formers of any kind. That was a challenging job.
This is the point I stopped...
Next, the wheel cowlings and the grill. Maybe next week...
View attachment 185095View attachment 185096View attachment 185097View attachment 185098View attachment 185099View attachment 185100View attachment 185101View attachment 185102View attachment 185103View attachment 185104View attachment 185105View attachment 185106View attachment 185107View attachment 185108View attachment 185109
The hood and bonnet are difficult pieces to join together. You have done an excellent job on this. Your assembly techiques are incredible to watch and a real treat to behold. Keep on building!
Sky Seeker
Hello all.
Unfortunately I am putting this model on hold until at least end of August. Got some unexpected things to take care of...
Sorry everybody..
Unfortunately I am putting this model on hold until at least end of August. Got some unexpected things to take care of...
Sorry everybody..
- Apr 5, 2013
- 13,876
- 10,216
- 228
Hello all.
Unfortunately I am putting this model on hold until at least end of August. Got some unexpected things to take care of...
Sorry everybody..
I hope you are doing well, and any problems just go away.

