I first saw 2001 ASO when I was 9 yrs old. It made a very big impression on me, (and still does,) and was pivotal in the decisions I made later in life about my career and personal interests.
Out of all SciFi films I've seen, the 'hardware' in 2001, is for me the most realistic.
The Discovery was, and still is, my MOST favourite SciFi spacecraft.
I have always wanted a model of her, but have never really found one that satisfied my yearning! Or, prices were not in my budget......!!
So, after a bit of searching and detective work, I found the card version from UHU02. (And NO, I am NOT telling how I got it! (at the request of the designer))
The size of this model and the detail is spot-on for me. And, without the need for the airbrush, that keeps the missus happy, because there are no paint fumes in the home.....

Here in Holland, we use gsm as paper weight measurement. (The imperialists lost the battle ...
 )
)
And reading comments and the few blogs/forums on the subject in hand, I decided to print out the whole model in 3 weights: 80 gsm, 120 gsm and 160 gsm. These weights should accommodate load-bearing structures, structural forms and the more delicate parts.
I have to say: It sure helps to have my good lady running her own sucessful copy/print business ....
Anyway, I figuered there were going to be a few instances of FUBAR's occuring, so in some cases I decided to print a couple of extra copies of a few of the pages in the model. Especially the nutty nuts......
So, with straight edge, scalpel, a beer and some of Amsterdams finest
, I went nuts on the first one......
It was at this point that I discovered that my eyesight and hand control is not what it used to be....(Grand old 50 next year..... )
Basically, the result of the first nut was not exactly brilliant......

I sat there thinking and wondering how long my sanity was going to last on this project, let alone the consumed liter-age (<--note: more metric stuff!!) of beer and full ashtrays.... I have to mass-produce ,was is it, 33 of these things????
CLICK!!! 3 earlier (a lot earlier,) years of Production Engineering experience switched on a brain-cell somewhere screamed: JIG !!!!
So, spending most of the evening and 2 attempts to get it right (I think), I made a simple jig, in the lateral shape of the nuts, out of a few laminated pieces of thick card. I made sure that all the curves, angles and straight edges were 'spot on' at the bottom edge of the hexagonal 'pit'. That should give a good firm, square, correctly shaped form to push against when gluing down the tiny tabs.
Using the 160 gsm paper, I used the jig for the second attempt.
The system worked really well for the gluing process. Until I tried to get the nut out of the jig............... The model is card, the jig is card, the glue is white glue..... You dont need to be an engineer to work out the result.

Muttering to myself in frustration (already) ,and looking for more rolling papers, I suddenly thought of a colleague of mine from long ago, who's nickname was TEFLON; Because nothing stuck ....
"What a silly **** I am!", I exclaimed. SILICONE !!!!! Not a lot sticks to that either, AND it is waterproof (marine grade). That should solve the problem of the glue soaking into the jig and gluing the nut to the jig.........
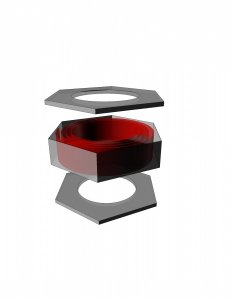
So, here is a pic of the jig, now coated in a thin, well worked silicon 'shield'....

So, I will let you ponder over the stress created, when I discovered about 50 items in my bits box (my whole attic is a bits-box, to be honest),.............

But then it wouldn't be a true paper model......
Would it.........
No, but the nuts are exactly the correct size....
Yeah, but IT'S NOT PAPER!!!
But, the angles of the metal nuts are exact, ensuring a true linear spine ....
Yeah, BUT IT'S NOT PAPER!!!..
I know, but, NOR IS THE WOODEN DOWEL STRENGTHENING THE SPINE, Ok it is the same material, but, ......
You get my point ........


Out of all SciFi films I've seen, the 'hardware' in 2001, is for me the most realistic.
The Discovery was, and still is, my MOST favourite SciFi spacecraft.
I have always wanted a model of her, but have never really found one that satisfied my yearning! Or, prices were not in my budget......!!
So, after a bit of searching and detective work, I found the card version from UHU02. (And NO, I am NOT telling how I got it! (at the request of the designer))
The size of this model and the detail is spot-on for me. And, without the need for the airbrush, that keeps the missus happy, because there are no paint fumes in the home.....
Here in Holland, we use gsm as paper weight measurement. (The imperialists lost the battle ...
And reading comments and the few blogs/forums on the subject in hand, I decided to print out the whole model in 3 weights: 80 gsm, 120 gsm and 160 gsm. These weights should accommodate load-bearing structures, structural forms and the more delicate parts.
I have to say: It sure helps to have my good lady running her own sucessful copy/print business ....
Anyway, I figuered there were going to be a few instances of FUBAR's occuring, so in some cases I decided to print a couple of extra copies of a few of the pages in the model. Especially the nutty nuts......
So, with straight edge, scalpel, a beer and some of Amsterdams finest
It was at this point that I discovered that my eyesight and hand control is not what it used to be....(Grand old 50 next year..... )
Basically, the result of the first nut was not exactly brilliant......
I sat there thinking and wondering how long my sanity was going to last on this project, let alone the consumed liter-age (<--note: more metric stuff!!) of beer and full ashtrays.... I have to mass-produce ,was is it, 33 of these things????
CLICK!!! 3 earlier (a lot earlier,) years of Production Engineering experience switched on a brain-cell somewhere screamed: JIG !!!!
So, spending most of the evening and 2 attempts to get it right (I think), I made a simple jig, in the lateral shape of the nuts, out of a few laminated pieces of thick card. I made sure that all the curves, angles and straight edges were 'spot on' at the bottom edge of the hexagonal 'pit'. That should give a good firm, square, correctly shaped form to push against when gluing down the tiny tabs.
Using the 160 gsm paper, I used the jig for the second attempt.
The system worked really well for the gluing process. Until I tried to get the nut out of the jig............... The model is card, the jig is card, the glue is white glue..... You dont need to be an engineer to work out the result.
Muttering to myself in frustration (already) ,and looking for more rolling papers, I suddenly thought of a colleague of mine from long ago, who's nickname was TEFLON; Because nothing stuck ....
"What a silly **** I am!", I exclaimed. SILICONE !!!!! Not a lot sticks to that either, AND it is waterproof (marine grade). That should solve the problem of the glue soaking into the jig and gluing the nut to the jig.........
So, here is a pic of the jig, now coated in a thin, well worked silicon 'shield'....
So, I will let you ponder over the stress created, when I discovered about 50 items in my bits box (my whole attic is a bits-box, to be honest),.............
But then it wouldn't be a true paper model......
Would it.........
No, but the nuts are exactly the correct size....
Yeah, but IT'S NOT PAPER!!!
But, the angles of the metal nuts are exact, ensuring a true linear spine ....
Yeah, BUT IT'S NOT PAPER!!!..
I know, but, NOR IS THE WOODEN DOWEL STRENGTHENING THE SPINE, Ok it is the same material, but, ......
You get my point ........

")


 ops:
ops: