

Hello and welcome to my first build upon this humble organ.
Please join me in a journey of cutting, folding and the odd swear word as aim to construct Dewey from the 1972 movie Silent Running directed by Doug Trumball.
Viewed with the eyes of a child at around the age of 8 years old, my eyes were transfixed to the three drones which helped Freeman Lowell, played by actor Bruce Dern to maintenance abord the spaceship Valley Forge.
These drones, named Huey, Dewey and Louie were in my mind fantastical, loveable and to latter eyes wonderful sci-fi designs.
From a production view the drones were played by actors/ex veterans from the UCLA Medical Center and Rancho Los Amigos hospital - I have the upmost praise for those actors who had to be cooped up within those abs shells! - Steven Brown, Mike Persons, Cheryl Sparks and Larry Whissenhunt... I salute you.
If you have not seen the film, I would urge you to give it a watch and let me know what you think...
Well on to the build, the parts from uhu, that's all I know from whomever made this model - comes in the form of 4 sheets of parts


Instructions found online were only in Japanese, so bing translate did its best to do just that, unfortunately the translation is at best a rough guide, so hopefully construction will have to follow the pictures which are not that much better at clarifying what to do.
My brother has a wealth of reference material, which he will be offering me in a few days time.

My tools, as laid out are many and varied, but usually I work with just two scalpels from renowned British manufacturer Swann-Morton with a 10a blade (fresh blade with the start of every new build) a variety of other scalpels, knives, scissors, metal rulers and to make my creases, an old darning needle.
Glues used are a fast acting card glue from Deluxe materials called Roket Card Glue and coincidental as per the name of the kit designer - UHU All purpose Gel.
The card glue is very fast acting which I tend to use most of the time on all parts, but larger surface areas are covered by the UHU, not as fast acting, so a pair of self-close tweezers are used or held by the Mk1 fingers with a youtube video ready to watch, whilst the gel takes hold.

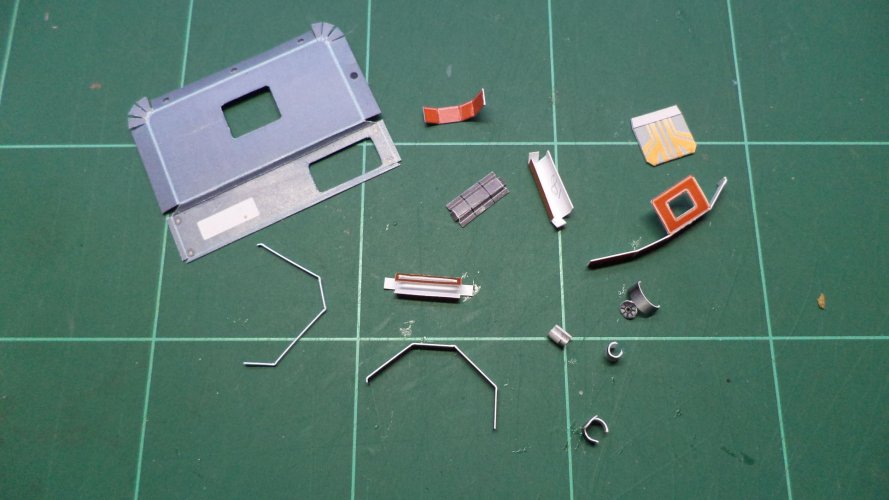
Part one of the build consists of parts 1 to 9 - of which these were sourced and duly cut out... a crowd of onlookers gathered too, so I had to watch what I was doing...


Cutting and creasing began - toing & froing from the pictures to see what was what. Determining the blocks and circled yellow section were for removal, and a odd Asian character I determined was 'crease here'
Part one was first creased in the areas required and then formed using a steel ruler clamped to the part and the fold formed using an old 3m tool a friend gave me, good for large areas saving my fingernails grief.
Certain areas on part 1 required a curved edge, so I used a wooden kitchen skewer to help the initial curve, then cutting two pieces the correct width, glued these in place to help the curve stay - curved.


The rest of the following parts were formed and creased as instructed.
Part 8 was needed to be bent and creased in multiple ways with a small curve to two areas.
A look through all my bits which my long suffering partner shoves in her hand bag after meals, because I usually say "keep this, it will be handy for my modelling" came up with a lolly (popsicle I believe to some) stick with just the right curve to tackle the job.
Ably assisted by my helping-hands clamp the crease was made with no trouble at all.


Well we have come to the end of todays work - Next time around, I shall tackle gluing the first 9.
Please join me in a journey of cutting, folding and the odd swear word as aim to construct Dewey from the 1972 movie Silent Running directed by Doug Trumball.
Viewed with the eyes of a child at around the age of 8 years old, my eyes were transfixed to the three drones which helped Freeman Lowell, played by actor Bruce Dern to maintenance abord the spaceship Valley Forge.
These drones, named Huey, Dewey and Louie were in my mind fantastical, loveable and to latter eyes wonderful sci-fi designs.
From a production view the drones were played by actors/ex veterans from the UCLA Medical Center and Rancho Los Amigos hospital - I have the upmost praise for those actors who had to be cooped up within those abs shells! - Steven Brown, Mike Persons, Cheryl Sparks and Larry Whissenhunt... I salute you.
If you have not seen the film, I would urge you to give it a watch and let me know what you think...
Well on to the build, the parts from uhu, that's all I know from whomever made this model - comes in the form of 4 sheets of parts
Instructions found online were only in Japanese, so bing translate did its best to do just that, unfortunately the translation is at best a rough guide, so hopefully construction will have to follow the pictures which are not that much better at clarifying what to do.
My brother has a wealth of reference material, which he will be offering me in a few days time.
My tools, as laid out are many and varied, but usually I work with just two scalpels from renowned British manufacturer Swann-Morton with a 10a blade (fresh blade with the start of every new build) a variety of other scalpels, knives, scissors, metal rulers and to make my creases, an old darning needle.
Glues used are a fast acting card glue from Deluxe materials called Roket Card Glue and coincidental as per the name of the kit designer - UHU All purpose Gel.
The card glue is very fast acting which I tend to use most of the time on all parts, but larger surface areas are covered by the UHU, not as fast acting, so a pair of self-close tweezers are used or held by the Mk1 fingers with a youtube video ready to watch, whilst the gel takes hold.
Part one of the build consists of parts 1 to 9 - of which these were sourced and duly cut out... a crowd of onlookers gathered too, so I had to watch what I was doing...
Cutting and creasing began - toing & froing from the pictures to see what was what. Determining the blocks and circled yellow section were for removal, and a odd Asian character I determined was 'crease here'
Part one was first creased in the areas required and then formed using a steel ruler clamped to the part and the fold formed using an old 3m tool a friend gave me, good for large areas saving my fingernails grief.
Certain areas on part 1 required a curved edge, so I used a wooden kitchen skewer to help the initial curve, then cutting two pieces the correct width, glued these in place to help the curve stay - curved.
The rest of the following parts were formed and creased as instructed.
Part 8 was needed to be bent and creased in multiple ways with a small curve to two areas.
A look through all my bits which my long suffering partner shoves in her hand bag after meals, because I usually say "keep this, it will be handy for my modelling" came up with a lolly (popsicle I believe to some) stick with just the right curve to tackle the job.
Ably assisted by my helping-hands clamp the crease was made with no trouble at all.
Well we have come to the end of todays work - Next time around, I shall tackle gluing the first 9.
Last edited:


")


")


