Spray Painting Track=Electrical problems

Herc Driver

Active Member
Apr 18, 2005
1,474
0
36
North Carolina
Is there some do's and don't when it comes to spray painting Nscale track? I am in the process of weathering the track with Tamaya spray paint and so far I like the results, but I've noticed a few electrical conductivity issues where the connectors fill with paint and decrease the power going through the rails.

Any good tips out there? What about spraying Peco Insulfrog turnouts? So far, I haven't painted them, but I'd like to - without ruining them.
 

60103

Pooh Bah
Mar 25, 2002
4,754
0
36
Brampton, Ontario, Canada
Visit site
Herc: don't spray around the points or other contact areas. Cover them with masking tape. Afterwards you can go over the outside bits with a brush, but don't go near the places where the points pick up electricity from the stock rails.
I don't spray (never had the hardware) so I paint my rails with a brush. I used a Sharpie brown marker on some but the brown is a bit light.
 

Herc Driver

Active Member
Apr 18, 2005
1,474
0
36
North Carolina
Thanks David...I covered the points with tape, as well as the switching mechanism just in case. I was hoping to avoid ruining rather pricey turnouts. I hand painted my first layout's track - which was a job in itself - but this new layout would take considerably longer to hand paint so I was hoping to spray a brown/black mixture on. The first attempt at spraying didn't go too badly, I got good color and coverage, but if I was too heavy handed where the track connected it affected the electrical conductivity. I'll need to go back and open each connection and clean the track ends up a bit to make sure the electricity flows. Plus, I found the engines with larger wheel flanges didn't seem to run as well, probably because they were in contact with too much paint and not enough clean rail. The only maker that gave me this problem was Bachmann...the Kato, Atlas, LifeLike, and Athearn diesels ran fine. The Bmanns stopped where two tracks connected just about every time.
 

doctorwayne

Active Member
Sep 6, 2005
3,516
0
36
Canada, eh?
I brush-painted all of my track. Spraying puts too much dust into the room (all of the overspray that dries before contact) that can add to electrical problems later. Ideally, sprayed paint should dry (to the touch, at least) shortly after contact, so none should be running into the contact points. If you don't have feeders going to every section of track, then you should have soldered the rails together at the railjoiners, which are not otherwise a reliable conductor of electricity over the long run. Other problems with spraying are prep time, including masking, as mentioned, and shielding any trackside structures or scenery that can't be removed. I use mostly lacquer-based paints, not the best to spray in areas where you can't provide adequate ventilation. Because of the attendant odour of such paints, I used PollyScale water-based paint for track painting. While turnouts do take some time, ordinary track can be brush painted very quickly, with no masking and very easy clean-up. I paint 10' or 15' of track, then wipe the dry-to-the-touch paint from the railtops with a dry rag stretched over my fingertip.

Wayne
 

RobertInOntario

Active Member
Mar 22, 2006
1,384
0
36
Toronto, Ontario, Canada
I'm interested in this as I have just been recently weathering the track of my HO layout. I bought a jar of rust coloured paint from an LHS, George's Trains. This paint is made specially for this -- I also bought a similar jar of grey/black paint for painting the ties an authentic colour. I'm quite pleased with the effects of both, as long as I don't get too heavy-handed with the rust paint.

I also bought (from a different LHS) some water-based paint for painting on the effect of diesel/oil spills onto the area between the rails, which you would see at stations and other places along the track. I water this paint down about 50-50 and then brush on. Again, I really like the effect as it looks quite realistic. I keep referring to pics of the prototype to try to get the effects as accurate as I can.

However, I have to brush all of this paint on using a small, fine brush. It's a little tedious so I'm doing this weathering in stages, bit by bit.

David, I like the idea of using a brown "Sharpie" to add rust as well -- I think I'll try that but doesn't this brown colour come off easily, especially when cleaning the track?

Thanks,
Rob
 

MasonJar

It's not rocket surgery
Oct 31, 2002
5,362
0
36
Ottawa, Canada
Visit site
A friend recently got Testors paint markers in a set specifically for painting rails - the 3 pack included rust, railroad tie brown, and one other colour (name escapes me right now) to do the track and ties nicely. The marker is easier to use than a paintbrush, and not as high maintenance as an airbrush. The results look good too.

My $0.02

Andrew
 

Herc Driver

Active Member
Apr 18, 2005
1,474
0
36
North Carolina
Thanks everyone for the input - I sincerely appreciate it.

As an update...I covered all the turnouts with masking tape to protect the points and mechanisms, and painted the rails with brown and black. Right now, there's nothing on the foam board by the tracks...no structures, no anything, so I'm not worrying about the overspray issues yet. I also took the foam board outside to mitigate the spray and it's effects. Overall, it'll be a few more days until I get back home and I really get a chance to look over the rails to see how well I did the job. But I can already tell that an airbrush would be better than spray paint cans...I just couldn't get a fine enough mist from the Tamaya can that I probably could achieve from an airbrush. I think I will hand paint the turnouts though...that seems like the safest idea to make sure I get paint only where it's needed. From all the layouts I've seen posted here...I'm amazed at the quality of the rail weathering, and obviously there are many techniques to achieve some impressive results. I need to take a close look at mine and see how things turned out. The close up test photos I took showed good coverage and a very prototypical look to what I see here in the Carolinas on the Norfolk Southern mainlines. Using a marker pen is an interesting idea...and one I might check into, espicially if I can find one in the proper rusty brown/black color I see locally. I would guess you'd have to use a special type of marker, since it's normally pretty tough to find one that covers evenly on metals.

Thanks again guys - and I'm still looking for some good do's and don't when it comes to rail weathering...The old layout is gone and work has been moving right along on the new layout...and I'd like this one to be a vast improvement over my first layout attempt.
 

MasonJar

It's not rocket surgery
Oct 31, 2002
5,362
0
36
Ottawa, Canada
Visit site
The paint markers seem to cover well. I don't know how they get the paint to flow through the tip, but it covers well. They do not leave light and dar areas like you can get even with the Sharpies or other good quality "markers".

Andrew
 

Herc Driver

Active Member
Apr 18, 2005
1,474
0
36
North Carolina
Thanks for the suggestion about the paint markers - I think I'll try them out on a test track and see what results I get.

Keep the tips coming guys - it really helps to get various opinions on how to weather track.
 

baldwinjl

Member
Apr 30, 2005
399
0
16
63
In my opinion, if paint getting into the rail joiners is causing you trouble, it's just pointing out the fact that counting on the joiners for electrical connectivity is chancy at best. Oxidation, and dirt, would have done the job eventually. Drop more feeders, or solder more joiners (might not work well after they are painted)>
 

Herc Driver

Active Member
Apr 18, 2005
1,474
0
36
North Carolina
I whole-heartedly agree about adding more feeders...I've gone from a simple, little layout on about 2/3 a flat door to one that is 16 feet long. I found that with the simple plan I've created for this new shelf layout, I still needed three feeders (and will probably need one or two more). As soon as I can, I'll check the overall continuity and see what the added paint has done.
 

Russ Bellinis

Active Member
Feb 13, 2003
4,501
0
36
78
Lakewood, Ca.
Visit site
You can use a bright boy to clean paint off the top of the rails. As far as paint causing problems with the rail joiners, I would agree with baldwinjl. Rail joiners should only be used for a mechanical connection.
 

Herc Driver

Active Member
Apr 18, 2005
1,474
0
36
North Carolina
I might have to learn how to solder just to complete this new layout. That is probably the safest and most long-term solution to the conductivity problem. Adding more feeders will be first on my list. I picked up the MRR "DCC Guide" today so that I can wire it for DC for now and upgrade to DCC very soon. I don't know enough about DC wiring vs. DCC wiring to know if there's any large differences or do's and don'ts to watch out for...but hopefully after reading and doing some research on this forum, I'll be able to add the additional feeders in the right places to run DC for now and DCC for later.
 

baldwinjl

Member
Apr 30, 2005
399
0
16
63
Soldering rail joiners is a snap. Feeders are a little harder, but not hard.

As far as feeders to the track, there really isn't a lot of difference between DC and DCC. So don't worry much about that. If you can drive a Herc, you can figure it out!
 

doctorwayne

Active Member
Sep 6, 2005
3,516
0
36
Canada, eh?
Herc, from what I've read, DCC-equipped locos are a bit more finicky as far as power requirements are concerned than are their DC counterparts. I run DC and soldered all of my track together, then cut gaps in the rail anywhere I needed to isolate a section of track. I then ran feeders from the main track, through an On/Off switch, to the isolated track area. The entire layout (over 300' of track) is fed from one pair of wires near the power pack.
If you don't want to solder all of the track together,you need to run a pair of feeders to each individual piece of track - if you have a hundred pieces of track and turnouts, that's 200 feeders. :eek: You could compromise by soldering sections of track together (say five track sections and/or turnouts each), then just run feeders to each section. Now you're down to 20 sections and only 40 feeders. :-D No matter how you do it, don't rely on the rail joiners to give reliable electrical conductivity, especially over the long term. And that's true whether or not you paint your track.

Wayne
 

Herc Driver

Active Member
Apr 18, 2005
1,474
0
36
North Carolina
Wow, I had no idea just how unreliable (over the long term) those little rail joiners would be. OK...I guess I'll be soldering everything together and that should help both the initial DC and the later DCC operations when I convert over. Since I've amassed quite a number of diesels, it's too costly to convert all of them to DCC right away, so I'll convert them to DCC slowly and be running a straight DC operation until I get enough decoder-equipt diesels. I just want to make sure I don't hamstring my own plan by not incorporating a major consideration for DCC...like track soldering the joints and feeder wires. Thanks again for the input.
 

Russ Bellinis

Active Member
Feb 13, 2003
4,501
0
36
78
Lakewood, Ca.
Visit site
Technically, dcc should not be anymore fussy about electrical connections than dc; but it is. If you get a poor connection in dc, and flywheels in your locomotive enable it to get past the bad spot, it will continue on with no problem. If you have a bad spot on a dcc layout, it may require you to reaquire the locomotive to have it respond to your throttle. The biggest problem is shorts. A small short in a turnout for instance, that just causes a little spark as the locomotive runs through it, will shut down a dcc system.
 

railwaybob

Member
Jun 15, 2003
419
0
16
Ottawa, Ont
www.railwaybob.com
When it comes to joining the track and weathering it, here's some tricks of the trade that I use.

Cutting Rail Joiners
Rail joiners are too long, so cut them so that you only are using ½ to 2/3 of the joiner. Simply slide the rail joiner onto a piece of scrap rail, take an Atlas Snap Saw and saw off the excess part of the rail joiner. After you have sawed off the excess rail joiner, dress up the cut with a small file. Push the scrap rail through the cut to push out the burrs and file off the burrs. It may take a bit of extra care to slide the rail joiner onto the rail but it is well worth the effort.

You can easily make a "tool" for holding the rail joiners. Take a small piece of wood about 1"x 1" square and 4" - 5" long. Drill a 1/8" hole about 2" into one end of the piece of wood. Stuff a bit of epoxy glue into the hole and push a piece of scrap rail into the hole so that it hits the bottom of the hole. You should have about 3" sticking out of the piece of wood. Or snip the rail off until you are comfortable with your "rail joiner holder" tool. Dress the ends of the rail with a file so that a rail joiner easily slides off the end of the tool.

Dress (File) the Ends of Every Piece of rail
Rail, whether Snap Track, Flex Track, or single pieces, has a "burr" on each end of the rail. This burr is created when the rail is cut into pieces - even when you use those rail nippers.

Before you install the rail, "dress" (file) the ends of the rail at the web (bottom) and the sides. All it takes is a couple of swipes with a flat file. Don't push the file. Simply draw the file back towards you. This gets rid of the burrs and makes installation of the rail joiner very easy.

Similarly, whenever you cut a piece of rail, whether with a razor or snap saw, or with rail nippers, dress the ends of the rail.

Solder all joints
Mechanical connections don't conduct electricity very well. It's usually a good idea to solder those rail joiners. All you need is a 20 - 40 watt soldering iron, some rosin core (electrical) solder, and some flux.

Position your track in place with the rail joiner midway between the two pieces of rail. Apply a bit of flux. Make sure your soldering iron is well heated. Wipe the tip of the soldering iron a a wet sponge or a wet piece of cloth to remove the oxide that is created when you heat a soldering iron. Apply a touch of solder to the iron and shake it off with a quick flick of the wrist. Apply the soldering iron to the outside edge of the rail. Quickly touch the solder to the rail right next to the iron and remove the solder. Move the soldering iron down the length of the rail joiner.

Don't linger very long as you can quickly melt the plastic ties. No longer than 2 seconds (slowly count one thousand, two thousand).

Painting Rails
There are several ways to weather the rails. The easiest is with an orange and black magic marker. Simply apply the orange marker to the side of each rail first. Let it dry. It may require several coats. Then apply the black magic marker. At least this will get rid of that bright shine on the rails. Don't apply the magic marker to the top of the rails! After you have your track in place, clean the top and inside flange of the rails with a bright boy or sanding sponge.

The ultimate way is to paint the rails. However, it does require a bit of extra work but the results are worth the effort. I do this using a 2-step process.

First, apply some light sewing machine oil to the top and inside flange of the rails. Or, apply some masking tape cut into 1/8" strips to the top and inside flange of the rails.

On your turnouts, apply masking tape to the top of the points or stuff some kleenex into the open side of the points

If your rail is fastened to your layout, mask off the parts of the layout on each side of the track.

The first coat of paint is a red oxide primer in the spray can, (Tremclad for example) that is generously sprayed on the rails and the ties - the inside edges, the outside edges, the top of the ties, the sides of the ties. Don't over-do the spray! Hold the spray can about 18" from the track. The red oxide is really bright so we now need to tone it down.

Before the red oxide dries, over-spray the track with a light coat of flat black. The idea here is to add "highlights" to the red oxide so that we have a mix of "rust" (the red oxide" and the creosite, oil, dirt, etc). We want enough of the red oxide showing through, however, so that we know it is rusted rail.

Let the paint dry.

The next part does require a bit of work but the effort is well worth it. If you've masked the top and inside flange of the rail, your work is relatively easy. If you didn't mask the rail, you will require a bit of elbow grease. The paint on the top and inside edge of the rail needs to be scraped off. I do this using a variety of tools ranging all the way from a 1/8" square steel bar, an X-Acto knife and a bright boy - anything that will scrape off the paint. I even use paint remover.

After all of the paint on the top of the rail and the inside flange has been scraped off, I polish up the rail with a bright boy or sanding sponge. Carefully inspect the rails to ensure that all of the paint has been removed.

And voila, you have weathered track!

The weathered track, combined with the shortened rail joiners and some ballast will give you some really nice-looking trackwork. For an idea of what it all looks like, visit this page on my website.
Laying the Roadbed and Track - Page 1

Bob M.
 

Attachments

  • Weathered Track.jpg
    Weathered Track.jpg
    99.4 KB · Views: 9
  • Weathered Track Ballasted.jpg
    Weathered Track Ballasted.jpg
    53.9 KB · Views: 6

railwaybob

Member
Jun 15, 2003
419
0
16
Ottawa, Ont
www.railwaybob.com
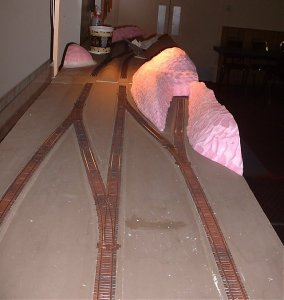
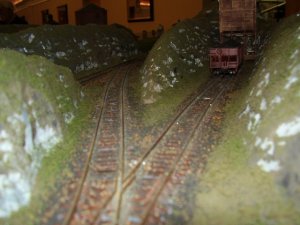
The top photo was taken after the track was weathered and fastened to the module deck. The bottom photo is after the scenery was added and the track ballasted. You may notice that the bottom photo is looking down the track into the siding on the right in the top photo.

You have to look real hard to find those rail joiners, even at the ends of the turnouts!

The impact of weathering of the track is quite obvious, eh?

Bob M.
 

Herc Driver

Active Member
Apr 18, 2005
1,474
0
36
North Carolina
Wow Bob, thanks for a great tutorial! My compliments on taking the time to write all that out. I never thought of shortening the rail joiners and I think I might try that. (BTW...nice website! Lots of interesting info.)

Soldering the track sections I can see by the popular opinion is a must and another idea I'll incorporate.

I've already sprayed some of the track lightly, and some not so lightly, so I'll go back and replace problematic track sections that may not conduct as well as others.

Everyone's ideas have been great and I'm guessing they're gleaned from problems experienced in the past.

Thanks again for some great info! When I get something built worthy of a picture, I'll post it here since you've all had a hand in its creation.