When it comes to joining the track and weathering it, here's some tricks of the trade that I use.
Cutting Rail Joiners
Rail joiners are too long, so cut them so that you only are using ½ to 2/3 of the joiner. Simply slide the rail joiner onto a piece of scrap rail, take an Atlas Snap Saw and saw off the excess part of the rail joiner. After you have sawed off the excess rail joiner, dress up the cut with a small file. Push the scrap rail through the cut to push out the burrs and file off the burrs. It may take a bit of extra care to slide the rail joiner onto the rail but it is well worth the effort.
You can easily make a "tool" for holding the rail joiners. Take a small piece of wood about 1"x 1" square and 4" - 5" long. Drill a 1/8" hole about 2" into one end of the piece of wood. Stuff a bit of epoxy glue into the hole and push a piece of scrap rail into the hole so that it hits the bottom of the hole. You should have about 3" sticking out of the piece of wood. Or snip the rail off until you are comfortable with your "rail joiner holder" tool. Dress the ends of the rail with a file so that a rail joiner easily slides off the end of the tool.
Dress (File) the Ends of Every Piece of rail
Rail, whether Snap Track, Flex Track, or single pieces, has a "burr" on each end of the rail. This burr is created when the rail is cut into pieces - even when you use those rail nippers.
Before you install the rail, "dress" (file) the ends of the rail at the web (bottom) and the sides. All it takes is a couple of swipes with a flat file. Don't push the file. Simply draw the file back towards you. This gets rid of the burrs and makes installation of the rail joiner very easy.
Similarly, whenever you cut a piece of rail, whether with a razor or snap saw, or with rail nippers, dress the ends of the rail.
Solder all joints
Mechanical connections don't conduct electricity very well. It's usually a good idea to solder those rail joiners. All you need is a 20 - 40 watt soldering iron, some rosin core (electrical) solder, and some flux.
Position your track in place with the rail joiner midway between the two pieces of rail. Apply a bit of flux. Make sure your soldering iron is well heated. Wipe the tip of the soldering iron a a wet sponge or a wet piece of cloth to remove the oxide that is created when you heat a soldering iron. Apply a touch of solder to the iron and shake it off with a quick flick of the wrist. Apply the soldering iron to the outside edge of the rail. Quickly touch the solder to the rail right next to the iron and remove the solder. Move the soldering iron down the length of the rail joiner.
Don't linger very long as you can quickly melt the plastic ties. No longer than 2 seconds (slowly count one thousand, two thousand).
Painting Rails
There are several ways to weather the rails. The easiest is with an orange and black magic marker. Simply apply the orange marker to the side of each rail first. Let it dry. It may require several coats. Then apply the black magic marker. At least this will get rid of that bright shine on the rails. Don't apply the magic marker to the top of the rails! After you have your track in place, clean the top and inside flange of the rails with a bright boy or sanding sponge.
The ultimate way is to paint the rails. However, it does require a bit of extra work but the results are worth the effort. I do this using a 2-step process.
First, apply some light sewing machine oil to the top and inside flange of the rails. Or, apply some masking tape cut into 1/8" strips to the top and inside flange of the rails.
On your turnouts, apply masking tape to the top of the points or stuff some kleenex into the open side of the points
If your rail is fastened to your layout, mask off the parts of the layout on each side of the track.
The first coat of paint is a red oxide primer in the spray can, (Tremclad for example) that is generously sprayed on the rails and the ties - the inside edges, the outside edges, the top of the ties, the sides of the ties. Don't over-do the spray! Hold the spray can about 18" from the track. The red oxide is really bright so we now need to tone it down.
Before the red oxide dries, over-spray the track with a light coat of
flat black. The idea here is to add "highlights" to the red oxide so that we have a mix of "rust" (the red oxide" and the creosite, oil, dirt, etc). We want enough of the red oxide showing through, however, so that we know it is rusted rail.
Let the paint dry.
The next part does require a bit of work but the effort is well worth it. If you've masked the top and inside flange of the rail, your work is relatively easy. If you didn't mask the rail, you will require a bit of elbow grease. The paint on the top and inside edge of the rail needs to be scraped off. I do this using a variety of tools ranging all the way from a 1/8" square steel bar, an X-Acto knife and a bright boy - anything that will scrape off the paint. I even use paint remover.
After all of the paint on the top of the rail and the inside flange has been scraped off, I polish up the rail with a bright boy or sanding sponge. Carefully inspect the rails to ensure that all of the paint has been removed.
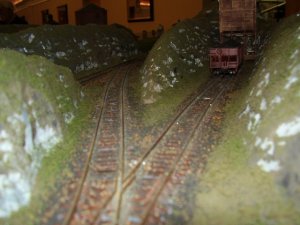
And voila, you have weathered track!
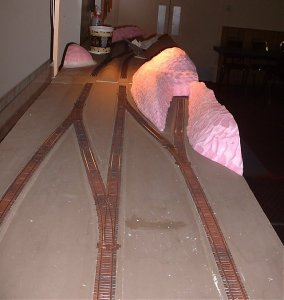
The weathered track, combined with the shortened rail joiners and some ballast will give you some really nice-looking trackwork. For an idea of what it all looks like, visit this page on my website.
Laying the Roadbed and Track - Page 1
Bob M.


 You could compromise by soldering sections of track together (say five track sections and/or turnouts each), then just run feeders to each section. Now you're down to 20 sections and only 40 feeders. :-D No matter how you do it, don't rely on the rail joiners to give reliable electrical conductivity, especially over the long term. And that's true whether or not you paint your track.