Brick Paper

Woodie

Active Member
Mar 23, 2001
2,093
0
36
Northern Rivers NSW Australia
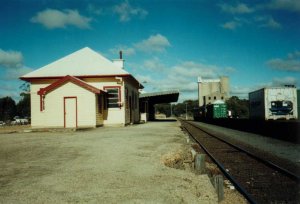
I'm about to attempt my first scratch built construction, and it's going to be this (in HO):
TocumwalFlourMill.JPG


Question is, what is the best method of adhering brick paper to card and/or styrene sheet, without it creasing, bubbling up, staining or have the inks run? What adhesive should I use? Should I perhaps use balsawood instead?

It's a bit big, and I have nowhere, really, to put it on Garahbara, but it'll be a good start to scratch building, and, hopefully, take pride of place on Garahbara MK II. :cool:
 

yellowlynn

Member
Jul 7, 2001
741
0
16
93
Whitehouse, Tx USA
Visit site
Woodie, I'm not very knowledgable on gluing paper to styrene. I thought of spray adhesive to both surfaces, but that wouldn't do because it has to be absolutely perfect the first time. Paper to wood, I think diluted white glue is best because it give a couple minutes to get it down with no creases or bubbles.

Where did you get the brick paper? There is a place somewhere you can download brick prints, but I lost the URL somewhere. Anybody out there rewmember where?

Lynn
 

Woodie

Active Member
Mar 23, 2001
2,093
0
36
Northern Rivers NSW Australia
Originally posted by yellowlynn
Where did you get the brick paper?

Lynn,

I got about 30 assorted sheets from the junk box at my local hobby shop ($2 worth).

I've tried the diluted wood glue on balsa before, (using fine wet/dry emery paper) for my station platform, and it did bubble and crease and caused the balsa to warp, but then again, I didn't put it in a compress until it dried. I just left it sitting ther overnight.

As far a printable brick paper, I've looked, and found software with it in it, but nothing downloadable. Can't remember where though. It was ages ago.
 

Bill Stone

Member
Apr 20, 2001
528
0
16
90
San Dimas, California, USA
Visit site
Try Rubber Cement

Looks like a great project, Woodie. Be sure & keep us posted.

I've had good success laminating paper on various materials using rubber cement (available at artists supply stores.) This is the process commercial artists use: Coat both surfaces with the rubber cement, and let it dry. Lay a sheet of smooth paper on the one surface, with just a quarter inch or so of the rubber cement uncovered along one edge. Lay the brick paper over this sandwich and burnish it down on that 1/4 inch of exposed cement. Then slowly --- a little at a time --- pull the smooth paper out from between the two cemented sheets, burnishing as you go. With a little practice, you can get a nice smooth surface with no bubbles or wrinkles.

By the way --- on those silos --- I'd venture that you'd be better off laminating the brick paper on the finished shape, rather than laminating it flat and then trying to bend the sandwich into a drum. Laminations don't like to bend.

One great thing about rubber cement is that you can be a little sloppy, and it will clean up off your finished work. To clean it off anything, create a "booger" as we used to call them --- a wad of dried rubber cement, rolled up into a clump that looks very much like something you'd find in your nose --- Just rub the wad over any exposed (dried) rubber cement, and it will pick it right off. The "booger" gets bigger with use over the years, because it keeps consuming rubber cement, and the bigger it gets, the easier it is to hold onto.

Bill S.
 

Woodie

Active Member
Mar 23, 2001
2,093
0
36
Northern Rivers NSW Australia
sticking stuff...

Thanks guys! :D

Bill, just to clarify that. The "rubber cement" I know is pretty thick stuff. When you say coat "both surfaces" do you mean the back of the brick paper, and the entire surface of the styrene sheet?? Then let it dry????? THEN stick the brick paper to it???

I think I understand your process of the smooth paper inbetween sliding it out, but will the brick paper stick to the DRY cement??

The silos, I intend to use 3" PVC plumbing pipe, so no need to bend into a cylinder.

The actual building is cement rendered (not brick) but I was gunna use the brick paper on it, but it's not really necessary. I could just use Floquil Aged Concrete and weather it, but I'm gunna give the brick paper a go, on the flour mill, not the silos. I'm also gunna try and make it look derelict, as in the pics as well. with the "demolished" markings that are exposed on the wall.

Bruce,

yep..... it'll be pretty big! Too big to fit anywhere on the current Garahbara, but so the book shelf will have to do for a while. Anyway, it'll make good practice, so if I stuff it up, it won't really matter. :p

I actually had an email from a "Roger MeggEt" in New Zealand researching family history. I had misspelt Meggit in the narrative on my website, and it came up in search engines when he was researching his family history!
 

Woodie

Active Member
Mar 23, 2001
2,093
0
36
Northern Rivers NSW Australia
Tocumwall

BTW guys,
That flour mill and silo is in a place called Tocumwal on the Murray River at the Victoria/New South Wales border. These are some pics of the overall scene, and I'm leaning very heavily on using this town as a prototype for Garahbara MK II.
 

Attachments

  • tocumwalpubmill.jpg
    tocumwalpubmill.jpg
    37 KB · Views: 118

Woodie

Active Member
Mar 23, 2001
2,093
0
36
Northern Rivers NSW Australia
The Rotary Club in Tocumwal were donated a layout and they use it for fundraising from the tourist. $5 entry to have a look. Open "afternoons only" so the sign says. In here.
 

Attachments

  • tocumwalpubshop.jpg
    tocumwalpubshop.jpg
    43.7 KB · Views: 111

bobrien

Member
Feb 15, 2002
128
0
16
74
Waiuku,New Zealand
Visit site
off the tracks here a bit Woodie ... but I have to tell you how nostalgic your pics made me (God, imagine a Kiwi being nostalgic for bloody Oz!!!)
But the pics reminded me so much of many of the places I saw in my journeys around Queensland and Northen NSW in my days of touring the states ( I was SUPPOSED to be working..)
Big sigh about the old Terminus hotel. Those pubs just used to blow me away. Gotta love that style.

Anyway mate, I look forward to the new layout.
I have finally settled on mine which will be based on the Main Trunk, Auckland to Wellington, with some branch lines thrown in.
Not geographically correct, but each foot of layout will (hopefully) be representative of an actual piece of line.
I have already started think ahead of extensions which will be a bush tramway and a colliery line.
Oh the joys of modelling... I can see where my free time will be going for the next 10 years or so.

Bruce

BTW - so are you related to Roger Megget then ????:rolleyes:
 

sumpter250

multiscale modelbuilder
Jan 19, 2002
3,073
0
36
80
Vernon Hills, Illinois
Visit site
Woodie,
I haven't used paper ( shingle,brick,etc.) in years, but it would seem logical that attaching the paper to the structure would best be accomplished with wallpaper paste. I would go with the Walthers styrene sheet brick, but that is a little pricey, and you already have the paper.
Pete
 

Gary Pfeil

Active Member
May 7, 2001
2,510
0
36
Boonton NJ
Visit site
A word about painting plastic to look like concrete. For a long time I just couldn't get the coloring right. Concrete as you all know appears in many different shades. When you ask someone what color is concrete you will often get: grey, tan, buff, off white, etc. Fact is, concrete is not a color, it is many different shades blended together. I managed to get very satisfactory coloring on a concrete road awhile back, although the process was labor intensive. I sprayed the styrene with a gray primer, then brushed on floquil's concrete, a small area at a time, then rubbed lightly with a cloth to remove much of the paint, followed with application of "aged concrete" in similar manner. This was followed with a thin wash of black with a fair amount of dish detergent added. When dry, the detergent allows you to rub off the wash on the high spots. (I had scribed expansion joints into the road surface) All this followed by drybrushing various colors such as light gray and (very little) earth tones. This past week I have been working on another scene with a lot of road surface and wanted to find an easier way. This is what I came up with, I like it. Prime styrene with gray primer, mix artist acylics (mostly white, some raw siena, and a touch of black) this mix gave a color I find quite satisfactory. I find the floquil concrete has too much green tone in it. This color was brushed on and brush marks were allowed to show, but finely. Again, I scribed expansion joints and followed with thinned black wash with detergent. At this point, you have decent looking road/sidewalk, not too new looking nor to old. Further drybrushing will enhance its appearance but doesn't seem as needed as on my previous method. Now I have to add pigeon droppings and gum to my sidewalks. Any thoughts?

Gary
 

Woodie

Active Member
Mar 23, 2001
2,093
0
36
Northern Rivers NSW Australia
Gary,
I've sorta headed down the track you talk about already! :cool:
The PVC pipe I used for the silos is already grey, and I've just given them their first coat of aged concrete. looking good so far. I had to work out a way to get a straight cut on the PVC pipe si I didn't get a "Leaning Tower of Pisa" silo. I used a thin strip of paper pulled tight around the pipe, drew a line according to the paper edge,and cut AROUND the pipe (along the line), not through it. Seemed to work OK. superglued to four pipes together and VIOLA!

If you look at the original pic, you can see "bands" around the structure. with a smooth structure, I'm wondering how I can reproduce that affect.... hmmmm.

With regard to weathering, I was going to use BURNT sienna acrylic wash, followed up by and even lighter black wash.

I'll keep all informed of progress. :) (which is good so far)
 

Gary Pfeil

Active Member
May 7, 2001
2,510
0
36
Boonton NJ
Visit site
Woodie, If by bands you mean the color variations visable as bands particularly at the top, you can slice masking tape to suitable width, apply around pipe (after basic painting is done) and overspray a differently tinted concrete color . After removing tape you can drybrush to blend somewhat. For cutting pipe straight, nothing can beat a pipe cutter. However, if you have no other use for one I guess it would be silly to buy just for that. I have seen automotive hose clamps fastened around pvc pipe to provide an edge to cut against.

Gary
 

farmer ron

Member
Jan 18, 2002
377
0
16
74
B.C., canada
Visit site
Woodie, I would do a little practice first on the different methods that have been mentioned. My experience, for what its worth, is with the thicker glues, have had difficulty getting a smooth surface when putting the two together. I have glued small areas with ordinary white glue, again small areas, signs, sides of lineside structures and the like. With such a large area you may get "bumps" that would be difficult to smooth out. My best suggestion would try spray adhesive. Again practice a little with paper of similar thickness, or a small piece of what you will be attaching, spray both sides then start in one corner end and carefully roll it on, smoothing it as you go with a small roller or your finger. With the silos I would use tubes, attach your adhesive method that works and roll the paper on, if you search around I am sure you can come up with some heavy cardboard tubing, or plastic, the diameter that you require. Just a thought, Ron.