2001 Orion by Pilsworth (quick build)

Chuffy70

Well-Known Member
Jun 5, 2022
842
1,708
75
Norwich UK
In a effort to help out fellow builder @seraphim - I shall be building the Shuttle craft, or Orion Clipper fro the film 2001 A Space Odyssey.

A plastic model of this ship sat in my brothers display case for many years, before I actually saw it at the cinema, gracefully spinning into action so to speak.
I have planned to build the Orion for my brother for Christmas, so in a strange twist and a call for assistance from @seraphim to help. I thought I'd bang the Pilsworth model out, before tackling the UHU at a later date.

Its a bit of a basic looking model and the instructions are not very clear, but we'll have a stab at it and see what the build brings. I just hope this of some help.

PLEASE NOTE THIS IS MAINLY AN INSTRUCTIONAL GUIDE TO HELP A FELLOW MEMBER - QUALITY AND CARE WILL NOT BE ADRESSED.

First sheet covers the main front fuselage

20240123_214923.jpg

First set of parts have been cut out and rudimentarily formed over a plastic pipe

20240123_222302.jpg

Cockpit widows have been creased on all available angles including the widow supports - tiny top two tabs have been attached to the upper hull

20240123_224523.jpg

Rear of front cockpit window, arrows showing glued tabs, sorry poor pic!

20240123_224531.jpg

Next section of the nose - forward of the cockpit windows with the black anti-glare panel was added next, Tabs glued either side of the cockpit windows, then the windows glued to the section
20240123_225348.jpg

The front nose section needs to be creased across the line indicated
20240123_225748.jpg


As I had not quite formed a tight enough curve on my hull, I glued a tab one at a time on the port, then the starboard side first, then the next tab up.
20240123_230049.jpg20240123_232217.jpg


Red arrows are the first glued tabs, then the blue arrowed tabs were bent backwards and glued up.
20240123_232520.jpg
Front half of the ship should look something like this
20240124_103401.jpg

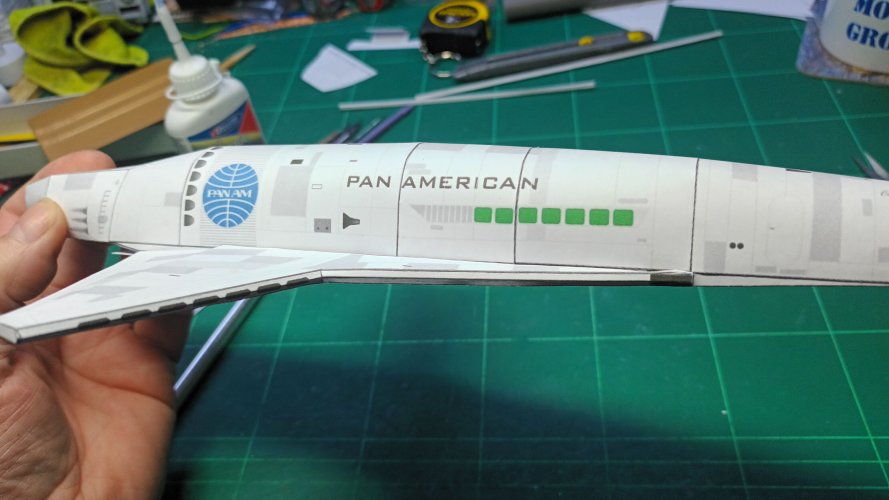
With all hull sections stuck together froward of 'PAN AMER' it was onto the 'ICAN' and head backwards...

20240124_094150.jpg

There's nothing really to note on construction of the rear hull, as tabs very much guide you through alignment.
CIRCLED EXTREME REAR OF HULL LEFT OFF UNTIL LATER

20240124_103310.jpg

Blue circled, same as red above

20240124_103324.jpg

THIS COMPLETES UPPER HULL SECTIONS - NEXT INSLALLMENT INTERNAL FORMERS AND WING CONNECTORS (probably?)

Any questions please do ask away!
 

Revell-Fan

Co-Administrator
Staff member
Administrator
Moderator
Aug 1, 2009
11,620
12,365
228
Vreden
Great work! You are a fast builder. It would be great to see some side-by-side pictures of the finished models later. :)
 
  • Like
Reactions: Chuffy70

Rhaven Blaack

!!!THE MAN BEHIND THE CURTAIN!!!
Staff member
Administrator
Moderator
Jun 12, 2009
12,538
9,924
228
Oregon
www.deviantart.com
You are off to a great start on this project! Thank you for taking the time to conduct a detailed and thorough build thread of this template. I am looking forward to seeing how it turns out.
 
  • Like
Reactions: Chuffy70

Chuffy70

Well-Known Member
Jun 5, 2022
842
1,708
75
Norwich UK
Great work! You are a fast builder. It would be great to see some side-by-side pictures of the finished models later. :)
Yes that would be a good idea, best I keep hold of this instead of giving it away!
You are off to a great start on this project! Thank you for taking the time to conduct a detailed and thorough build thread of this template. I am looking forward to seeing how it turns out.
Well so far, so good... and thank you
Nice work and indeed very fast.
...it's all in the reflexes
 

seraphim

Well-Known Member
Sep 1, 2023
252
553
75
48
Yes that would be a good idea, best I keep hold of this instead of giving it away!

Well so far, so good... and thank you

...it's all in the reflexes
i think if formula 1 racing ever start kit building you will definitely win lol awesome build so far and thankyou for the help :toast:
 
  • Haha
Reactions: Chuffy70

Chuffy70

Well-Known Member
Jun 5, 2022
842
1,708
75
Norwich UK
Righty'O - second part of the Orion build. @seraphim

Bulk heads are requested to be put onto the corresponding joins.
When they were cut from the sheet, I made notes as to what one went where.

20240124_104308.jpg

The rear bulk head has to be fitted correctly so that the hull conforms to the shape.
20240124_132806.jpg

As the bulkhead was glued the rea of the ship began to take shape.
20240124_142540.jpg

Slightly out of sequence here, bu the rest of the bulkheads went in with no problem.
20240124_184805.jpg

Backplate which fits over the rear bulkhead was acquired next.

20240124_141822.jpg

A quick dry fit and it was fitted a tab at a time.
NOTE - I LEFT THIS PART TO PULL THE REST OF THE HULL TOGETHER & NOT GLUED TO THE BULHEAD UNDERNEATH.

20240124_142729.jpg

Plate fitted.
20240124_155522.jpg

This rear plate formed up the back of the ship quite nicely.
20240124_155540.jpg

Upper wings were requested next.
ALL LINES TO BE CREASED - APART FROM THE INNER PART WHICH MEETS THE HULL - THESE ARE DENOTED WITH A '
RED T'
However further into the build these should be creased downwards.

20240124_160227.jpg

The rear edge of the wing needs to be stepped down.
20240124_172853.jpg

Trying to show the step with the wingtip bent upwards.
20240124_172900.jpg

Close up of the wing tip as to what needs to be cut out.
20240124_162202.jpg

These parts are the trailing edge.
NOTE EVERY LINE HERE NEEDS TO BE CREASED

20240124_165405.jpg

Outer most leading edge to be formed like this
20240124_172625.jpg

...and the other end
20240124_172632.jpg

The leading edge fitted to the top starboard side wing.
20240124_172811.jpg

The other part of the front leading edge needs to be creased and bent in the same way,
20240124_173651.jpg20240124_173728.jpg

After all that, the front parts of the upper wings should look something like this.

20240124_183520.jpg

The rear flaps on the upper wing are not yet attached, the parts circled are yet to be identified, but I'm sure they have something to do with them, so I have cut out the underside belly to better understand the fit.
20240124_183830.jpg

MORE ORION FUN TOMORROW
 
Last edited:

seraphim

Well-Known Member
Sep 1, 2023
252
553
75
48
Righty'O - second part of the Orion build. @seraphim

Bulk heads are requested to be put onto the corresponding joins.
When they were cut from the sheet, I made notes as to what one went where.

View attachment 216342

The rear bulk head has to be fitted correctly so that the hull conforms to the shape.
View attachment 216343

As the bulkhead was glued the rea of the ship began to take shape.
View attachment 216344

Slightly out of sequence here, bu the rest of the bulkheads went in with no problem.
View attachment 216345

Backplate which fits over the rear bulkhead was acquired next.

View attachment 216346

A quick dry fit and it was fitted a tab at a time.
NOTE - I LEFT THIS PART TO PULL THE REST OF THE HULL TOGETHER & NOT GLUED TO THE BULHEAD UNDERNEATH.

View attachment 216347

Plate fitted.
View attachment 216348

This rear plate formed up the back of the ship quite nicely.
View attachment 216349

Upper wings were requested next.
ALL LINES TO BE CREASED - APART FROM THE INNER PART WHICH MEETS THE HULL - THESE ARE DENOTED WITH A '
RED T'

View attachment 216350

The rear edge of the wing needs to be stepped down.
View attachment 216358

Trying to show the step with the wingtip bent upwards.
View attachment 216359

Close up of the wing tip as to what needs to be cut out.
View attachment 216351

These parts are the trailing edge.
NOTE EVERY LINE HERE NEEDS TO BE CREASED

View attachment 216352

Outer most leading edge to be formed like this
View attachment 216353

...and the other end
View attachment 216354

The leading edge fitted to the top starboard side wing.
View attachment 216355

The other part of the front leading edge needs to be creased and bent in the same way,
View attachment 216356View attachment 216357

After all that, the front parts of the upper wings should look something like this.

View attachment 216360

The rear flaps on the upper wing are not yet attached, the parts circled are yet to be identified, but I'm sure they have something to do with them, so I have cut out the underside belly to better understand the fit.
View attachment 216361

MORE ORION FUN TOMORROW
looking at these bits (last 2 parts for rear of fuselage) would they go along the fuselage at the rear of the wings (where the flaps meet the fuselage?) AGF000041.jpg
although the build is a mainly simple one this is one of those 'hmmmmm......?' parts not detailed lol. Your build is coming along great :BRAVO:
 

Chuffy70

Well-Known Member
Jun 5, 2022
842
1,708
75
Norwich UK
looking at these bits (last 2 parts for rear of fuselage) would they go along the fuselage at the rear of the wings (where the flaps meet the fuselage?) View attachment 216362
although the build is a mainly simple one this is one of those 'hmmmmm......?' parts not detailed lol. Your build is coming along great :BRAVO:
Yes. I'm quite sure they do, as to their orientation and fit, that's the £100 question!
 

zathros

*****SENIOR ADMINISTRATOR*****
Staff member
Administrator
Moderator
Apr 5, 2013
13,498
9,549
228
The model came out superb. If you used strips instead of tabs, you would have even better hull fitment/fuselage, and since the strips can be added to the bulkheads, you could have made each section, and had a straight fuselage before you mounted it to the wings. However, the model looks superb!! :)
 

Chuffy70

Well-Known Member
Jun 5, 2022
842
1,708
75
Norwich UK
The model came out superb. If you used strips instead of tabs, you would have even better hull fitment/fuselage, and since the strips can be added to the bulkheads, you could have made each section, and had a straight fuselage before you mounted it to the wings. However, the model looks superb!! :)
Thank you @zathros - kind words & great input, your suggested upgrades I utilise on most of my favourite and more intricate builds, but this model is being made 'as per the instructions' and purely as a guide.

I'm sorry to say this, but this version is not really worth the effort to enhance by your recommendations, when there this a far superior, although harder version to build.
 

zathros

*****SENIOR ADMINISTRATOR*****
Staff member
Administrator
Moderator
Apr 5, 2013
13,498
9,549
228
I guess you are referring to the UHU Version. Uhu uses a lot of graphic lines for apparent detail, these also give you a guide for further enhancement. It's on my bucket list too, as is most of his 2001 Space series. ;)
 

Chuffy70

Well-Known Member
Jun 5, 2022
842
1,708
75
Norwich UK
I guess you are referring to the UHU Version. Uhu uses a lot of graphic lines for apparent detail, these also give you a guide for further enhancement. It's on my bucket list too, as is most of his 2001 Space series. ;)
Yes Guv, I mentioned it at the start of the build... looks 100% better
 

seraphim

Well-Known Member
Sep 1, 2023
252
553
75
48
Yes Guv, I mentioned it at the start of the build... looks 100% better
all of UHUs work is amazing, and very detailed. My question would be whether to build it with full interior or not? Its a shame that this version is quite lacking in detail, but makes for a reasonable quick build i guess?
 
  • Like
Reactions: Chuffy70 and mijob

Chuffy70

Well-Known Member
Jun 5, 2022
842
1,708
75
Norwich UK
all of UHUs work is amazing, and very detailed. My question would be whether to build it with full interior or not? Its a shame that this version is quite lacking in detail, but makes for a reasonable quick build i guess?
A couple of years ago I made the Moon Bus, it had a full interior, although most of its hidden, most of the internals are structure related, so I would seem plausible you would have make most of it anyway.
As to how much you add is up to you...

My Moon Bus interior
DSC01808.jpg
 

Chuffy70

Well-Known Member
Jun 5, 2022
842
1,708
75
Norwich UK
More Orion gubbins...

Getting nowhere with the instructions and dry fitting becoming too complex to fathom, I attached the bottom hull to the nose cone tab.
This let me raise and lower the belly to see where everything needed to go.

20240124_184039.jpg

A main wing spar runs through the wings, folded into a square tube.
20240124_203004.jpg

Main belly dry fit.
20240124_212714.jpg

Rear part of main top wing added - once again, note the step in the wing.
20240124_222850.jpg

Spar constructed and fuselage side wing guides. Note square hole notched out.
20240124_223822.jpg20240125_100446.jpg20240125_100524.jpg

Although the side guides matched the notches, I feel these have been labelled wrongly as left should be right & right should be left!
20240125_100757.jpg

Once installed the black indicator should be at the front and the rear should have the sloping end trailing into the tail.
20240125_103438.jpg

The belly is too long on the dry fit, but this is correct and will sit correctly once construction continues.
20240125_103500.jpg

Note the angle which caters for the seemingly over long belly.
20240125_103510.jpg

Installation of the spar, unfortunately it fouled the step in the wings, so I left it out.
20240125_103617.jpg

Hinged access
20240125_110811.jpg

The blue arrows show these tabs to be folded inwards and will sit on the belly and the red tabs with the red 'T' on them should be bent downwards and not kept flat as per the inept instructions state.
20240125_110842.jpg

Cursing and swearing about the flaps which the dry fit showed up, but slowly getting there!
20240125_111952.jpg

The odd parts which were finally identified as fitting here.
20240125_114620.jpg

All flaps here should face down
20240125_115021.jpg

With all mating edges and tabs in their correct orientation, a liberal amount of glue was plastered inside and we nearly have a starship!
20240125_141441.jpg

WILL LEAVE IT HERE TODAY AND HOPEFULLY FINISH UP TOMORROW...
 

Attachments

  • 20240125_141506.jpg
    20240125_141506.jpg
    866.1 KB · Views: 3
Last edited:

seraphim

Well-Known Member
Sep 1, 2023
252
553
75
48
More Orion gubbins...

Getting nowhere with the instructions and dry fitting becoming to complex to fathom, I attached the bottom hull to the nose cone tab.
This let me raise and lower the belly to see where everything needed to go.

View attachment 216364

A main wing spar runs through the wings, folded into a square tube.
View attachment 216365

Main belly dry fit.
View attachment 216366

Rear part of main top wing added - once again, note the step in the wing.
View attachment 216367

Spar constructed and fuselage side wing guides. Note square hole notched out.
View attachment 216368View attachment 216369View attachment 216370

Although the side guides matched the notches, I feel these have been labelled wrongly as left should be right & right should be left!
View attachment 216371

Once installed the black indicator should be at the front and the rear should have the sloping end trailing into the tail.
View attachment 216372

The belly is too long on the dry fit, but this is correct and will sit correctly once construction continues.
View attachment 216373

Note the angle which caters for the seemingly over long belly.
View attachment 216374

Installation of the spar, unfortunately it fouled the step in the wings, so I left it out.
View attachment 216375

Hinged access
View attachment 216376

The blue arrows show these tabs to be folded inwards and will sit on the belly and the red tabs with the red 'T' on them should be bent downwards and not kept flat as per the inept instructions state.
View attachment 216377

Cursing and swearing about the flaps which the dry fit showed up, but slowly getting there!
View attachment 216378

The odd parts which were finally identified as fitting here.
View attachment 216379

All flaps here should face down
View attachment 216380

With all mating edges and tabs in their correct orientation, a liberal amount of glue was plastered inside and we nearly have a starship!
View attachment 216381

WILL LEAVE IT HERE TODAY AND HOPEFULLY FINISH UP TOMORROW...
im glad to see it wasnt just me having some, er, 'clarification' issues with the instructions lol, that said, youre doing a fine job, looks great :toast:
 
  • Like
Reactions: Chuffy70