Water Forming

lizzienewell

Well-Known Member
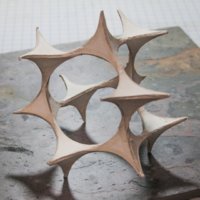
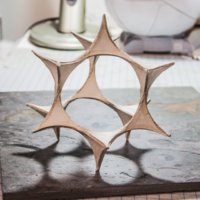
Zathros has been talking about water forming. I think this may be what he's talking about. I'd like to see what others are doing with similar techniques. These are some models/sculptures which I made years ago before I knew what cardmodeling was. I'd been studying ceramics. I tried making the shape in clay which didn't work out very well. I decided to make the shape in the easiest and most readily available material, paper. The model is made of board held together with strips of tracing paper dipped in corn starch paste. To make corn starch paste, you boil corn starch in water is if you were going to make pie filling. It's nicest to use while it's still warm. Refrigerate if you plan to use it later. When it's cool it's kind of lumping and slimy feeling.
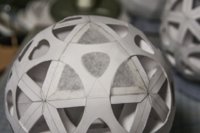
I laid out shapes using a compass: draw a circle with a compass, set the center of the next circle on the edge of the first, then place the next where the two circles overlap and so on. Cut the shapes on the circles. Four triangles go together wet into a tetrahedron. This allows for compound curves. Then dry and the vertices slot together. It's like building with clay with waiting for parts to dry before putting things together further. It involves being aware of the moisture of the material. My current project of geodesic spheres seems to be similar in conception. 20160412_6532 (640x640).jpg
20160412_6533 (640x640).jpg

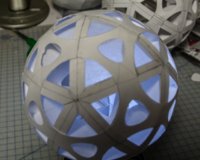
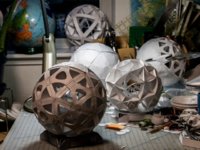
This is iterations of the current project. The triangular parts are similar and can form a compound curve. I use PVA glue which adds some moisture to the paper but which isn't as slimy as corn starch paste. It's 110 lb index, which is easier to bend than illustration board. I add a few parts at a time and let them dry before adding to the model/sculpture. PVA dries faster than corn starch paste. Like the tetrahedrons the geodesic spheres are also built out of circles. Using Coreldraw for circles is easier than using a compass.20160411_6516 (640x480).jpgy in between.
 

zathros

*****SENIOR ADMINISTRATOR*****
Staff member
Administrator
Moderator
When using a model printed out from a .pdf. or jpegs, etc., if you try waterforming, you must make sure you printer uses pigment ink. This is vital as if you printer uses Dye based ink, the colors will run. Most Epson printers use Pigment Ink, which also holds up against U.V. rays better. The ink is not interchangeble between printers no matter what anyone tells you. The printer heads are different and you can easily ruin a printer using the wrong ink..

Lizzie, your work always astounds me!! :)


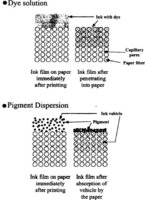
The picture below demonstrates the superiority of pigment Ink over Dye Based Ink. Pigment Ink Connects with the paper matrix in a much more uniform pattern, and as opposed to Dye based ink, is NOT water soluble. The Dye based ink lodges loosely between the paper matrix, and it is this ink which is saturated a loosened with water, and through capillary reaction sucks the ink off of the paper matrix, not completely, just enough to screw up the whole image or pattern. The Pigment ink is heated and this, and it's chemical makeup make it stick to paper. Dye based printers cannot heat up the Pigment ink properly. This is the difference, and why I only bye printers with pigment ink, as it is available in archival quality. I use www.inkproducts.com , they pioneered the availability of O.E.M. ink to the masses and obtain their ink from the same place that the manufacturers do, the source being Dupont, but must be purchased from their designated suppliers. They can also assist you in picking the best printer for your needs. They actually answer the phone when you call them, yes, humans, that speak to you. They are the last, and the best of a human to human contact retailer.

One way to avoid this altogether is to make the model, water form it to shape, and paint it afterwards. This kind of scratch building has great advantages as if offers you a chance to fill, and sand the surfaces to perfection and make a model, or art form that is to your minds eye. This is the hard path, which leads to the finest work, and you personal expression, which is to me IMHO, ART.

Cylongirl
has demonstrated this, with step by step pictures, producing models with whatever works, producing some of the most convincing models I have ever seen. :)

inkjet_fig33.JPG
 

lizzienewell

Well-Known Member
Interesting. I've got three printers, 2 Epsons and a Brother. The Brother is cheapest per copy. The big Epson can handle bigger format and has archival ink but it's older and the paper feed doesn't seem to be working right. It can be frustration. The smaller one is newer and more reliable. I'm not sure if it has dye or pigment. The earlier model in this post was laid out with pencil so ink running isn't a problem. The spheres also don't seem to be a problem either. The lines are for layout only. But from what you are saying my ink is probably pigment based. I'm experimenting with acrylic matt medium for the skin. I should probably show today's experiment. I visited the model airplane hobby store to ask about doing tissue paper on wings. I decided against wing dope. Next I stopped by the art supply story around the corner for rice paper. I'd like to get 8 1/5x 11 rice paper that I can run it through my small printer, but it doesn't seem to be available. I ended up with a 12" x 18" pad of rice paper. I might try cutting it down to go in my little printer. I cut the panel below using a template. Its glued it on the edges with PVA which I let dry and then brushed on acrylic matte medium to both tighten and seal. It's got a few wrinkles, and this is one on my trial versions of the sphere. I've got some more things I'd like to try. I may do every panel of this sphere with a different technique.
20160413_6550 (640x427).jpg 20160413_6551 (1) (640x512).jpg
 

Rhaven Blaack

!!!THE MAN BEHIND THE CURTAIN!!!
Staff member
Administrator
Moderator
I really like these orbs that you are making. I like the technique.
 

zathros

*****SENIOR ADMINISTRATOR*****
Staff member
Administrator
Moderator
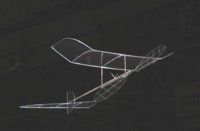
Have you investigated Acetate? It is a very interesting chemical, pretty harmless, to work with. you gentle poor it on a tray of water about an inch deep, the Acetate solidifies, the you dip your model, slightly wetting the surfaces, just a touch, enough to enable a negative charge, this will lift the acetate, which you then pat down with a dry tissue around the edges, it dries clear of translucent, depending how thick or how many times you do it. This is the method for making those rubber band planes that seem to hang in the air, moving forward at around 3 mph, they weigh nothing they seem to hang in the air. The propeller revolves very slowly, moving large volumes of air. It is huge relative to the size of the plane. The rubber bands are treated with Brake Fluid which allows the to wind tighter with less stress, and yet release the stored energy better. They are extremely fragile, but worth the effort. The Acetate usually has to be thinned. It's been such a long time, but there are tutorials on how to do this, Google it. The tale wing (elevator) is crooked to counter the P-Factor) ;)

Acetate winged.jpg
 

spaceagent-9

Right Hand Man and Confidant
Moderator
if I took a epoxy mold of a positive plastic egg. or dome. and then laid in a water softened and glue paper stips or just pushed in with my thumb, and popped it out when dry, do you think it would be sturdy enough, or would I need to harden it with glue? I don't even want to try until I hear from someone who knows about it please.
 

zathros

*****SENIOR ADMINISTRATOR*****
Staff member
Administrator
Moderator
I would use a glue on the opposite side of the surface showing. If it can penetrate the surface, even better. This is called cold molding, by the way a plastic bag over the piece which is glued, with a vacuum source to make the glue penetrate the part is at the heart of composite manufacturing, vacuum bag molding. This is how you could make rounded fenders or hoods, etc., for an older style car. This is also how Mahogany stripped canoes are made. :)
 

spaceagent-9

Right Hand Man and Confidant
Moderator
you mean like the wet glue tissue is over a greased light bulb surface, and then put a plastic bag over all of it with the mouth over the bottom, and then rubber band it to the hose outer surface and turn it on? how long? and what kind of glue, will elmers work well? no acetates because of allergies to that stuff.
 

zathros

*****SENIOR ADMINISTRATOR*****
Staff member
Administrator
Moderator
You wouldn't need it with Elmer's glue because it already saturates the tissue. I might consider putting extremely fine wood dust mixed with the Elmer's glue to strengthen it, along with fine threads crisscrossed, forming a matrix. The trick would me to coat the surface so you need not cut if, but then again, you can use carefully cut plastic sheets to separate pieces so you can remove them from something like a bulb, or oddly shaped object. Only time you would use a bag is if you are going to apply vacuum, otherwise, it would serve not purpose, and you would have have to use a two part epoxy that did not need air to work. The vacuum is to draw the epoxy through the material.
 

spaceagent-9

Right Hand Man and Confidant
Moderator
oh I see now! yes the threads as with the domes on the forrest domes in silent running! what a great idea!! thank you.
 

mbauer

Cardstock Model designer
I would use a glue on the opposite side of the surface showing. If it can penetrate the surface, even better. This is called cold molding, by the way a plastic bag over the piece which is glued, with a vacuum source to make the glue penetrate the part is at the heart of composite manufacturing, vacuum bag molding. This is how you could make rounded fenders or hoods, etc., for an older style car. This is also how Mahogany stripped canoes are made. :)
And Homebuilt Composite Airplanes.

Mike
 
Top