Walther's Cornerstone trackside structures kit.

Bill Nelson

Well-Known Member
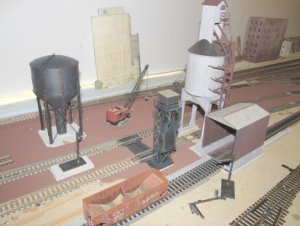
I'm rebuilding my Ho layout ( see the logging minning and industrial section). I am changing the set up of my interchange with the Southern Railway; in this next incarnation of my frelanced shortline, I will share a section of mainline with the Southern Ralway. I will use return loops built into the layout proper, and my Southern staging so that Southern trains will apear to be going and comming in bothe directions, they used to just shove cuts of cars onto my railroad and leave.

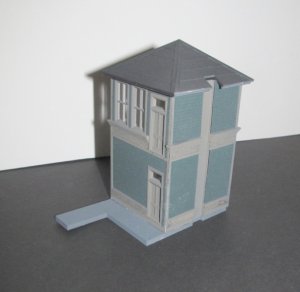
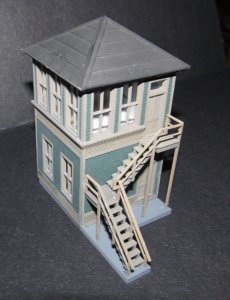
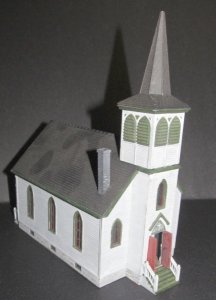
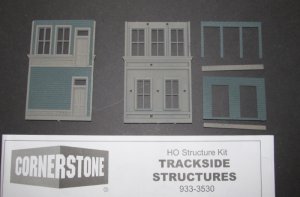
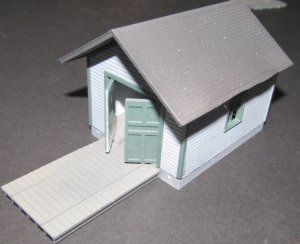
I figured with this new set up I needed an interlocking tower for the Southern at each end of the shared track, and I chose the Walther's Cornerstone trackside stuctures kit, which has an interlocking tower, a crossing shanty, and a speeder shed. I bought two kits, and will paint and build both of the interlocking towers and the crossing shanties for the Southern, and will paint one of the speeder shed for my own DG CC & W RR, in the white and green trim color scheme I have been using for the last ten years, some of my older buildings are red and black.

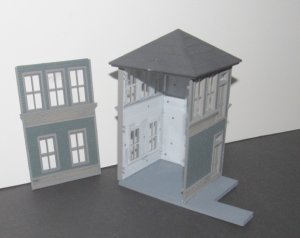
I am writing this review because I really like the way these kits are set up with the multiple piece walls, which allows some serious strength, and detail, while allowing great seperation of colors for the trim and windows

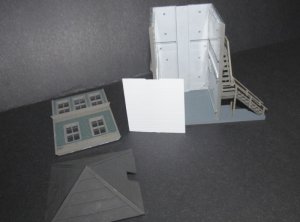
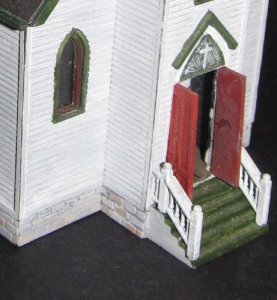
I always paint every piece of a plastic kit (excepting window glazing) with spray paint to kill any plastic shine. while it takes a little . head scratching to figure what should be painted what color, The fit of the parts and the way the wall is set up allows for very neat construction, and color seperation. I've only gotten results this neat with laser cut wood stuctures. these produce real quality buildings with relative ease.

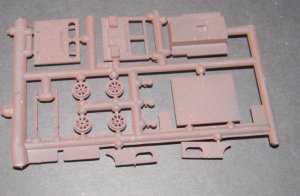
I haven't built them yet, but I am showing the parts for one of the Jordon speeders. these may be too mocern for my era, (I'll have to check, If they are I will build them and take them to the club. these have a special place in my heart, as My Grandfather Nelson was a Patent Attourney, and drew up the patent's for these critters.

Bill Nelson
 

Attachments

  • AAA-cornerstone kit #1.jpg
    AAA-cornerstone kit #1.jpg
    108.9 KB · Views: 64
  • AAA Cornerstone kit #2.jpg
    AAA Cornerstone kit #2.jpg
    136.5 KB · Views: 33
  • AAA Cinerstone kit #3.jpg
    AAA Cinerstone kit #3.jpg
    140.2 KB · Views: 36

zathros

*****SENIOR ADMINISTRATOR*****
Staff member
Administrator
Moderator
Anxious to see what you do with this. You make what appear to be simple kits so nicely detailed and weathered! :)
 

Bill Nelson

Well-Known Member
Thanks Zathros,


this kit is really pretty complicated, I get those nice subtle touches by spray painting with at least two colors at once. I have been using a battle ship gray primer, plus the primary color on these. I used to model in the late 1940's, and did a lot of severe weathering; but I have regressed to the late 20's, and am trying to be a lot more subtle with the weathering on equipment and structures.


I used to do a lot of air brush work, but several of the paints I was really good at using were discontinued. I got tired of the learning curve, and learned to do with spray paint.Nelson
 

zathros

*****SENIOR ADMINISTRATOR*****
Staff member
Administrator
Moderator
There has been a lot of talk about Air Brushing on the forum lately. The resulting pictures are excellent. I have never done it. I believe may deserve it's own section for tutorials and techniques. :)
 

Bill Nelson

Well-Known Member
air brushing.

I haven't air brushed in years. I learned to air brush with the original floquil RR paints; and got real good at it. They changed the paint formula, and I struggled with the new formula for years, about the time I was half as good with the new formula as I was with the old, they changed the formula again.


I started working with the water based Floquil Polly S, before I was satisfied with my paainting skill, they changed the formula again. I screwed up my good air brush experimenting with adding some rubbing alcahol to the mix trying to get the stuff to spray finer, and dry faster. Boy howdy did it spray finer, for a minute or so, the problem was the stuff dried on the control surfaces inside the brush, and I was not able to get it all off, so my good air brush is messed up. I have some cheap single action air brushes, but I have not used them in years. were I to do a toutorial, I'd have to get a good brush, and learn how all over again.

the advantages of an air brush is you can mix your own paint, to paint exactly the color you want.; and lay it on extremely fine, so details are not obsured by the thickness of the paint. one can dust a model very lightly, several times to get good coverage, with very little paint thickness. for weathering, nothing can match the subtlety you can achieve with an air brush. the chief disadvantage is you can spend four or five times the time preparing your paint setting up the brush, and cleaning up afterwards , so you tend to let projects stack up waiting to get enough plied up to make it worth the hastle of setting up and cleaning the brush.


I get my awesome results with rattle cans. I'd do a tutorial on that, but I will need to train a photographer, as when I do my method, I usually am working fast, with a spray paint can in each hand, which makes doing pjhotography problematic..


I have installed three walls of the tower. I left the fourth wall off, because I want to add a second floor; and possibly some details and lighting to these towers, as they will be important visually, and operationaly, marking off where my RR and the Southern Share the Mainline. another visual clue will be the rail size, as I'm using code 83 for most of my new main line (I will probably use code 100 on the helix and on any long sections of hidden track)


one thing I like obout the way this kit is enginered, is with the windows made into the wall base, the inside of the model is very clean, with only the clear window glazing inside the structure and it doesn't show, so the building is nicely suited for interior detailin. because of this I have painted the inside walls white, usually I'm painting the inside walls of a plastic kit flat black so the bumps and irregularities don't show, note hoe clean the inside of this tower looks
 

Attachments

  • AAAA  SR  sw twr  wls up #1.jpg
    AAAA SR sw twr wls up #1.jpg
    72.2 KB · Views: 83
  • AAAA  SR  sw twr  wls up #2.jpg
    AAAA SR sw twr wls up #2.jpg
    90.1 KB · Views: 33

Bill Nelson

Well-Known Member
interior floor

I used a pair of calpers to measure some evergreen V groved siding, to cut an upper floor for the tower.

I used some evergreen HO 4x 10 material glued to the inside of the walls to support the upper floor. these " boards" rest directly on top of the location tabs for the wall joints, so I can believe they are pretty level


I have yet to paint the floor , and I won't glue it in place untill affter I have done the interior detailing, and the lighting, but that may be a very long time from now, as I don't see much point in doing that untill they are on the layout, and that section of layout does not exist yet.


all that remains in the short term is the chiminey. I have that glued together, and I already have it spray painted gray, I will just have to work with some brick red acrylic paint and dry brush the bricks, leaving the mortar lines gray, tricky, but relatively easily done once one has practiced. I will probably build in some wires for the eventual LED lighting, which I will put on the top floor, it will very well lit, which will make the interior details really pop. I'll need to find a pot belly stove for each tower, some chairs. and scratchbuild an iinterlocking mechanism, and a desk, It will need some pictures or maps on the walls too.

If you look at the interior walls you can see some dots, those are the ends of the locating tabs for the exterior panneling and trim, I may touch them up with white paint so they don't stand out quite so much.

the little white dots on the roof , and less visibly elsewhere is plastic dust from sanded styrene, that will be dusted or vacumed off, so hoefully it won't make it to the layout. I got leaves on my trees, so snow would be inapropriate.


in the last photo with the tower put together, you can see how the addition of the floor improves the look of the whole tower making it more solid looking. adding floors and interior walls even if they are just foam core, and lack details, prevent you from looking through buildings in inapropriate ways making the buildings seem more solid, and less of an empty shell greatly improving the realism.
 

Attachments

  • aaa SR twr w  fl #1.jpg
    aaa SR twr w fl #1.jpg
    114.1 KB · Views: 34
  • aaa SR twr w  fl #2.jpg
    aaa SR twr w fl #2.jpg
    98.3 KB · Views: 38
  • aaa SR twr w  fl #3.jpg
    aaa SR twr w fl #3.jpg
    101.1 KB · Views: 38

Bill Nelson

Well-Known Member
another cornerstone kit I built

This used to be St, Elgius's in Montgomery Furnace, and will likely be again. St Elgius is the patron sait of Metal workers.

this kit ws built prety much stock except I did add a floor to it, and cut up the front door some some so I could have it open, it is begging for interior detailing and lighting at some time. sadly I broke the little cross that was on the top of the steeple, and wil need to replace it with something stronger than plastic. The kit has some stickers or decals, I forget which, with nice plain stain glass paterns, that I have not yet put on.


I have also make a couple cornerstone kits for the club, a New river minning Co, and one of thier round concrete coaling tower that I started and Bob finished off. great kits, lots of fun and good results from careful work; a notch or two above the normal plastic structure kit.
 

Attachments

  • aaa  St. Elgius's.jpg
    aaa St. Elgius's.jpg
    73.3 KB · Views: 35
  • aaa St  elgius's  det.jpg
    aaa St elgius's det.jpg
    113.8 KB · Views: 36

Bill Nelson

Well-Known Member
At the train club I took photos of some of the cornerstone buildings at the clube. In the Jackson Street yard's engine facilities we hace a concrete coaling tower , a water tower and a ash conveyor.


I started the coaling tower kit, painting it, and building the main structure (it is very tricky, pay attention there are parts that can go in backwards or in the wrong place) and Bob finished up the details as I had lots of projects on my workbench.


I turned over the water tower and the ash conveyor to Bob, so I can't comment on their construction,

The round concrete coaling tower interested me cause there were the hulks of several of these in South Georgia I remember studingy as a teen, the model is very nice with incredable detail.
 

Attachments

  • aaaa  Engine  facilities.jpg
    aaaa Engine facilities.jpg
    144.6 KB · Views: 46
Top