

'Using Rhinoceros' Discussion Thread
- Thread starter wunwinglow
- Start date
You are using an out of date browser. It may not display this or other websites correctly.
You should upgrade or use an alternative browser.
You should upgrade or use an alternative browser.
wow, thank you Gil for the lesson, it's far beyond my abilities :?
I went with flat surfaces for the wing tips, and I'll have to adjust them when I do the test build...
I went with flat surfaces for the wing tips, and I'll have to adjust them when I do the test build...
Joseph,
The darts can be easily done by inspection during the build. Burnishing the wing tips on a vinyl eraser will cause wrinkles to form on the outer periphery of the tip. Guess what? This is exactly where the darts are cut removing the wrinkle from the tip. By the way the wrinkles will always form in exactly the same position given that you have carefully worked the surface evenly in both directions. Make sure you prepare the paper surface with a light coat of white glue that's allowed to dry before starting the burnishing operation. An alternate technique is to just make several small slices in the tip and fold one surface over the other as the burnishing is done. The other side of the dart is cut and the seam glued when enough curvature is achieved.
-Gil
I have been having some difficulty getting rhino to loft the way I would like it to. In the most recent case I had two arcs in parallel planes one was larger than the otherand both were oriented with the concave portion pointed downward. Rhino keeps lofting it so it looks like a bow tie, ie the lines are going to the opposite corners from where they should be going. How do you tell Rhino which way is correct?
Rhino senses a direction reversal between the two. Try selecting them in reverse order and try lofting them. If that doesn't work rebuild both and then loft.
-Gil
-Gil
No need to rebuild. Click on the button that has a little forest of white arrows, then click on one of your curves. A white arrow will appear at one end. Hit the 'F' key to 'Flip' the direction. Now select the two curves for the loft operation.
When you start a loft, these arrows will appear conecting the ends of the curves Rhino has identified as the start points of each curve. Imagine these as the first edge of the surface it is going to generate. If these points DON'T correspond, you will get a twisted loft. Rhino is very good at telling you what it is proposing to do, so watch the screen, and read the command line as you work.
This usually happens when you draw one curve from left to right, the next from right to left. Rhino will usually sort this out, but sometimes there is no obvious 'right' way and that is the result. 'Direction' also affects surfaces, and you can use the same tool to check which is the 'inside' or the 'outside' of a surface. This affects the way surfaces unroll, so it is worth getting to know this command; it is VERY useful!
Sukhoi tutorial covers this in some detail, by the way.
Tim P
T
tausugAir
Hello, Every body:
If my attachment would go (I have weakness in that department), this one is REALLY, REALLY a Baby's Step/s in the use of Rhino!! I appreciate the "Rhino Gurus" (Tim, Nobi, Josseph, et al) to critique my attempt to "wrestle" a Rhino.... Regards
Muhammad or Farouk
If my attachment would go (I have weakness in that department), this one is REALLY, REALLY a Baby's Step/s in the use of Rhino!! I appreciate the "Rhino Gurus" (Tim, Nobi, Josseph, et al) to critique my attempt to "wrestle" a Rhino.... Regards
Muhammad or Farouk
There you go!! All journeys start with a first step. I just get the biggest kick out of seeing new guys making progress like this! Can't wait to see your first model, but before you go charging ahead, try exporting the lines to your colouring software, put some camouflage on it, print it, cut it out and MAKE IT!! I guarantee the thrill of seeing, folding and assembling your first model part!
Muhammad, great stuff!
Tim P
Muhammad, great stuff!
Tim P
T
tausugAir
wunwinglow said:There you go!! All journeys start with a first step. I just get the biggest kick out of seeing new guys making progress like this! Can't wait to see your first model, but before you go charging ahead, try exporting the lines to your colouring software, put some camouflage on it, print it, cut it out and MAKE IT!! I guarantee the thrill of seeing, folding and assembling your first model part!
Muhammad, great stuff!
Tim P
Thanks for the encouragement; and I need that! But, THIS was possible thru following along your tutorial "Designing A Paper Model Using Rhinoceros" and the thread "Panel Lines in Rhino".... CREDIT goes to you!!
I've just reloaded CorelDraw10 and I'll just do like what you recommend. I hope I'll successful with the exporting and coloring in that application...
THANKS SO MUCH for being generous with your knowledge and talent..
Best regards to and all.
Muhammad
T
tausugAir
NOBI said:Muhammed,
u get Rhino already?
Hi, Nobi :
Yes, I have the Evaluation Version, courtesy of Rhino Website. And its limited to 25 savings.... So, I don't save, I'll just screen grab (by Screen Hunter) my exercises in Rhino...then close the application for another work! A bit tedious, isn't. Will have to double the effort to come up with the US DOLLAR 900....thouhg
 :roll: Best regards
Muhammad
I have seen the future, and it is RHINO!
http://www.rhino3d.tv/ano_2005/August_2005/unrollsrf.html
Start saving now for your v4 upgrade, fellow rhinoists....
Tim P
http://www.rhino3d.tv/ano_2005/August_2005/unrollsrf.html
Start saving now for your v4 upgrade, fellow rhinoists....
Tim P
T
tausugAir
wunwinglow said:There you go!! All journeys start with a first step. I just get the biggest kick out of seeing new guys making progress like this! Can't wait to see your first model, but before you go charging ahead, try exporting the lines to your colouring software, put some camouflage on it, print it, cut it out and MAKE IT!! I guarantee the thrill of seeing, folding and assembling your first model part!
Muhammad, great stuff!
Tim P
Still making am making "baby steps"! I did a wing following the steps describe by Steve Sanvito over at RhinoWebsite tutorial page. I wonder why it wouldn't "unroll"? ... The wing is done by Sweep2 using as rails the wing leading and trailing edges with the rib (top) as top curve and wingtip "point"' repeating the process for the bottome surface using rib(bottom)curve.
Expert advices from the Gurus and Wunwinglow is very much welcome and appreciated.. Regards to everyone...
Muhammad
Attachments
Split the rails so you do make the surface in two pieces. Then unroll each one seperately. Imagine trying to unroll that whole wing as one piece. It wouldn't work, it has to be split where the change in trailing edge occurs. Rhino has the same limitation, at the moment anyway!
Tim P
Tim P
Attachments
T
tausugAir
wunwinglow said:Split the rails so you do make the surface in two pieces. Then unroll each one seperately. Imagine trying to unroll that whole wing as one piece. It wouldn't work, it has to be split where the change in trailing edge occurs. Rhino has the same limitation, at the moment anyway!
Tim P
Tim .... Thanks a lot... I'll keep it in my notebook to do just that. I'll work on it tomorrow. It's past midnight and I can take the needed rest (sleep!) now the Guru had spoken!! Thanks, again
wunwinglow said:I have seen the future, and it is RHINO!
http://www.rhino3d.tv/ano_2005/August_2005/unrollsrf.html
Start saving now for your v4 upgrade, fellow rhinoists....
Tim P
Tim....INCREDIBLE....now we will not have a problem about where to join anymore (i have some problem when unfold a tank..i alway confuse about place to join it together hehe :???: ) Thank you very much...:smile:
Nobi,
That's one reason to also develop a certain amount of surface detail..., it helps figure out which way is up and right side around.
-Gil
That's one reason to also develop a certain amount of surface detail..., it helps figure out which way is up and right side around.
-Gil
T
tausugAir
Gil said:Nobi,
That's one reason to also develop a certain amount of surface detail..., it helps figure out which way is up and right side around.
-Gil
Yes, I so very much reliy on surface detail to get my bearing on surface orientation....Regards
Hi Folks,
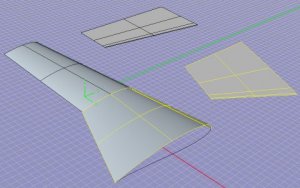
just a quick note on surface orientation. If you have e.g. a wing surface like above, check the orientation with analyze - direction. Press f for flip if the arrows do NOT point outwards.
If the arrows point outwards and you unroll the surface, the outerside will be facing the top (arrows pointing upwards).
To distinguish fron/back left/right of difficult unrolled parts, I always place a tickmark at a distinct place on the surface before unrolling.
If you keep checking the direction during design, it makes things easier.
Regards
Jan