

I have been binge-watching Series 1 of "Witcher" on Netflix over the last couple of weeks. I'm feeling tired today, but I'm going to add some more to the Interceptor build 
Here I have added the orange LEDs for the high-velocity cannons simulation. I used thin (24 SWG) tin-copper wire for the connections. On the middle left wire you can see the 1/8 Watt resistor enclosed in heat-shrink tubing. It's better to use a dedicated resistor for each LED to avoid issues.

Over the last months I found a lot more of my build photos for this model, so have been including them here. In the future I am going to sequence the lighting effects with a microprocessor. This will enable me to synchronize lights and sound.

Sliding on the nose assembly to the main body making sure to route the wires properly.

It was better for me to work on the model with the body vertical. This enabled the glue to flow into the bulkheads better. It also avoided putting pressure on pieces that didn't need pressure.

I made a stand for the Interceptor out of some small cereal boxes, and some thick cardboard I had been trying to find a use for. You can see the horizontal strengthening pieces along the sides of the fuselage. I didn't glue the side panels to these as it would distort the shapes of the paper.

This here's the micro-servo used for the canopy operation. I made a long control arm out of thick plastic-card to give enough throw The servo at the bottom is for the pilots animation.

A bit blury, but more detail on the routing of the fibers and wiring.

Time to start work on the rest of the body panels. My work table was getting way too small for this guy!

Getting a nice glint off the paper This all brings back happy memories! I really enjoyed working on this project!

These small clamps are very useful from Harbor Freight. Here;s a wiring loom, and the bowden-cable.

A glitch with the camera, but you get the idea. This is the underside skin being tested for correct fit. The parts have to be tested over-and over to make sure any imperfections have not been scaled up too.,

More panels ready for cutting and laminating for strength.

I fitted a thin transparent piece of plastic around the edge of the cockpit for the canopy to locate against when it is in the closed position. This is pretty important to make sure the canopy fits right and is snug.

Deciding on Canopy Implementation:
I looked at all the UFO Series and movies, everything I could find to see how the canopy hinged. I couldn't find anything! We just were shown the pilot going down the slide and the next thing we see him in the Interceptor cockpit. It took quite a lot of thought, experimentation, and research to determine how it "could" work. It seems this has never been attempted before maybe?
I have a really good reference from Japan. It is all in Japanese language but there are many images of all the aspects of the UFO Series/Movie franchise at that time. Each of the pilots take their own "chute" from the internal Moon-base Launch room. The chute takes the pilot down to the lower level of the Interceptor launch bay below the moon surface. At the bottom of the chute the pilot is lowered into the seat of the Interceptor from above. This would suggest that the Interceptor Launch Bay is pressurized, so the pilots can breath.
The Interceptor's canopies are all in the open fully position, so that the pilots can be gently lowered in to the seat inside the cockpit. After the pilot is inside the Interceptor, the mechanism for lowering the pilot is retracted clear of the vehicle. Then the canopies all close and the cockpit is pressurized (it has to be because there is no sign of any breathing apparatus installed for the pilots to breath). The Interceptor Launch Bay is then depressurized, and then the sliding doors separate, and fully open allowing the Interceptors to be lifted on hydraulic platforms to the surface. They then engage thrusters and lift-off in pursuit of the UFO. When they return, the actions are reversed aside from the quick launch entry chute. Instead the pilots disembark through another path as they cannot go backwards up through the chute due to low gravity. It appears that artificial gravity exists on the Moon-Base Alpha to simulate that of earth, otherwise everyone would be bouncing around Someone told me that the Moon has 1/6 the gravity of Earth so it does have some gravity but not the same as Earth.
Okay, that is my take on the way the Interceptors launch procedure is executed. With this in mind, it would require that the canopy is fully open without obscuring the lowering of the pilot into the pilot seat. I experimented with the canopy first of all with the hinge located at the back of the canopy, and found that it was not possible to open it far enough without hitting the fairing on top of the fuselage just behind the rear of the canopy. This was due to the angle of the window (the overall shape). This would prevent the access for the pilot. Also, with the hinge at the rear, which actually would have been easier to build it would conflict with the telescope viewing system to the back of the craft (located just behind the pilot's head). With the canopy fully open with the hinge behind it actually looks kind of weird too as it sticks way high up above the top of the fuselage :Smartass:
With the hinge at the front, it allows full access for lowering in the pilot into his seat also much faster as you don't have to wait so long for the canopy to fully open as you would if it was possible with rear mounted hinges if you see what I mean? It also does not conflict with any of the other equipment, and seems to look more natural, kind of like opening the hood on an E-Type Jaguar.
So, that was my take on it as I couldn't find any reference to this in any episode, movie or otherwise
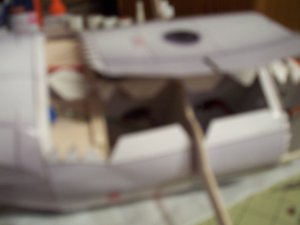
Another view of the rear body internals before they are closed forever!

A little tricky getting the panels to butt join nicely thumbsup

I use Post-It notes to hold parts together as it doesn't harm the paper. Also, rubber-bands, clamps, mini clothes-pins, and modelling pins. I also rest my model on a soft towel to stop the chances of damaging the paper parts by scratching them on the work surface.

I had to plan for mounting the Missile on the front of the nose.

Building up the fins of the air intakes. A nice bead of white glue to add nice strength to it.

Here is the left front cowling. I did have to re-make one of these as the first attempt didn't go together right. Patience is needed on each of the joints with a strip of paper on the inside to support the parts. I cut off the majority of the tabs for all the parts as the overlap was just too noticeable, and looked bad especially due to the thicker material (laminated paper).

I need a new cutting board! This one has been very well-used!
Here I have added the orange LEDs for the high-velocity cannons simulation. I used thin (24 SWG) tin-copper wire for the connections. On the middle left wire you can see the 1/8 Watt resistor enclosed in heat-shrink tubing. It's better to use a dedicated resistor for each LED to avoid issues.
Over the last months I found a lot more of my build photos for this model, so have been including them here. In the future I am going to sequence the lighting effects with a microprocessor. This will enable me to synchronize lights and sound.
Sliding on the nose assembly to the main body making sure to route the wires properly.
It was better for me to work on the model with the body vertical. This enabled the glue to flow into the bulkheads better. It also avoided putting pressure on pieces that didn't need pressure.
I made a stand for the Interceptor out of some small cereal boxes, and some thick cardboard I had been trying to find a use for. You can see the horizontal strengthening pieces along the sides of the fuselage. I didn't glue the side panels to these as it would distort the shapes of the paper.
This here's the micro-servo used for the canopy operation. I made a long control arm out of thick plastic-card to give enough throw
The servo at the bottom is for the pilots animation.A bit blury, but more detail on the routing of the fibers and wiring.
Time to start work on the rest of the body panels. My work table was getting way too small for this guy!
Getting a nice glint off the paper This all brings back happy memories! I really enjoyed working on this project!
These small clamps are very useful from Harbor Freight. Here;s a wiring loom, and the bowden-cable.
A glitch with the camera, but you get the idea. This is the underside skin being tested for correct fit. The parts have to be tested over-and over to make sure any imperfections have not been scaled up too.,
More panels ready for cutting and laminating for strength.
I fitted a thin transparent piece of plastic around the edge of the cockpit for the canopy to locate against when it is in the closed position. This is pretty important to make sure the canopy fits right and is snug.
Deciding on Canopy Implementation:
I looked at all the UFO Series and movies, everything I could find to see how the canopy hinged. I couldn't find anything! We just were shown the pilot going down the slide and the next thing we see him in the Interceptor cockpit. It took quite a lot of thought, experimentation, and research to determine how it "could" work. It seems this has never been attempted before maybe?
I have a really good reference from Japan. It is all in Japanese language but there are many images of all the aspects of the UFO Series/Movie franchise at that time. Each of the pilots take their own "chute" from the internal Moon-base Launch room. The chute takes the pilot down to the lower level of the Interceptor launch bay below the moon surface. At the bottom of the chute the pilot is lowered into the seat of the Interceptor from above. This would suggest that the Interceptor Launch Bay is pressurized, so the pilots can breath.
The Interceptor's canopies are all in the open fully position, so that the pilots can be gently lowered in to the seat inside the cockpit. After the pilot is inside the Interceptor, the mechanism for lowering the pilot is retracted clear of the vehicle. Then the canopies all close and the cockpit is pressurized (it has to be because there is no sign of any breathing apparatus installed for the pilots to breath). The Interceptor Launch Bay is then depressurized, and then the sliding doors separate, and fully open allowing the Interceptors to be lifted on hydraulic platforms to the surface. They then engage thrusters and lift-off in pursuit of the UFO. When they return, the actions are reversed aside from the quick launch entry chute. Instead the pilots disembark through another path as they cannot go backwards up through the chute due to low gravity. It appears that artificial gravity exists on the Moon-Base Alpha to simulate that of earth, otherwise everyone would be bouncing around
Someone told me that the Moon has 1/6 the gravity of Earth so it does have some gravity but not the same as Earth. Okay, that is my take on the way the Interceptors launch procedure is executed. With this in mind, it would require that the canopy is fully open without obscuring the lowering of the pilot into the pilot seat. I experimented with the canopy first of all with the hinge located at the back of the canopy, and found that it was not possible to open it far enough without hitting the fairing on top of the fuselage just behind the rear of the canopy. This was due to the angle of the window (the overall shape). This would prevent the access for the pilot. Also, with the hinge at the rear, which actually would have been easier to build it would conflict with the telescope viewing system to the back of the craft (located just behind the pilot's head). With the canopy fully open with the hinge behind it actually looks kind of weird too as it sticks way high up above the top of the fuselage :Smartass:
With the hinge at the front, it allows full access for lowering in the pilot into his seat also much faster as you don't have to wait so long for the canopy to fully open as you would if it was possible with rear mounted hinges if you see what I mean? It also does not conflict with any of the other equipment, and seems to look more natural, kind of like opening the hood on an E-Type Jaguar.
So, that was my take on it as I couldn't find any reference to this in any episode, movie or otherwise
Another view of the rear body internals before they are closed forever!
A little tricky getting the panels to butt join
nicely thumbsupI use Post-It notes to hold parts together as it doesn't harm the paper. Also, rubber-bands, clamps, mini clothes-pins, and modelling pins. I also rest my model on a soft towel to stop the chances of damaging the paper parts by scratching them on the work surface.
I had to plan for mounting the Missile on the front of the nose.
Building up the fins of the air intakes. A nice bead of white glue to add nice strength to it.
Here is the left front cowling. I did have to re-make one of these as the first attempt didn't go together right. Patience is needed on each of the joints with a strip of paper on the inside to support the parts. I cut off the majority of the tabs for all the parts as the overlap was just too noticeable, and looked bad especially due to the thicker material (laminated paper).
I need a new cutting board! This one has been very well-used!


")
 , specifically, the one of Luke Skywalker pilot from Star Wars. I just basically used the same techniques, and scaled it up to match the Interceptor's scale. I made a standing and a seated version. I will be doing a section just on the pilot's build at the end of this build. It's a project in itself.


 I had to re-do this!


 I'm tryiing to make another post before I have to pack up my computer. It may be a while before I am able to post again. There is no Internet at the new place for the next 6 weeks or so
  .
.


")


