

Thunderbird 3
- Thread starter Sky Seeker
- Start date
You are using an out of date browser. It may not display this or other websites correctly.
You should upgrade or use an alternative browser.
You should upgrade or use an alternative browser.

Joining main body to lower nacelle section
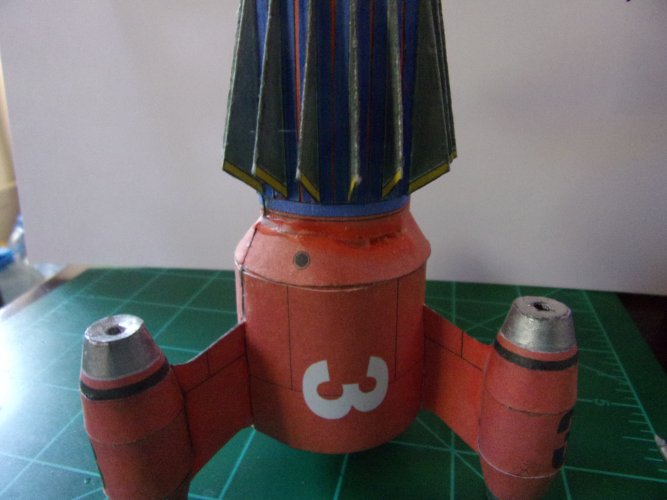
Lower section with nacelles

Attach top section that has the fins to the lower nacelle section. Glue a couple of tabs first then work your way around the periphery in sections. Glue, wait, glue and repeat until you get the entire periphery. While gluing moves the tabs inside either by hand or stylus. Note inside view below.

Note outside view below.

Lower nacelle section joined to main body

After everything is joined to together - colored the top nacelles caps with the silver maker to blend the top of the nacelle with the cap.

Another view of everything joined together

That's it for now!
Sky Seeker
Lower section with nacelles
Attach top section that has the fins to the lower nacelle section. Glue a couple of tabs first then work your way around the periphery in sections. Glue, wait, glue and repeat until you get the entire periphery. While gluing moves the tabs inside either by hand or stylus. Note inside view below.
Note outside view below.
Lower nacelle section joined to main body
After everything is joined to together - colored the top nacelles caps with the silver maker to blend the top of the nacelle with the cap.
Another view of everything joined together
That's it for now!
Sky Seeker

Assembling the back plate to the lower nacelle assembly
End view along the entire length of Thunderbird 3. Strong sunlight also highlights any gaps from the outside to highlight possible repair areas. This view also shows how the tabs end up after being glued and drying.

Starting out - pick one of the three nacelle connecting areas then start working your way around the periphery. Due to the nature of the construction all of the nacelle connection areas created a triangular formation of the lower nacelle assembly which made gluing to something circular quite challenging.

While the photo is blurry it shows the tendency of the model to be triangular.

Bottom almost joined - Upon gluing the edges to the main body the lower plate started bowing upwards.

The bowed area of the lower plate was cut with the edge aligned with the edge of the main body. Then the area was overglued for reinforcement.

The lower plate completely glued to the main body. Any gaps around the periphery (such as at the top) can be filled with glue, dried, and colored with a silver marker. Can you see where the fix was made?

That's it for now!
Sky Seeker
End view along the entire length of Thunderbird 3. Strong sunlight also highlights any gaps from the outside to highlight possible repair areas. This view also shows how the tabs end up after being glued and drying.
Starting out - pick one of the three nacelle connecting areas then start working your way around the periphery. Due to the nature of the construction all of the nacelle connection areas created a triangular formation of the lower nacelle assembly which made gluing to something circular quite challenging.
While the photo is blurry it shows the tendency of the model to be triangular.
Bottom almost joined - Upon gluing the edges to the main body the lower plate started bowing upwards.
The bowed area of the lower plate was cut with the edge aligned with the edge of the main body. Then the area was overglued for reinforcement.
The lower plate completely glued to the main body. Any gaps around the periphery (such as at the top) can be filled with glue, dried, and colored with a silver marker. Can you see where the fix was made?
That's it for now!
Sky Seeker
I rraly like how you build this model its a great help for anybidy who wants to build it.
Yes.Can you see where the fix was made?

...
Ok, just kidding!


Great job, Sky!


It's a work in progress... , but thanks MIJOB.I rraly like how you build this model its a great help for anybidy who wants to build it.
")
The gap in the picture at the top of the model is actually so small you can't see with the naked eye, but the gluing and coloring technique still holds true. It's still amazing to me when you take a picture how the picture can really get blown up to see all the issues that can't be seen normally. Now imagine how the picture gets blown up when you have a monitor that's 42 inches! At that point we're almost talking about seeing something on the micro-scale such as individual fibers or the like. Just an observation.Yes.
...
Ok, just kidding!
Great job, Sky!
Thanks for your comments RF!
Sky Seeker
Last edited:

To be honest, I was shocked to see the close-ups of the lamps I cut out for the house I built. They looked so crude in the pics but so pleasant with the naked eye.
I'm never sure about cameras - sometimes it's the lighting, or the focus, or the angle. There is still a real difference in resolution between the human eye and the digital sensor. Photography is an art. Of course we haven't even gotten into the old film vs digital argument or even AI enhancement. AI is close but still looks artificial upon close inspection.To be honest, I was shocked to see the close-ups of the lamps I cut out for the house I built. They looked so crude in the pics but so pleasant with the naked eye.
My two cents.
Sky Seeker
Good strategy. If a part looks crude it wasn't the builder, it was the cam. ")

Since I'm a huge Supermarionation fan, it's almost inevitable that one day or another I'll end up making all the Thunderbirds models... so I'll be keeping a close eye on this work
Good job.
Thank you Sky Seeker.
Good job.
Thank you Sky Seeker.
Anytime DeckardSince I'm a huge Supermarionation fan, it's almost inevitable that one day or another I'll end up making all the Thunderbirds models... so I'll be keeping a close eye on this work
Good job.
Thank you Sky Seeker.
Last edited:
Getting ready to attach the side struts ... or so I thought
Ok I had all the sections glued together, but when I rested them on the nacelles this happened

This is when I had an Anakin Skywalker moment.


It's moments like these that make you appreciate when things go right..
Sky Seeker
Ok I had all the sections glued together, but when I rested them on the nacelles this happened
This is when I had an Anakin Skywalker moment.
It's moments like these that make you appreciate when things go right..
Sky Seeker
After about a week (my time) thinking about a way to overcome the above, a solution hit me...

I cut into the model until the upper portion was able to move.

Then moved the model until it was vertical then glued everything in place


What happened was that when the model was re-positioned to a more vertical position a portion of the wet skirt folded downwards under the upper section then cured in place. Now I had another problem..
The solution (so I thought) was to make a wider skirt that would go from the lower end of the blue line down to the top of the bottom nacelle section skirt.


In trying to put the new skirt portion flush on top of the old skirt everything bowed outwards. I thought by cutting that might solve that problem, but.....noooo


At this point I just torn everything off and sanded it with an Emory board


I then decided to keep to the original width, reprinted the relevant template, but then ran into another problem.. the skirt was too small!!

And the same with the upper blue line...

What I did next was modify the existing templates in Microsoft Paint and made them longer. Also the existing color scheme from the template was used and didn't try to recolor like what was done before.

Now onto the application. Hope that this works this time...
Sky Seeker
I cut into the model until the upper portion was able to move.
Then moved the model until it was vertical then glued everything in place
What happened was that when the model was re-positioned to a more vertical position a portion of the wet skirt folded downwards under the upper section then cured in place. Now I had another problem..
The solution (so I thought) was to make a wider skirt that would go from the lower end of the blue line down to the top of the bottom nacelle section skirt.
In trying to put the new skirt portion flush on top of the old skirt everything bowed outwards. I thought by cutting that might solve that problem, but.....noooo
At this point I just torn everything off and sanded it with an Emory board
I then decided to keep to the original width, reprinted the relevant template, but then ran into another problem.. the skirt was too small!!
And the same with the upper blue line...
What I did next was modify the existing templates in Microsoft Paint and made them longer. Also the existing color scheme from the template was used and didn't try to recolor like what was done before.
Now onto the application. Hope that this works this time...
Sky Seeker
Attachments
Last edited: