

OK finally here we go with the struts.
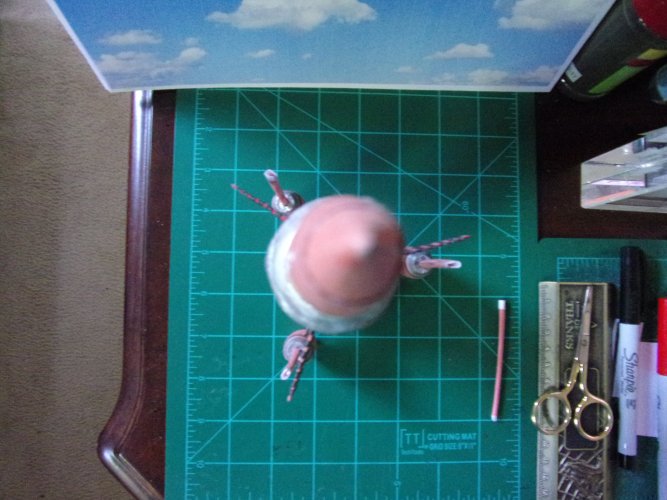
Struts - first pre-fit the struts and check for alignment issues

As you can see we have a MINOR issue here. The upper wings and lower rocket pods are out of alignment just a bit even when you assemble everything on the seams. Recommend in future builds that you rotate the lower pods until they are lined up with the wings. Have some struts pre-made to check length and alignment. In this case, the wings and the connector to the rockets pods with the main body are flexible enough to bend enough to line up with each other.

Even though there are alignment issues, the struts were glued in place on the rocket pods. Overgluing was done to strengthen the placement of the struts.

Struts glued in place. Note that the marker areas on top of the rocket pods were removed by the glue. As can be seen the struts line up with the 2nd to last stripe on the wings.
 The wings are cut to line up with the struts.

Once the wings are cut insert the end of the wings as shown.

The tips of the wings were colored in with marker. (I promise with the naked eye you can't see the individual fibers - amazing how close the autolens can zoom in).

The tips of the wings are pre-fitted into the pockets on top of the struts.

A marker line is drawn to get an idea of the lined up areas and where to cut to make everything look flush.

Strut is then cut. The white areas on top of the strut are colored with black marker to blend in with the stripes on the wing.

The struts are then glued in place. Any bowed out cut sections on the strut below the wing can be glued together and pressed in while the glue is setting to make the strut look more cylindrical.

Additional stripes for the wing.

Additional stripes for the wing - adding stripes to the wing. Make sure to keep the stripes against the edge of the main body. First glue a stripe on one side of the wing.

Then fold over and pinch the top to make sure that it is squared off.

That's it for now! - Almost Done. Next up the landing pad.
Sky Seeker
Struts - first pre-fit the struts and check for alignment issues
As you can see we have a MINOR issue here. The upper wings and lower rocket pods are out of alignment just a bit even when you assemble everything on the seams. Recommend in future builds that you rotate the lower pods until they are lined up with the wings. Have some struts pre-made to check length and alignment. In this case, the wings and the connector to the rockets pods with the main body are flexible enough to bend enough to line up with each other.
Even though there are alignment issues, the struts were glued in place on the rocket pods. Overgluing was done to strengthen the placement of the struts.
Struts glued in place. Note that the marker areas on top of the rocket pods were removed by the glue. As can be seen the struts line up with the 2nd to last stripe on the wings.
The wings are cut to line up with the struts.Once the wings are cut insert the end of the wings as shown.
The tips of the wings were colored in with marker. (I promise with the naked eye you can't see the individual fibers - amazing how close the autolens can zoom in).
The tips of the wings are pre-fitted into the pockets on top of the struts.
A marker line is drawn to get an idea of the lined up areas and where to cut to make everything look flush.
Strut is then cut. The white areas on top of the strut are colored with black marker to blend in with the stripes on the wing.
The struts are then glued in place. Any bowed out cut sections on the strut below the wing can be glued together and pressed in while the glue is setting to make the strut look more cylindrical.
Additional stripes for the wing.
Additional stripes for the wing - adding stripes to the wing. Make sure to keep the stripes against the edge of the main body. First glue a stripe on one side of the wing.
Then fold over and pinch the top to make sure that it is squared off.
That's it for now! - Almost Done. Next up the landing pad.
Sky Seeker


")


