The UHU02 Colonial Viper appreciation thread

silveroxide

Senior Member
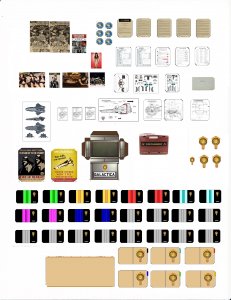
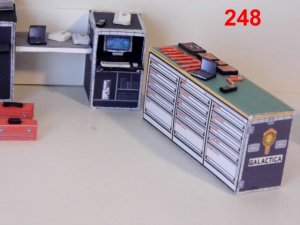
Time to revive this old thread with some more updates. There is still so much to do and too many models but this one deserves a finish. I am still considering the diorama display for it, from a full hangar maintenance bay to a one or two wall display or no walls and a floor display. the tool boxes and fixtures are made and need tobe cut and build. Maybe a couple of more figures to add flavor to the setup. Enjoy and hope to be back with this thread soon. The number sequence is off due to inactivity and I forgot where I left off.

237.jpg 
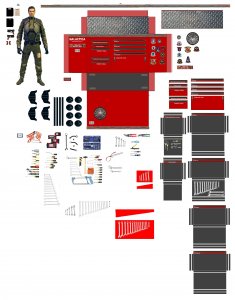
I tried to simulate chief Tyrol on this figure and there are two versions of the flight suits, but that is due to the ink print out which gave two color variations.

238.jpg
The wing has an access panel cut out. The series and models of the Viper have no possible process of loading ammunition to the wing stores.

239.jpg

240.jpg

241.jpg

242.jpg
 

Attachments

  • 236.jpg
    236.jpg
    60.3 KB · Views: 14

Rhaven Blaack

!!!THE MAN BEHIND THE CURTAIN!!!
Staff member
Administrator
Moderator
I am glad to see you returning to this project!!!
What you have so far, looks AMAZING!!!
I am really looking forward to seeing how your diorama turns out!!!
 

Revell-Fan

Co-Administrator
Staff member
Administrator
Moderator
Fantastic and FUNtastic work, silver! ;) Great to see this one coming together!
 

silveroxide

Senior Member
I am glad to see you returning to this project!!!
What you have so far, looks AMAZING!!!
I am really looking forward to seeing how your diorama turns out!!!

Thanks for your comments. there is so much to do on this project and while the Viper is almost done, it is the details that bring out the most fun.

Fantastic and FUNtastic work, silver! ;) Great to see this one coming together!

Thanks and there is more to come this way.


The Viper itself is almost finished and now it is for the rest of the scenario which is another project in its own right. The cabinets are from the Nakajima racing mechanics set from EPSON. As for the tools, they are a mix from crafstman, Huskey, snap-on and other web sites. I will not do a schematics on them since they belong to some one else, especially the EPSON cabinets which I modified with BSG logos and and other markings. The tools are cut individually and it is very time consuming, that is the reason for the slow down. The devil is in the details and this project still has a way to go. Enjoy and see you all soon with more items for your enjoyment.

243.jpg

244.jpg
 

Rhaven Blaack

!!!THE MAN BEHIND THE CURTAIN!!!
Staff member
Administrator
Moderator
I like the tools. They look GREAT!!!
Yes, little details (like the tools) are VERY TIME CONSUMING, but they are well worth the effort!!!
(I should add tools as well to finish off my diorama.)
 

silveroxide

Senior Member
(I should add tools as well to finish off my diorama.)

Your model is smaller than mine and the tools will be extra hard to accomplish but it can be done. Mine are at a larger scale and that is why I made them. in a past diorama build, I made the tools as a set and not cut individually. At a 1/35 or 1/48th scale, tools are very fiddly.


Here is another update on the tool boxes, desk and assessories and there are more detail items to accomplish. I am at it again with my overkill syndrome. Enjoy, the photos do not need any comments since they are self explanatory. Most of the items are from EPSON, Nakajima race car pit crew sets. The EPSON markings have been removed and BSG logos and decals added. Floor Jack, Tow Bar, Crew access stairs and the two wall hangar sections are in the works. Enjoy and see you all soon with more stuff, it is slow going for now.


245.jpg
The tool drawers have the tool markings on the tray doors.

246.jpg The tool boxes have beeb modified with handles and BSG logos, decals.

247.jpg The desk is made from two upright tool chests with a desk top spanning the space between them.

249.jpg Power transfer unit boxes and tool tray cart with individual wrenches in the bins.

250.jpg
A complete set of tool boxes desk and accessories. Need more stuff like chairs, waste cans and other small stuff that make a diorama light up. Enjoy and see you all soon.
 

Attachments

  • 248.jpg
    248.jpg
    46.9 KB · Views: 15

Rhaven Blaack

!!!THE MAN BEHIND THE CURTAIN!!!
Staff member
Administrator
Moderator
As always, my friend, your work is ABSOLUTELY OUTSTANDING and INSPIRING!!!
I especially like all of the extra components that you have made (like the manuals and other such). It all adds a more "REALISTIC" feel to it.
Although, I would not say that what you are doing is "OVER KILL". I would call it "Making all of the components needed to make a GREAT diorama"!
KEEP UP THE GREAT WORK!!!
 

Revell-Fan

Co-Administrator
Staff member
Administrator
Moderator
Holy, this is mind-boggling! Really, THANK YOU AgO2 FOR BEING HERE!!! :Bravo:
 

micahrogers

Moderator "Where am I, and how did I get here?"
Staff member
Moderator
Fantastic work as usual AgO2... the level of realism brought to this build is Frakking Awesome :Bravo:
 

silveroxide

Senior Member
As always, my friend, your work is ABSOLUTELY OUTSTANDING and INSPIRING!!!
I especially like all of the extra components that you have made (like the manuals and other such). It all adds a more "REALISTIC" feel to it.
Although, I would not say that what you are doing is "OVER KILL". I would call it "Making all of the components needed to make a GREAT diorama"!
KEEP UP THE GREAT WORK!!!

Thanks for looking in. As with each build, I do like to enhance them a bit more.

Holy, this is mind-boggling! Really, THANK YOU AgO2 FOR BEING HERE!!! :Bravo:

I am also pleased to be here.

Fantastic work as usual AgO2... the level of realism brought to this build is Frakking Awesome :Bravo:

Thanks for your comment. As I have said in the past, a model by itself, is just a mode, but a model in action tells a story.


The going is a bit slow but it trudges along. There are a few more details and that floor jack, tow bar, and crew access ladder is in the works, before I start on the display base.

251.jpg


254.jpg
The desk is finished and you can make the small details, I need to crumple som paper and place it inside the trash can.

Enjoy and see you all soon with more to come.
 

Rhaven Blaack

!!!THE MAN BEHIND THE CURTAIN!!!
Staff member
Administrator
Moderator
I like the desk. It turned out GREAT!
All of the different components really make this whole thing come to life!
Watching your threads (granted this is a group thread), is always inspiring and thought provoking.
 

silveroxide

Senior Member
I like the desk. It turned out GREAT!
All of the different components really make this whole thing come to life!
Watching your threads (granted this is a group thread), is always inspiring and thought provoking.

Thanks for your vote of confidence. Details is what makes a model stand out.

That should be your signature! :)

It is done. Thanks for looking in.


The display base is coming along nicely. Because of the size, I cut the wall section down a little. The base and the walls are from searching the net for reference photos and taking it from there. The photos are self explanatory. Enjoy and now the best part will be on the making the diorama display and what not pieces to add. I have so many to choose from that I may take away some and add others. That bay will be really cramped if I were to place all of the details on it. Enjoy and see you all soon with more to come.
255.jpg

256.jpg

257.jpg

258.jpg

259.jpg

260.jpg


261.jpg
 

silveroxide

Senior Member
ABSOLUTELY SPECTACULAR!!!


Thank you for your comment and for looking in.


Here are some added attractions for you diorama builders. They are still in the beta stages and I will place them in the resources soon. Keep in mind that they are larger in size and you will have to downscale them to fit your needs. Some of the smaller parts can be discarded if they sre too small when downscaled. See you all soon with some more stuff but I have a two week hiatus for thanksgiving and will be off line for a while with no updates but I will be back in December with more detailed oriented build photos. Enjoy and see you all soon.
 

Attachments

  • Image2desk items and logos.jpg
    Image2desk items and logos.jpg
    766.7 KB · Views: 45
  • maintenance tool box..jpg
    maintenance tool box..jpg
    650 KB · Views: 39
  • maintenance tools 1.jpg
    maintenance tools 1.jpg
    299.6 KB · Views: 38

silveroxide

Senior Member
This is awesome! :) Thank you so much for the templates! :)

You are all welcome. They are still in the beta stage but they are do-able. If you build them basic without all of the greebles and panels, it will still come out good. I just like to add a few small details.

These look good!
Thank you for sharing this with us!

As mentioned above, you are all welcome to the templates. Keep in mind, that they are large scale and you will have to reduce, downscale them to UHU-02;s scale. If you do that, them skip some of the smaller details since they are hard to cut at that size.

At the moment, I am just finishing up with the flooe jack and will post the build sequence for it. Here is a teaser and see you all soon with more. This diorama is far from over. The jack and tow bar are depicted in this photo.

275.jpg
 

Rhaven Blaack

!!!THE MAN BEHIND THE CURTAIN!!!
Staff member
Administrator
Moderator
@silveroxide As you may know, I am repainting Tirick's figurines (these are both in 1:32 and 1:50 scale). I am currently working on the Deck Crew. I have just finish both the Orange and Yellow uniforms for the men. I have to work on the females and then send everything off to Tirich for approval.
So these will work well with your set as well.
 
Top