Part 6: The Loading Platform
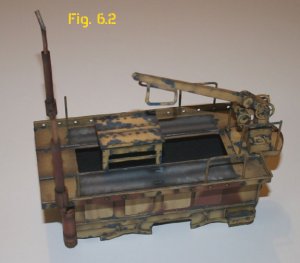
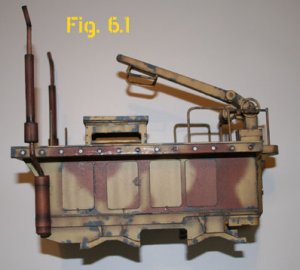
Building this assembly (Figs. 6.1 & 6.2) went smoothly, for the most part. The fit and coloring of the parts is excellent. I won’t describe the whole process, just things I changed or that gave me some difficulty.
I started with the top, building up the platform and adding the side rails (parts 34b,c, & d). If I were doing it again, I’d leave the side rails off until much later. It’s very difficult to handle the assembly without bending them inward. I ended up re-gluing them late in the project. The base went together easily. I lined the inside walls of the base with black construction paper, since the platform is open at the top, and I have no clue what the inside is supposed to look like. The eight access doors on the sides are all the same size and part number, but for best results, spend a little extra time to match the camouflage patterns on the doors with those on the body. (Fig. 6.1)
The rolling cradle that carries the shells to the breech has no coloring on the inside of its legs. It’s laminated to heavier stock and you’re expected to color that stock to blend in. I photocopied the parts (14-14d) and laminated the photocopies to the backside of the kit parts. The color match isn’t perfect but it’s very close and good enough.
The instructions call for laminating the rolling table (part 14d) to heavier stock, then folding it. I was afraid that fold would be difficult so I cut the sides from the top, and glued the sidepieces to the underside of the top. I had to bend the legs out a little to get the wheels to ride on their tracks but it looks fine. In retrospect, I should have glued the top between the sides. That might have required trimming the top a bit to make the wheels fit the rails. Live and learn.
The plans show railings and posts (parts s7, s8, & s9) to be made of wire(?). I made them out of 1/16” Evergreen plastic rod. For the curved corners on s7, I carefully bent the rod with a jeweler’s pliers, and then took the tension out of the bend by passing the piece carefully about an inch over a candle flame. (It took a couple of tries, and a couple of pieces of rod, to get it right.) I tapered the ends of the railings and posts with a flat file, and painted them with Testor's Model Master paints (2099-Afrika Grunbraun and 1723-Gunship Grey). I made divots in the platform with a 1/16” drill bit in a pin vise, and super-glued the railings and posts in place.
The subassembly I worried most about was the two exhaust stacks. Built up from paper tubes with 45° bends, they looked too fragile. As it turned out, they went together well and are sturdy enough. I started by rolling all the parts. With small tubes like the exhaust pipes, I roll them tight on a piece of wire, and then use a toothpick or paintbrush handle to open up the tube. Rolling it tighter than the finished part will be, makes it easier to handle.
Long tubes, like the long exhaust column, are always a challenge. (Maybe the ship modelers have some advice here.) I rolled this piece first around a 1/8” dowel, then around a smaller dowel, then around wire. I used a toothpick to tease it out to something like its finished shape and then I started at one end, gluing about ¼” at a time, and using a piece of the 16” rod as a backing for pressing the seam tight. The best advice I can give is: Be patient and work slowly. Rolling and gluing that one piece took somewhere between five and ten minutes, and the result was worth the time spent.
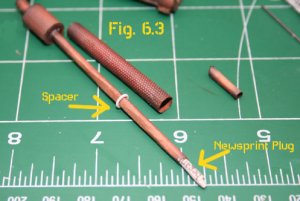
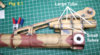
According to the instruction drawings, the angled joints in the exhaust pipe are simply butted together. To make them stronger, I rolled a piece of newsprint around 1/32” wire and stuck one end in the bottom piece of the pipe. In Fig. 6.3, you can see the newspaper plug sticking out the top of the long piece of pipe. Then I slid the next part over the newsprint plug, aligned the two pieces, and touched the joint with brush-on superglue.
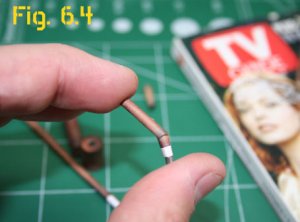
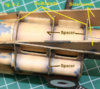
I used Elmer's Brush-On "CrazyGlue." This stuff wicks into every crack, sets up fast, and dries flat (if you don't lay it on too thick). In about ten seconds, I had a good, strong, fairly rigid joint. (Fig. 6.4) I worked my way up the pipe, checking angles and alignment as I went. The newsprint plugs should be rolled loosely, so they can bend without flattening too much.
The white ring around the pipe in Fig. 6.3 is a spacer/collar I made with my leather punch, to keep the shroud properly aligned with the pipe. With the largest punch, I punched halfway through a piece of 1mm cardstock. I switched to a smaller punch, centered it in the circle I'd just made, and punched all the way through. Then I went back to the large punch and punched out the "donut." (Getting a nice, even donut took several tries.)
Newsprint is also very handy for repairs. If you cut something you didn’t want to cut (as I did when my steel straightedge slipped), glue a scrap of newsprint to the back of the cut to splice it back together. That creates a strong joint while adding very little thickness. I keep an old copy of TV Guide at the workbench, to supply all the newsprint I might need. (Choose one with a cover you like looking at; it will last you for about a gazillion years.)
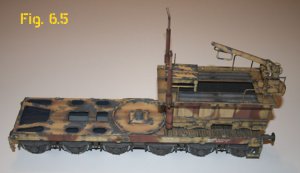
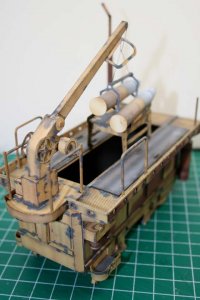
Fig. 6.5 shows the loading platform sitting on its railcar. I'm not going to glue it down; I want to be able break the finished model into subasseblies for transporting it to shows. I’ll add the crane’s cable and grapple and the artillery shells later on.
So far this has been a wonderful kit with excellent fit and finish, and few and minor problems or difficulties. I've put a lot of hours in the kit already but they’ve been enjoyable hours. The result isn't a contest quality model, but I’m happy with it.
The most intimidating thing about this kit is its size and the number of parts.
I think any intermediate modeler with a few good kits under her or his belt would have the skills to build this one. It would also help to have a long workbench. And I still don’t know how or where I’m going to display the finished model. I can hang airplanes from the ceiling but this may need its own furniture!
Next up is the other railcar. But first, I’m going to take a break from this project for a week or two, to build something a little smaller and simpler—like a cardboard box, or maybe snowflakes.
No worries,
--David
"Results? Why, man, I have gotten a lot of results.
I know several thousand things that won't work."
-- Thomas A. Edison
Building this assembly (Figs. 6.1 & 6.2) went smoothly, for the most part. The fit and coloring of the parts is excellent. I won’t describe the whole process, just things I changed or that gave me some difficulty.
I started with the top, building up the platform and adding the side rails (parts 34b,c, & d). If I were doing it again, I’d leave the side rails off until much later. It’s very difficult to handle the assembly without bending them inward. I ended up re-gluing them late in the project. The base went together easily. I lined the inside walls of the base with black construction paper, since the platform is open at the top, and I have no clue what the inside is supposed to look like. The eight access doors on the sides are all the same size and part number, but for best results, spend a little extra time to match the camouflage patterns on the doors with those on the body. (Fig. 6.1)
The rolling cradle that carries the shells to the breech has no coloring on the inside of its legs. It’s laminated to heavier stock and you’re expected to color that stock to blend in. I photocopied the parts (14-14d) and laminated the photocopies to the backside of the kit parts. The color match isn’t perfect but it’s very close and good enough.
The instructions call for laminating the rolling table (part 14d) to heavier stock, then folding it. I was afraid that fold would be difficult so I cut the sides from the top, and glued the sidepieces to the underside of the top. I had to bend the legs out a little to get the wheels to ride on their tracks but it looks fine. In retrospect, I should have glued the top between the sides. That might have required trimming the top a bit to make the wheels fit the rails. Live and learn.
The plans show railings and posts (parts s7, s8, & s9) to be made of wire(?). I made them out of 1/16” Evergreen plastic rod. For the curved corners on s7, I carefully bent the rod with a jeweler’s pliers, and then took the tension out of the bend by passing the piece carefully about an inch over a candle flame. (It took a couple of tries, and a couple of pieces of rod, to get it right.) I tapered the ends of the railings and posts with a flat file, and painted them with Testor's Model Master paints (2099-Afrika Grunbraun and 1723-Gunship Grey). I made divots in the platform with a 1/16” drill bit in a pin vise, and super-glued the railings and posts in place.
The subassembly I worried most about was the two exhaust stacks. Built up from paper tubes with 45° bends, they looked too fragile. As it turned out, they went together well and are sturdy enough. I started by rolling all the parts. With small tubes like the exhaust pipes, I roll them tight on a piece of wire, and then use a toothpick or paintbrush handle to open up the tube. Rolling it tighter than the finished part will be, makes it easier to handle.
Long tubes, like the long exhaust column, are always a challenge. (Maybe the ship modelers have some advice here.) I rolled this piece first around a 1/8” dowel, then around a smaller dowel, then around wire. I used a toothpick to tease it out to something like its finished shape and then I started at one end, gluing about ¼” at a time, and using a piece of the 16” rod as a backing for pressing the seam tight. The best advice I can give is: Be patient and work slowly. Rolling and gluing that one piece took somewhere between five and ten minutes, and the result was worth the time spent.
According to the instruction drawings, the angled joints in the exhaust pipe are simply butted together. To make them stronger, I rolled a piece of newsprint around 1/32” wire and stuck one end in the bottom piece of the pipe. In Fig. 6.3, you can see the newspaper plug sticking out the top of the long piece of pipe. Then I slid the next part over the newsprint plug, aligned the two pieces, and touched the joint with brush-on superglue.
I used Elmer's Brush-On "CrazyGlue." This stuff wicks into every crack, sets up fast, and dries flat (if you don't lay it on too thick). In about ten seconds, I had a good, strong, fairly rigid joint. (Fig. 6.4) I worked my way up the pipe, checking angles and alignment as I went. The newsprint plugs should be rolled loosely, so they can bend without flattening too much.
The white ring around the pipe in Fig. 6.3 is a spacer/collar I made with my leather punch, to keep the shroud properly aligned with the pipe. With the largest punch, I punched halfway through a piece of 1mm cardstock. I switched to a smaller punch, centered it in the circle I'd just made, and punched all the way through. Then I went back to the large punch and punched out the "donut." (Getting a nice, even donut took several tries.)
Newsprint is also very handy for repairs. If you cut something you didn’t want to cut (as I did when my steel straightedge slipped), glue a scrap of newsprint to the back of the cut to splice it back together. That creates a strong joint while adding very little thickness. I keep an old copy of TV Guide at the workbench, to supply all the newsprint I might need. (Choose one with a cover you like looking at; it will last you for about a gazillion years.)
Fig. 6.5 shows the loading platform sitting on its railcar. I'm not going to glue it down; I want to be able break the finished model into subasseblies for transporting it to shows. I’ll add the crane’s cable and grapple and the artillery shells later on.
So far this has been a wonderful kit with excellent fit and finish, and few and minor problems or difficulties. I've put a lot of hours in the kit already but they’ve been enjoyable hours. The result isn't a contest quality model, but I’m happy with it.
The most intimidating thing about this kit is its size and the number of parts.
I think any intermediate modeler with a few good kits under her or his belt would have the skills to build this one. It would also help to have a long workbench. And I still don’t know how or where I’m going to display the finished model. I can hang airplanes from the ceiling but this may need its own furniture!
Next up is the other railcar. But first, I’m going to take a break from this project for a week or two, to build something a little smaller and simpler—like a cardboard box, or maybe snowflakes.
No worries,
--David
"Results? Why, man, I have gotten a lot of results.
I know several thousand things that won't work."
-- Thomas A. Edison