

SPACE: 1999 MARK IX HAWK
- Thread starter bgt01
- Start date
You are using an out of date browser. It may not display this or other websites correctly.
You should upgrade or use an alternative browser.
You should upgrade or use an alternative browser.

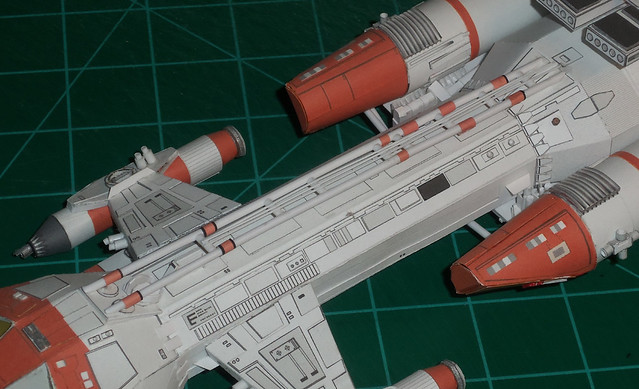
ATTITUDE THRUSTERS
Well Hello, Modelers! Things really picked up steam when the warm weather finally got here and it's left little time for modeling. But, I finally made it to some vacation days and despite further efforts to delay me I finally found some time to build. So, today I sat down and got re-acquainted with the Hawk.
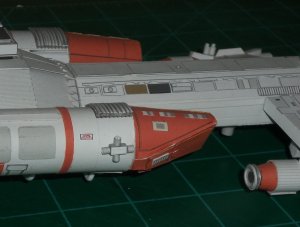
I thought I'd do something easy and finish the attitude thrusters on the rocket boosters. But, all that downtime rusted my skills up but good! This little task took over an hour! These parts are not included in the original JayBats files. These parts are from my previous Eagle build scaled down to fit the Hawk. They are just simple boxes with four tubes each. I did add the raised rectangle on the front like the studio model.
Well Hello, Modelers! Things really picked up steam when the warm weather finally got here and it's left little time for modeling. But, I finally made it to some vacation days and despite further efforts to delay me I finally found some time to build. So, today I sat down and got re-acquainted with the Hawk.
I thought I'd do something easy and finish the attitude thrusters on the rocket boosters. But, all that downtime rusted my skills up but good! This little task took over an hour! These parts are not included in the original JayBats files. These parts are from my previous Eagle build scaled down to fit the Hawk. They are just simple boxes with four tubes each. I did add the raised rectangle on the front like the studio model.
Attachments

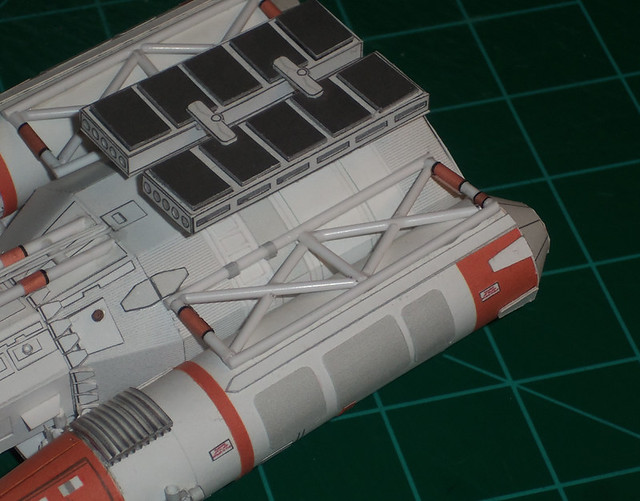
UPPER HULL FRAMEWORK
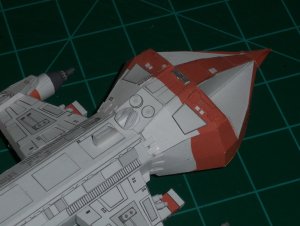
Truth be told, I'd put off working a lot on the framework for the top hull because it takes a long time and I'd kind of lost my drive. But, today was the day to get back on the horse...or in this case, Hawk.")
First, I had to scratch build a greeblie to represent the lunar module piece behind the command module. I used 67 lb. white cover to build with. I drew out the parts freehand, did some test fitting and trimming, then glued it into this basic shape, making sure it cleared the framework.
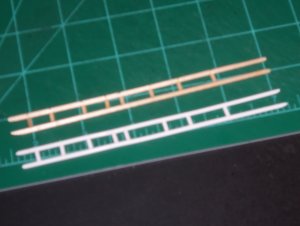
I used bamboo skewer to make a mock up of the framework for size and placement. Once I got it locked down, I made a new piece out of 2mm styrene. At this size and shape, there was no way I was going to get a good piece out of paper and I want this to look as nice as I can make it. I taped rails to the cutting map, lined the mock up next to it, then cut and glued in the center rod working from the back to the front to keep the part from twisting.
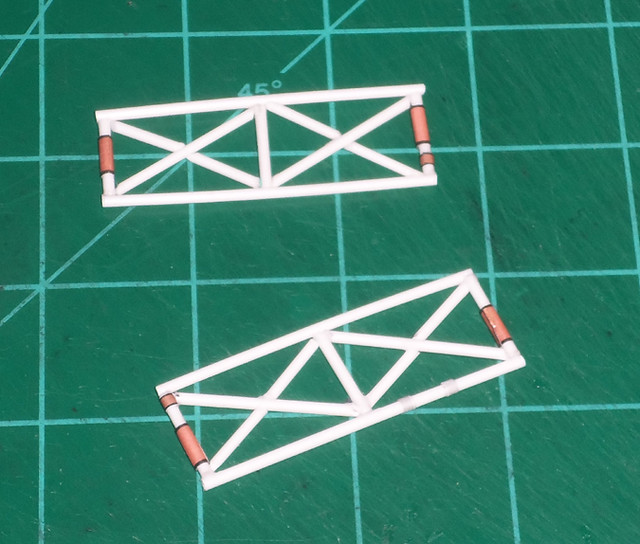
To get the stripes on the frame, I made various size stripes (3mm-8mm) on the computer to match the studio model. I printed this on sticker paper, cut out the stripes and applied them as needed.
I've still got the side struts that go down both sides of the frame, but getting this part built and on made me really want to get back on this build as much as possible.
Truth be told, I'd put off working a lot on the framework for the top hull because it takes a long time and I'd kind of lost my drive. But, today was the day to get back on the horse...or in this case, Hawk.
First, I had to scratch build a greeblie to represent the lunar module piece behind the command module. I used 67 lb. white cover to build with. I drew out the parts freehand, did some test fitting and trimming, then glued it into this basic shape, making sure it cleared the framework.
I used bamboo skewer to make a mock up of the framework for size and placement. Once I got it locked down, I made a new piece out of 2mm styrene. At this size and shape, there was no way I was going to get a good piece out of paper and I want this to look as nice as I can make it. I taped rails to the cutting map, lined the mock up next to it, then cut and glued in the center rod working from the back to the front to keep the part from twisting.
To get the stripes on the frame, I made various size stripes (3mm-8mm) on the computer to match the studio model. I printed this on sticker paper, cut out the stripes and applied them as needed.
I've still got the side struts that go down both sides of the frame, but getting this part built and on made me really want to get back on this build as much as possible.
Attachments

- Apr 5, 2013
- 13,876
- 10,215
- 228
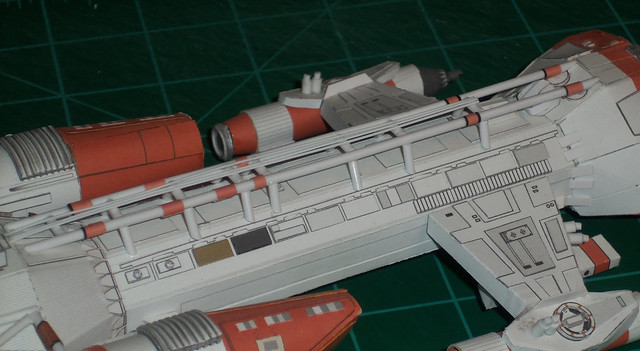
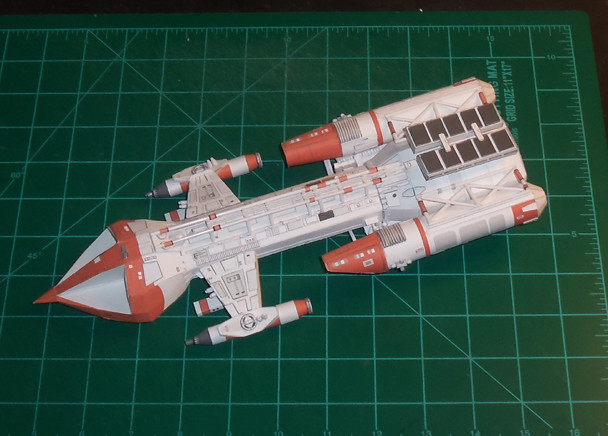
MORE FRAMEWORK
Long time, no post, everyone! I've had a lot going on in the last 8 months that's eaten up a lot of my time. Not the least of which was starting a new job! But there's finally a little normalcy back and that, plus a head cold keeping me inside, got me to sit down today and work on the Hawk.
It's not a huge amount of progress, but I did manage to build the two frames that connect the tops of the boosters to the rear fuselage. They are made from 2mm styrene rods that I cut to shape. The colored marks stickers like the ones I put on the upper framework. All of it was done by eye, so there was a lot of trial and error. They certainly aren't laser straight, but neither were the ones on the studio model. I used my editing block for splicing 8-track tapes as a mitre box for cutting the rods.
While waiting for the frames to dry, I used more styrene rod to make the three "cables" that run along the top of the upper framework. This stuff is super-small and bendable. I glued it down using Super Glue gel and then clipped the ends with my sharp precision scissors.
Next, I glued the frames in place using regular papercraft gel glue so I'd have time
to adjust the fit.
Lastly for today, and easily the most maddening, I cut and glued the 14 little pieces of rod that go down the sides of the upper framework and attach to the main fuselage. Again, this was all done by hand and isn't perfect, but it gives a decent representation of what the studio model looks like.
That's all for today.
https://www.flickr.com/photos/bgt01/32540565656/in/dateposted-public/
https://www.flickr.com/photos/bgt01/31737574584/in/dateposted-public/
https://www.flickr.com/photos/bgt01/31737574154/in/dateposted-public/
https://www.flickr.com/photos/bgt01/31737573754/in/dateposted-public/
https://www.flickr.com/photos/bgt01/32540566226/in/dateposted-public/
https://www.flickr.com/photos/bgt01/31737573254/in/dateposted-public/
https://www.flickr.com/photos/bgt01/31737572744/in/dateposted-public/
From Zathros: Use the "Embed feature on your Picture Hosting site, select "BBcode", and paste that into the thread, the pictures will then show, as I did below. Click on the "Share" arrow on the lower right Window, it will take you to the page that you select "BBCode".
 s1 by Bill, on Flickr
 s2 by Bill, on Flickr
 s3 by Bill, on Flickr
 s5 by Bill, on Flickr
s5 by Bill, on Flickr
 s6 by Bill, on Flickr
 s7 by Bill, on Flickr
Long time, no post, everyone! I've had a lot going on in the last 8 months that's eaten up a lot of my time. Not the least of which was starting a new job! But there's finally a little normalcy back and that, plus a head cold keeping me inside, got me to sit down today and work on the Hawk.
It's not a huge amount of progress, but I did manage to build the two frames that connect the tops of the boosters to the rear fuselage. They are made from 2mm styrene rods that I cut to shape. The colored marks stickers like the ones I put on the upper framework. All of it was done by eye, so there was a lot of trial and error. They certainly aren't laser straight, but neither were the ones on the studio model. I used my editing block for splicing 8-track tapes as a mitre box for cutting the rods.
While waiting for the frames to dry, I used more styrene rod to make the three "cables" that run along the top of the upper framework. This stuff is super-small and bendable. I glued it down using Super Glue gel and then clipped the ends with my sharp precision scissors.
Next, I glued the frames in place using regular papercraft gel glue so I'd have time
to adjust the fit.
Lastly for today, and easily the most maddening, I cut and glued the 14 little pieces of rod that go down the sides of the upper framework and attach to the main fuselage. Again, this was all done by hand and isn't perfect, but it gives a decent representation of what the studio model looks like.
That's all for today.
https://www.flickr.com/photos/bgt01/32540565656/in/dateposted-public/
https://www.flickr.com/photos/bgt01/31737574584/in/dateposted-public/
https://www.flickr.com/photos/bgt01/31737574154/in/dateposted-public/
https://www.flickr.com/photos/bgt01/31737573754/in/dateposted-public/
https://www.flickr.com/photos/bgt01/32540566226/in/dateposted-public/
https://www.flickr.com/photos/bgt01/31737573254/in/dateposted-public/
https://www.flickr.com/photos/bgt01/31737572744/in/dateposted-public/
From Zathros: Use the "Embed feature on your Picture Hosting site, select "BBcode", and paste that into the thread, the pictures will then show, as I did below. Click on the "Share" arrow on the lower right Window, it will take you to the page that you select "BBCode".
s1 by Bill, on Flickrs2 by Bill, on Flickrs3 by Bill, on Flickrs5 by Bill, on Flickrs5 by Bill, on Flickrs6 by Bill, on Flickrs7 by Bill, on Flickr
Last edited by a moderator:
Thanks guys. Hopefully, I can finish this model in the near future and start on my RBSTP (Ridiculously Big Star Trek Project). I wish I could have found a paper equivalent for they styrene, but in the end it really worked the best and made the framework construction as easy as possible.
@Rhaven Blaack and @zathros I copied your instructions to my desktop. If I mess it up, I'll call for help")
@Rhaven Blaack and @zathros I copied your instructions to my desktop. If I mess it up, I'll call for help
Hi Rhaven. Long time, no post. Sorry I haven't been around. I've had a lot of things going on this summer and have had no time to work on any models. But, fall is here and I'm making it a goal to finish up the Hawk soon. Expect some updates in the near future.@bgt I was wondering if you have made any progress on this project yet?
I am glad to see you back.Hi Rhaven. Long time, no post. Sorry I haven't been around. I've had a lot of things going on this summer and have had no time to work on any models. But, fall is here and I'm making it a goal to finish up the Hawk soon. Expect some updates in the near future.
I fully understand not building. I have gone back to school. I am studying to be a paralegal. I am not really going to be able to do much building untl after I finish school.
I am looking forward to seeing you finish out this model.
Once again, good to see you again.
So in essence, when you have finished your studies you will be able to legally force anyone to build a paper model for you.I am studying to be a paralegal. I am not really going to be able to do much building untl after I finish school.

Off-topic out.
So in essence, when you have finished your studies you will be able to legally force anyone to build a paper model for you.
Off-topic out.
