

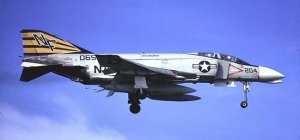
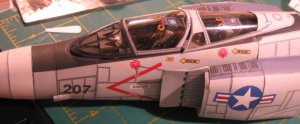
Hi all. it's been awhile since I posted a thread or have seriously started cutting and folding. I thought I'd start the New Year with my all time phavourite aircraft, the F4 Phantom. Designed by McDonnell-Douglas, taking ideas from thier F3 Demon aircraft and a few new ones they came up witha winner. In it's debut the jet captured speed climb and altitude records. It had an all weather radar setup, a second seat, twin engines and carrier launch and recovery ability. The bird was far from "perfect" however. The know alls in planning decided that the bird didn't need a gun. They thought the radar guided Aim7s and the close range sidewinders was all she needed. It wasn't until several upgrades that they figured on given it a gun in the F4E model. Anyways you could go on with history, but down to card. This kit may suspiciously look familiar, and it is, the GPM F4C model. The original kit comes in USAF SEA camo, but is erroneouly labeled and F4B. The kit is good as it is but a little incorrect. The later F4Cs and up had a fatter main wheel which required very noticable wing root bulges. The GPM kit lacks these. Plus it is an Airforce bird, which is ok but not for this "Squid". Using some oldish Paint shop pro 7 or 8 and Mgi I was able to recolor and and correct a few aggravating bits from the GPM. The bird is B model from the USS Midway. The build is actually progressed to the forward fuselage and cockpits and air intakes. The plane in flight is the model I'm building. Shown is the long nose which is one of the reason's for the "rhino" nickname.
Phabulous Phantom F4B in 1/33
- Thread starter cmdrted
- Start date
You are using an out of date browser. It may not display this or other websites correctly.
You should upgrade or use an alternative browser.
You should upgrade or use an alternative browser.
- Status
- Not open for further replies.
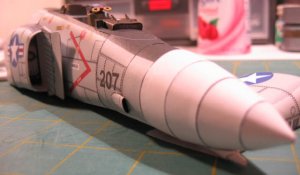
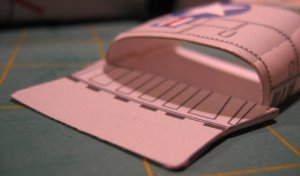
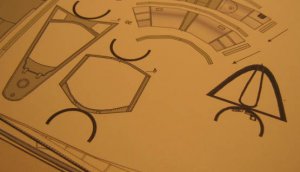
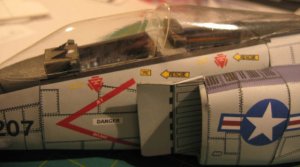
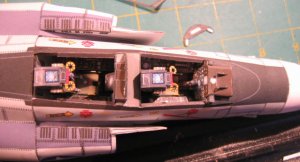
On with the build. The kit has a few problems, the sparrow troughs are a little short and have a curious notch that doesn't quite fill the fuselage bottom. I redrew new ones, you can see the original plain white one and the redraw in the pic. The air splitters and intake were pretty straightforward and the transition from the roughly circular forward fuselage to the cokebottle after fuselage is done by butt fitting the 2 sections. All the other fuselage sections have connector strips. So far so good.
Attachments
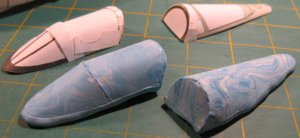
Having finished the forward fuselage the canopy needed to be formed. I usually vacuform my own and am going to do this for this kit also. However as I first built up the spare canopy I found the darn thing is too long for my home brewed vacuformer, so I decided to cut the canopy in 2 sections and form each piece separately. I've never done this before so we can all watch and see if it works. As it is late now I have to fire up the vac in the am. The sculpey molds are done but just need a little cleaning up.
Attachments

Ted, looking good. No reason whatever that forming the canopy in pieces won't work...I've had to resort to that myself because of the size limitations of my old Mattel vacuformer. The seats came out first rate. Hope you get some useful feedback on your string....I finally said to hell with doing monologs and am spending the time on other things.
Vacu-canopies
I eagerly await your pix of your canopy. I just started a ModelArt F-15, and plan on vacu-forming a canopy. I also have an old Mattel unit that I have jealously guarded for the last 20 years or so. My only problem with the thing is how to secure the plastic in the frame. My unit has lots of tiny little pins that are supposed to register in holes in the plastic. I've never found a satisfactory method for making the little holes or a source of Mattel forming plastic. I also want to try the Sculpy mold method. Great looking model!
I eagerly await your pix of your canopy. I just started a ModelArt F-15, and plan on vacu-forming a canopy. I also have an old Mattel unit that I have jealously guarded for the last 20 years or so. My only problem with the thing is how to secure the plastic in the frame. My unit has lots of tiny little pins that are supposed to register in holes in the plastic. I've never found a satisfactory method for making the little holes or a source of Mattel forming plastic. I also want to try the Sculpy mold method. Great looking model!
Thanks guys one and all, hope to keep up the momentum. It sounds reassuring that the pieces method for the canopy may work. I spent the am polishing and mating up the 2 sculpey molds and they mate together perfectly. I haven't decided on canopy up or down, I usually leave them down ready, gear down, flaps ready for a cat launch. Anyways more later.
Jasco............. not to hijack Ted's thread.......... try pre-heating the Vac-U-Form frame, both pieces approx 15 mins., then put the un-holely plastic in it and squeeze the frame together. The pre-heated pins will melt their own holes and become secure.
There is a web-site that is dedicated to the Mattel Vac-U-Form they sell replacement parts and precut, not punched, plastic and other items.
http://www.gaugepods.com/vacuform/
Ted - a diorarma of it on "the cat" would look very good! You could leave it canopy up, hooked up as a Cat Ready scene.
john
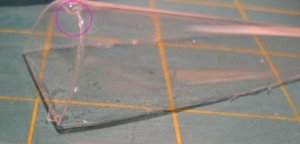
We Have Glass!
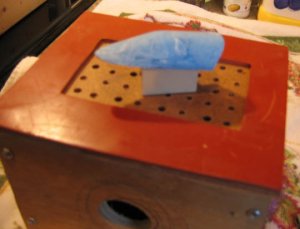
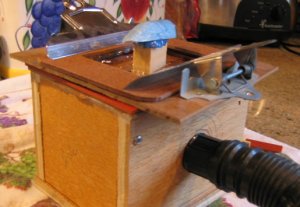
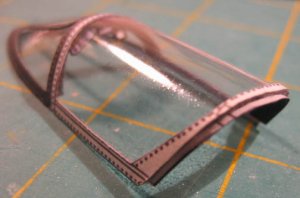
Well this am proved fruitful... so far so good. I polished up the molds and set to forming. I used .020 vivak that I bought as a 4x8 sheet and cut it to fit the frame. I placed the mold up in the box heated the plastic so it sagged -Alot! The ist run was good but the glass was a tad too thick, so I let it melt @1' below the holder. You better believe the other half was not home at the time! The glass formed perfectly after that and I made 2 copies just incase. I noticed a small blemish in the after cockpit glass and found it was from the sculpey mold. There is a lesson learned here, polish everything or it will show up in your casting. I lightly trimmed up the sections for a 1st run trial fit so far so good......
Well this am proved fruitful... so far so good. I polished up the molds and set to forming. I used .020 vivak that I bought as a 4x8 sheet and cut it to fit the frame. I placed the mold up in the box heated the plastic so it sagged -Alot! The ist run was good but the glass was a tad too thick, so I let it melt @1' below the holder. You better believe the other half was not home at the time! The glass formed perfectly after that and I made 2 copies just incase. I noticed a small blemish in the after cockpit glass and found it was from the sculpey mold. There is a lesson learned here, polish everything or it will show up in your casting. I lightly trimmed up the sections for a 1st run trial fit so far so good......
Attachments

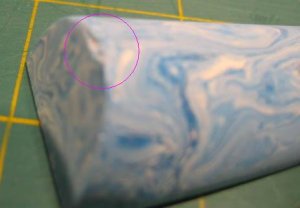
The fly in the ointment
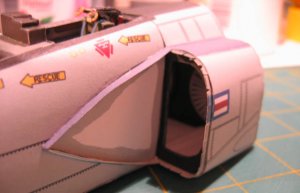
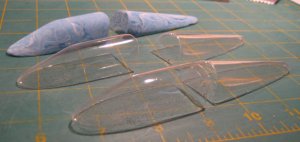
Here are the pics of the blemish and the culprit. This section will be covered up with the frame so no harm no foul, but beware, the vac picks up all sorts of imperfections. This can be of use when you may want to mold in some details but for now it is just a pain. The final pics are a rough fitting to the fuselage.
Here are the pics of the blemish and the culprit. This section will be covered up with the frame so no harm no foul, but beware, the vac picks up all sorts of imperfections. This can be of use when you may want to mold in some details but for now it is just a pain. The final pics are a rough fitting to the fuselage.
Attachments
Cmdrted, nice work pulling the canopies. The phit on the Phantom looks good. I am enjoying the build as this is one of my phavorite airplanes.
-Gil
-Gil
Ted, on my attempts at vacuforming, I've noticed a tendency for deformation to occur at the edges of the mold plug. To keep this from being a problem on the formed piece, it helps to extend the mold plug beyond the edges of the final piece, and trim off the excess after forming. That way, the "edge distortion" occurs in waste material, not the finished part. To assist in the trimming, you can sand down the "waste" part of the plug a little bit to create a slight step in the plug to mark the edges of the desired finished part. As you've indicated, it doesn't take much in the way of a dimension break to be noticible in the formed plastic. A step of as little as 5 mils should be visible in the finished piece (and why the "pros" tell you go through a couple of cycles of painting the mold plug with primer and wet sanding each coat just about completely off the plug with super-fine sandpaper). (Somehow, I jest caint overcome the temptation to teach granny how to suck aigs.)
Those are good looking canopies, Ted. Should make for a great looking model when finished. Any chance of you doing one of the Air Force versions of Double Ugly?
I still pull out my GPM model of the F-4E I have and wonder if I'll ever build it. Outside of being partial to Air Force birds, I sat in the cockpit of the aircraft the model is based on, and assisted singer Billy Joel while he climbed into the cockpit. That model means a lot to me and I want to do it right.
I still pull out my GPM model of the F-4E I have and wonder if I'll ever build it. Outside of being partial to Air Force birds, I sat in the cockpit of the aircraft the model is based on, and assisted singer Billy Joel while he climbed into the cockpit. That model means a lot to me and I want to do it right.
Thanks guys again, Ash, on the Rhino list is the F4E, I have the GPM, Maly and Hobby Model versions. The GPM is almost exactly the same as thier c model with the Gun and ANG low vis gray scheme. The Hobby model version looks alittle better and more accurate, ie has wing root bulges, and some of the right antannae etc., but it is in the Euro green gray scheme, wrap around substituing a Gunship grey color for the SEA Tan. My second favourite is the Recolor I did to the Maly kit. I painted it in IAF colors and the recolor looks good, I have no idea as to fit of the Maly, I need to redesign some cockpitstuff, and wheel wells, but i may lazy out and use the GPM stuff to fill in those details. Lastly is the F4J bird from Halinski. This looks to be Showtime 100, Duke Cunningham's bird. It is a wierdly designed kit, where you build the fuselage framework much like the balsa and stick kits and use the card as skinning material, in lieu of the tissue. It looks pretty detailed, and my skills need to improve before I tackle it. All this will probably take time, it's on "the list", I have the plane bug now but I hear the call of Blue water in the distance........
Ted,
Outstanding Job!!!!! Like Ash I like the AF jets. But that is just and Air Dog Talking. But I do like the canopies, the will make this jet.
Outstanding Job!!!!! Like Ash I like the AF jets. But that is just and Air Dog Talking. But I do like the canopies, the will make this jet.
some saturday evening fittings
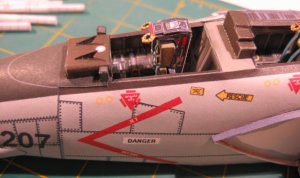
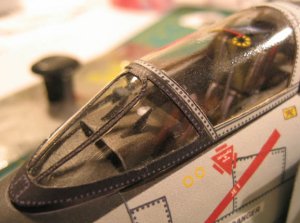
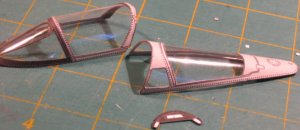
Hi guys, I've been busy all day with domestic stuff but have been fiddling around with the canopy bits. I've used the rougher of the 2 canopies do dry fit and see where the problems will be. So far the only down side is getting the separate sections to fit flush. I think when the pieces are sanded to fit each other and where the rails on the glass are properly glued to the fuselage surface, it will fit pretty darn close. The canopy hasn't been glued down yet in the pics but the fit is pretty close as is. More tomorrow....
Hi guys, I've been busy all day with domestic stuff but have been fiddling around with the canopy bits. I've used the rougher of the 2 canopies do dry fit and see where the problems will be. So far the only down side is getting the separate sections to fit flush. I think when the pieces are sanded to fit each other and where the rails on the glass are properly glued to the fuselage surface, it will fit pretty darn close. The canopy hasn't been glued down yet in the pics but the fit is pretty close as is. More tomorrow....
Attachments
S
shrike
What plastic are you using to pull the canopies? I'm finishing up my own homebuilt vacuum former (with heating elements from a cheap toaster - hoping that will work!)
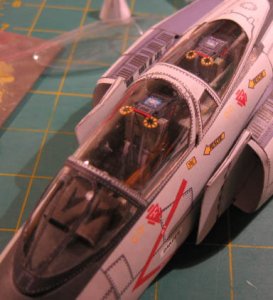
More canopy fittings
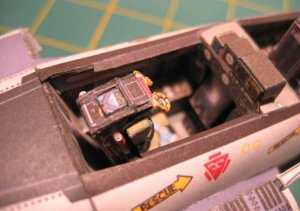
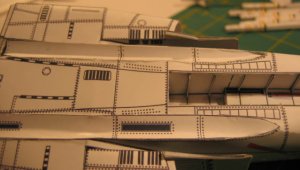
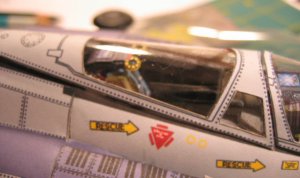
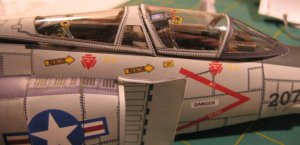
Thanks for the encouragement guys, The plastic I'm using here is vivak, you can get it in bulk @4x8 foot sheets for @ 20.00. Most plastic suppliers will cut it down for you. I'm using .020, this seems to be the thinnist plastic they sell to regular consumers. I actually like the .015 plastic that MicroMark sells, however I can't seem to get the stuff ordered when I'm in the mood, plus this huge sheet needs to be used up. Fitting the separate pieces is a little fiddley, I think it's time to build another vacuform machine to take into account the longer canopies on plane projects comming up. These are the final fittings to the actual models canopy, and a couple of the "front office". More later....
Thanks for the encouragement guys, The plastic I'm using here is vivak, you can get it in bulk @4x8 foot sheets for @ 20.00. Most plastic suppliers will cut it down for you. I'm using .020, this seems to be the thinnist plastic they sell to regular consumers. I actually like the .015 plastic that MicroMark sells, however I can't seem to get the stuff ordered when I'm in the mood, plus this huge sheet needs to be used up. Fitting the separate pieces is a little fiddley, I think it's time to build another vacuform machine to take into account the longer canopies on plane projects comming up. These are the final fittings to the actual models canopy, and a couple of the "front office". More later....
Attachments

- Status
- Not open for further replies.