On3 locomotive engine shops

Bill Nelson

Well-Known Member
IMG_4775.JPG


the underside of a Bachman On30 Climax truck. the truck is properly scaled. Fun fact, when Climax filled an order of a 30 inch gauge locomotive, they didn't build a special truck; instead they took a 3 foot gauge truck, and pushed the wheels in farther on the axle.


IMG_4777.JPG


the stick wheel is shown to the left. push the wheel outward till the center hub is flush with the end of the axle, and miraculously. the wheel is properly gauged for On3.


IMG_4784.JPG

some adjustment of the electrical pick ups are needed.


IMG_4780.JPGIMG_4780.JPGIMG_4780.JPG

The climax ix now an On3 model I always loved the brass Flying Zoo Brass climaxes, that are very similar, but they run close to $1,200.00 I couldn't resist the Bachman unit, that I picked up on sale for $250.00. It still has the silly HO coupler, mounted at HO coupler height. I had hoped that the link and pin pin was an extension of the coupler screw, but no such luck. the pin is press fit, and can be pulled out with a pair of pliers. the top two link and pin pockets are not deep enough to be useful, and A KD On3 coupler shank is a tad to tall to fit, so I sanded two KD On3 couplers shanks down till the would fit, and cut the draft gear spring slot off. The pocket's two top slots are not deep enough, so I'll have to mill out the pocket to make it deeper.


IMG_4786.JPG

the new coupler is mocked up, sanding the bottom of the shank till it fits, gets the height just right., as shown with this Foothill models Westside equipment flat.


a word about the track, San Juan Car Co's On3 flex track, the pretties flex I have ever seen . the triangular connections are the only connections between the ties, so the ties stay nicely distributed no mater which direction the track is flexed. or how tightly

IMG_4772.JPG

seen from the side, there is nothing under the rail anywhere, so iff you go for the new track on the ground look, it will look right.


IMG_4773.JPG

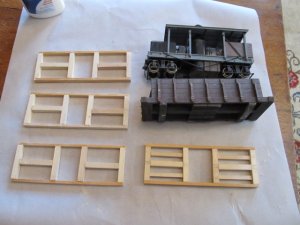
was also working on a Russian river generic box car kit, and got the under frame done, with the brake rigging detail.

IMG_4788.JPG

started on the body of the car. besides the box car, I have two of thier flat car kits, a high side Gon, and a short side gon. # of the kits are missing the cast underframe. but after modifying one to take the KD draft gear box, rather than a prototypical set up, with less couler swing, it may be less work to build a custom frame to start with.


I cant complain though, as I paid about $12.00 a piece for the kits with trucks and couplers included, and a bunch of Grant line details,as well as some nice stripwood, so they are a heck of a deal even if I have to cut wood, and build underframes.

IMG_4790.JPG
 

Bill Nelson

Well-Known Member
Joy! the universals on the drive shaft split, need parts. though the truck gears had split, but I might get lucky, and just get away with the drive shafts. one of the spit universals allowed too much slop in the truck gears, making m think the truck gears were bad as well.
 

Doctor G

Well-Known Member
That is a real bummer! Does Northwest shortline have replacement parts you could use? Good luck with the repair. Tom
 

Bill Nelson

Well-Known Member
Cleaning up my RR room I found a bundle of my dad's stripwood. I thought I had given it all to Dr. Tom. So rather than continuing to get my HO layout ready to roll, I started scratchbuilding 6 On3 ore cars. based largely on this O gauge standard gauge ore car Mack gave me, which is just a tad too wide toi be convincing as a narrow gauge car.
 

Attachments

  • IMG_4792.JPG
    IMG_4792.JPG
    101.1 KB · Views: 0

Bill Nelson

Well-Known Member
Have the frames for six ore cars mostly done. they just need some cut out and chisel work doine for the KD draft gear boxes. since this is all scratchbuilt, without a plan, I'm going to hac=ve to set up one frame with trouks and coulers to be sure everything is tight before proceeding with the other cars.IMG_4795 2.JPG
 
Last edited:

Bill Nelson

Well-Known Member
notched the end for s on3 KD coupler draft gear box. I have the notches marked on the other 5 frames, but am going to wait intill I have this car frame mocked up with bolsters, to be sure everything will be right before notching the other 5.

have next to no budget, so will likely use brass nails for the queen posts, and solder brass truss rods on to them. will likely need to spend between 50 and 120 bucks just to put trucks under these..


I don't see wood appropriately sized for the boardson the sides for these cars, so I may be firing up the table saw soon!


IMG_4796.JPG
 

zathros

*****SENIOR ADMINISTRATOR*****
Staff member
Administrator
Moderator
Use the "Attach Files" on bottom left,, it will give you thumbnail or full size options. The photos will go to the last position you clicked on in your thread, so if you want to lcate photos, just click on the spot, using the Enter key to Tab down, Backspace to go up, and you can choose the location and set up of your pics. Let me know if you have problems and the nature of them so we can have your valuable pics uploaded. ;)
 

Bill Nelson

Well-Known Member
The first if the ore cars is shaping up
IMG_4812.JPG

from the underside, still need to build the sloped inside floor, and figure out how I'm going to mess up the truss rods. scratch building without plans is an adventure I'm doubting I'll finish all six right away, the unfinished cars will likely go into a box, along with lumber, to be completed later . dont need six On3 ore cars right now, or even one or two.


Everything above the frame was built last night or tonight, as I just cut the Yellow poplar wood on my table saw last evening. sure do love the yellow poplar wood. part of me wishes I'd have cut all the lumber for these cars out of yellow poplar, like the Tweetsee hopper I gave to DR. Tom, but then again once it is painted, the inferior wood will disappear, just like the beautiful poplar.

IMG_4813.JPG
 

Bill Nelson

Well-Known Member
Your Tweetsie hopper was in lots of ways a dry run for this. I have let the 5 frames alone, and working on just the one car, and that speeds things up considerable. I have a budget so tight 6 On3 trucks are out of the question, unless I raid my Russian River kits.

May just finish 2 or 3 now.
 

zathros

*****SENIOR ADMINISTRATOR*****
Staff member
Administrator
Moderator
Really excellent job. That car looks fantastic. :)
 

Bill Nelson

Well-Known Member
fitting the supports for the sloped inside surfaces. this has been the trickiest part of building these cars with out any blueprints.

just a tad bit more work, and this first car will be ready for some gray paint for the beginning of the paint.

next I have some brass C channel properly sized to be used to scratch build some stake pockets. am going to scratch the queen posts as well, so commercial parts will be the couplers ,and coupler screws the trucks, the truck screws, and the turnbuckles, which I need to acquire.

have been wore out after work, and it has been easier to do a little bit on these cars, than go up to the RR room. also not knowing how long we will be in the farmhouse, it's hard to get fired up to go up and work on something that may end up as an unfinished masterpiece.


IMG_4814.JPG


IMG_4815.JPG
 

Bill Nelson

Well-Known Member
shot it with some gray primer , will need to dust the bottom with gray after this dries, cause I missed a couple spots on the under frame..

got no idea where I"m going with paint. don't know if my On3 stuff will reprise my State Line RR, which I have some HOn3 equipment lettered for, and also have some large scale stuff.

my Hon3 State lines hoppers are green, don't think I want to do these in green, perhaps oxide red.


IMG_4816.JPG
 

Bill Nelson

Well-Known Member
a jig for cutting brass C channel to size for making the stake pockets for the ore car


IMG_4817.JPG

The first one is test fitted, and looks about right

IMG_4820.JPG

Cut a bunch of these with a heavy duty grinding wheel on the dremil. these are tougher than the cut off wheels, and don't explode if you look at them hard like the thinner cut off disks do.

next I have to find fine fine brass wire and find a way to reliably bend it into C channels, and solder them to the pockets.


IMG_4821.JPG
 

Bill Nelson

Well-Known Member
some progress on the first ore car. was held up because of no turnbuckles. went to hobby lobby and got some small brass tubing to make turnbuckles out of . sadly they did not have brass rod properly sized for my truss rods.


IMG_4824.JPG

I file through the brass tubing to make an opening, and then I cut the tubing off with a grinding wheel on the dremil.


IMG_4826.JPG

I used this method to make turnbuckles for my surry parker log loaders ( logging and industrial RR section, Show us your unique logging equipment thread). these are conning out faster and nicer.


IMG_4827.JPG

after cutting it off, I ream out the inside with a drill bit to clear out any rough edges.


IMG_4828.JPG


testing the turnbuckle on some .032 phosphor bronze rod, which is just right. sadly this is all I have on hand, so I need to get more.

Unable to proceed with the truss rods, I mounted the couplers. I cut the coupler mounting notch a tad to long, so I'll try to refine that on the other six cars.


IMG_4829.JPG

the coupler height looks about right compared to this f
Foothill Models Westside Lumber Company equipment flat, one of my very few almost complete O freight cars


IMG_4830.JPG

at a standstill on the truss rods till I get some appropriately sized rods. will work on stake pockets, and then might have to start putting a body on one of the 5 remaining frames.

Just this week it has cooled off enough so I can go into the attic RR room without turning on the AC, so it is possible I might start working on the HO empire more
 

zathros

*****SENIOR ADMINISTRATOR*****
Staff member
Administrator
Moderator
The wooden car really pulls it off when all painted up. ;)
 

Bill Nelson

Well-Known Member
I stick small parts to masking tape on a paper plate, so I can spray paint them without blowing them off the paper plate and onto the gravel drivewayIMG_4836.JPG

stake pockets painted black

IMG_4837.JPG

yhe car with the beginnings of a paint job. will continue to dry brush red, and lightly sand model to expose the gray till it is where I want it to be.
IMG_4838.JPG
 
Top