Model Of The Month: Time to build Union Station!

Bill Nelson

Well-Known Member
ASL Un TRM layt #1.jpg ASL Nsbrgh US #4.jpg At the Clarksville Model railroad club in Clarksville Tn, the Guys have rebuilt the big yard removing all of the #4 switches, and going with #6s to make the yard more civilized. also in the interest of simplification they reduced the nearby double track main to single track. these changes opened up enough real estate to a two very long tracks for a through passenger terminal bu the main line. time for an impressive terminal!


the club thread is here. http://www.zealot.com/forum/showthread.php?t=166134 but since I'm going to be doing some scratchbuilding, in what I'm hoping will be a stretch project, that will force me to learn stuff, I thought I would do a thread on the construction here.


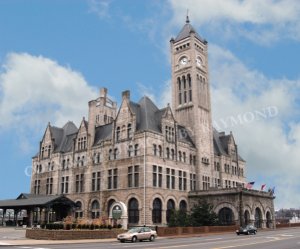
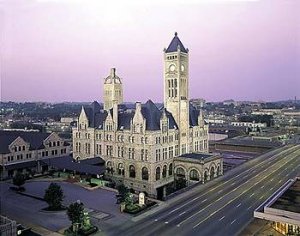
The inspiration here is the Nashville TN Union station, a massive limestone pile, with a Tower. An actual model of this structure would be both too big for the scene, but would also be too much work. available Kits did not get me close enough to inspire a kitbash, so I went to the drawing board. well no I didn't.


I had some Ghost line foam core, white foam core with a grid of light blue lines to aid folks with graphic design on the foam core. I started laying out wall shapes directly on the foam core, sketched in window and door locations, and when it was penciled in and satisfactory I traced over my pencil lines in ink, and then cut up the wall sections, and assembled them to become a mock up. I like the look of the building, so I will begin building it right on the mock up, so the mock up will become the base for the finished building, saving me a step.

Usually when I scratch build something, I have some commercial window and door castings in mind that I build the design around, but this time I could not find anything that I was excited about, and this brings me to the stretch part of this project. instead of using commercial doors and windows, I am going to make masters for the windows doors and some other architectural features. so I will be trying to learn mold making resin casting for this project.


I'm going to try to cast the windows and doors and the arches above the windows and doors, and I will cut dense foam to make the rectangular shapes for the cut limestone for the building. there will be a narrower clock tower sticking father out from the center of the tower. the terminal will be above grade with the tracks and platforms underneath the station accessed by stairs leading to the interior of the building.


here we go! adventures in model railroading! oboy oboy oboy, It has been a while since I have made myself learn something
 
Last edited:

Doctor G

Well-Known Member
Great start on a nice project.

Hi Bill,

This will be an interesting and enjoyable project to follow and learn from.

You are off to a very good start and the selection of a Nashville icon for inspiration makes it all the more fun.

I will throw on some pictures of the real deal in Nashville (Union Station) so readers can get a good sense of what is inspiring you.

Tom
 

Attachments

  • watermark_Print_Union_Station_Nashville_060_copy_sky_3.jpg
    watermark_Print_Union_Station_Nashville_060_copy_sky_3.jpg
    106.6 KB · Views: 40
  • union_station_a_wyndham_historic_hotel_nashville_1.jpg
    union_station_a_wyndham_historic_hotel_nashville_1.jpg
    21.9 KB · Views: 182
  • UnionStation_exterior1001.jpg
    UnionStation_exterior1001.jpg
    50.1 KB · Views: 40
Z

Zathros

That's some building you're doing. With all the plans for casing and the link, you have one heckuva project in front of you! :)
 

Doctor G

Well-Known Member
Hi Zathros,

I don't think Bill will build an exact replica of the Union Station. Like he said earlier the building including the train shed is/was huge.

I think he is getting "inspiration" from this beautiful structure made from Tennessee limestone. There is a similar station at the other end of the old L&N in Louisville Kentucky. Both are quite the sites to behold.
Doc Tom
 

Bill Nelson

Well-Known Member
Tom is right. the building I am making is quite modest compared to the structure that inspired it. In fact, until Tom posted the pictures, I had not even looked at a photo of the actual building, just worked from memories of some of the details.


an accurate Ho model of the model of the building would eat the whole club space, not to mention the life of the builder. our passenger termial track is just two tracks, while the train shed for this building was so big, that when it was torn down in the 80's it was the largest free standing wooden structure in the country. The preservationists worked hard to save it, but it need a huge amount of work, and , had they been able to restore it, the maintenance costs would have been astronomical. They operate a very fancy hotel and restaurant out of the terminal building to help keep it up
 

gbwdude

General Manager, W.R.Ry.
I can't remember if it was O or HO, but they have a model of the real deal at the Tennessee Central Railway Museum. That beast's footprint is about 3-4 ft square and we don't have room in our yard for something that crazy. At least the Nashville station is still standing, unlike the original Milwaukee station. That thing was beautiful and I can only imagine how fantastic it was to see in person.

Tyler
 

Bill Nelson

Well-Known Member
ASL   U S w bttss.jpg ASL w&d blks#2.jpg it has some butresses

I have added some buttresses to the foam core structure. I am really liking the shape, so I am no longer calling it a mock up, as I am rather sure the building is going to grow out of this frame.

I took it to the club last night, and built the mock up for the below street level box it sits on, with cut outs for the main and the station tracks . unfortunately I forgot to take the camera. it looks pretty good in it's intended location, and it will help the looks of the big yard considerably by breaking the view up a little.


I have some blanks , cut out of thick styrene, that I hope to shape into the masters for the molds for the windows and doors.


I used the antique drafting tools, which were my grandfather's, to help get the shapes right. I also want to make some molds for some architectural details, as I get further along on this project, and have a better idea about where I am going with this project. Once I have some windows and doors in hand I can start cutting out the window and door openings, and painting the inside and outside to seal the cardboard part of the foam core against moisture to help prevent warping, Then I can start carving foam "stones"; and begin the masonry work, which will hopefully transform this from a foamcore mock up into an impressive limestone edifice.


In the photo with the
 
Last edited:

Doctor G

Well-Known Member
Question

Looking good Bill.

Did you score/scribe and snap the curved pieces or did you scribe and cut with the blade???

Tom
 

Bill Nelson

Well-Known Member
Tom,

Scoring and snapping only works reliably with straight lines. so to get the curved lines, I start with an oversize blank, and use either my nibbler, or a rail nipper, to take tiny chunks out until


Bill I'm close to the intended curve shape , and then clean it up with sandpaper.
 

Bill Nelson

Well-Known Member
ASL wnds&drs#2.jpg progress on the window and door blanks

I have made some progress on the window and door blanks, drilling a hole through them big enough to get my nibbler (from Micro -Mark) through the hole, and then I can nibble the inside opening to close to what i want, and Finnish it off with files and sand paper.


when I have them all done I'll glue them on a flat chunk of styrene, and start gluing mullions and doors in place to make the masters for casting sufficient windows and doors to do this building,


I'm glad I'm just making masters, this is taking forever, I am reminding myself why I don't make windows and doors much. If I wasn't making two each of the windows and doors I'd be much farther along, but this way if I *** one up all will not be lost.


Bill Nelson
 
Last edited:
Z

Zathros

Neat nibbler. I haven't seen one like that for years! I have an air powered one. This one is nice for delicate situations. :)
 

Bill Nelson

Well-Known Member
My first experience with a nibbler was an air powered one I borrowed when doing custom speaker installs in autos. I never bought one, cause I hated those jobs, and if I had the right tool I'd have gotten all of them. When I saw this one in a Micro-mark catalog, I bought it on a whim one year when I set out to spend my yearly train budget on tool from Micro-mark. It has been extremely useful in shaping brass and plastic parts and pieces, both speeding projects up, and giving cleaner results at the same time.


Bill
 

Bill Nelson

Well-Known Member
ASL US  wndw & trm msts#2.jpg U gave started work on the arch section master, and got a lot more progress on the round window master, and the window and door master.

I have yer to start on the tall narrow windows for the tower. I will have to make them shorter than drawn on the mock up, to allow room for the round window and arch detail as they are shaping up.


I'm taking a lot of time with the masters, but I recon it will be well worth it, as progress on the building should take off one I have windows and doors. In any case this will be a focal point at the big yard, and will be well worth the time taken to make the model excell.


Bill Nelson
 
Last edited:

Bill Nelson

Well-Known Member
ASL-AUS w&ds#5.jpg I'm making progress with the roof arch trim. the round window and the doors and widows. the window archs come off lopsided every time. I'm going to make a mold with the roof arch and the round window in it, as I will need the exact same number of those two parts.


I have started the laborious process of putting in window mullions. they are oversize, but considering the trouble I'm having getting them right that is probably a good thing.

still trying to wrap my head around the look I want for the doors, and how to best achieve that.
 
Last edited:

Bill Nelson

Well-Known Member
ASL-a US w&D  #6.jpg I got the mullions in the windows, and the arch treatment done on the doors. still don't know what The doors will look like, but I will cast them as is, and cast the doors later. that way I can model some of the doors open should I wish, and more importantly make progress before I get the doors figured out. the door openings are about 8.5 feet tall and three and three quarters feet wide. That might seem big to some of Y'all, but the doors in my front hall are just slightly smaller.

I'll have to see how I feel after I clean off my work space, but I may start work on the molds for the windows, doors, and the roof arch before I get the masters built for the door and window arches .


Once I have some window and door castings, I can start cutting out the window and door openings, and begin working on styrofoam stones to start dressing up this monster.
 
Last edited:

Bill Nelson

Well-Known Member
asl-1a mld1a.jpg asl-1a mld1b.jpg work on the first master

I have the first master done, and made a mold box around it. I'll give it over night to dry, and try to make a mold tomorrow.
 
Last edited:
Z

Zathros

I hope it won't be to much to ask for a detailed instructional on how you are going to do this. This building is coming out really beautiful. It would be great how to do this. :)
 

Bill Nelson

Well-Known Member
ASL-a-1 mini casting  kit.jpg
I hope it won't be to much to ask for a detailed instructional on how you are going to do this. This building is coming out really beautiful. It would be great how to do this. :)


I usually try to do a step by step , with photo's to help teach folks, as Many folks helped me learn this stuff over the years. with the casting , I might not be as detailed, as I am in the middle of the learning process myself.


Back in the 1970's I did some experimental casting of small parts, using liquid latex molds (like the ones I have used for rock mold for scenery), and with rtv silicone like folks used to use for automotive gasket applications. For those parts, I cast them in epoxy , mixed straight from the glue tubes More recently I have done some large plaster (hydrocal dental stone) castings in molds made from liquid latex; creating the iron furnaces and coke ovens for the iron industry, that is the side line for my logging railroad in HO.

For this project I will be starting with a mini casting kit, from Alumilite, which I purchased from Hobby lobby. casting materials, and instructional materials are also available from Micro-Mark, and I expect I will end up using a lot of their stuff if I get into casting big time.

The master I made for the roof arch and round window is almost ready to pour a mold. all that remains to be done is to thouroughly seal the wood dam. That mold would probably use up most of or all of the mold making material in the kit though. I'm planning on working on the station from the ground up, so I will need the windows and doors first, and wont need the roof arches and round windows until near the end of the build. so I'm going to work on the master for the window and door mold, and make that mold first, cause once I have the windows and doors, I can start work on the exterior of this station, and that is where this will start to get fun.


I'll try to show step by step what I am doing, but this is early in the learning process, so one would be very much advised to read my stuff lightly, and the instructions for whatever material they are using very carefully .


besides casting these parts I'm interested in trying to cast parts for an HOn3 tweetsie hopper car, a car I have already scratchbuilt in wood. the car is available in a kit, but at a cost close to $20.00 without trucks and couplers. eventually I'd like to have 20-30 of these cars, so going with the kits would be expensive and time consuming, and scratchbuilding them all board by board would be very time consuming, so casting parts might make a lot of sense If I can get the quality needed.


Bill Nelson
 
Last edited:
Top