

--Right, anyone tell me how to insert an image into the post please?... 
----------------------------------------------------------------------
After seeing a rapid increase in the number of designers and great design tutorials recently, Lex was tempted to finally write one himself, for the good of the public mass Not sure if I'll finish it, plus I'm not good at explaining things, but, I will do my best ^^ --Let's make a start shall we?
==Useless Intro==
Some of you reading this might have felt the same as I had felt half a year ago: seeing so many figurines coming out on the Pepakura website (and else), that I started wondering, I can design aircrafts, spaceships, and all sorts of other stuff, but a mere human figure proved to be an unbeatable obstacle for a designer...wall1 Well, it's not that hard as I found, if there's something we can't do, learn it!
So, this tutorial is for those who:
--Eagerly wants to design a figure. (anime-style)
--Has basic experience on a polygon modeler software (Meta, Sketchup, anything. But not Rhino, haven't figured out how to do it with curves yet...) This is simply to check you don't sit there and wonder how to create a surface... :mrgreen:
--Knows a tiny little bit of photoshop, so that texturing is not a problem. If some reckon that this could be done in Paint that's just fine.
--Manga drawing skills is helpful, but not necessary. (Plenty of tutorials on the net anyway) Either way it's a figure we're designing and the last thing to happen is to get the body proportions wrong...
Um, well, I'm saying this because I don't do things on a step-by-step basis, that's all.
==Useless Intro Ends Here==
1, The Head and the Face
Before talking anything else (even body proportions), let's discuss about face... Since from my experience, if someone knows how to design the entire human head, that's half the total job done. Because once a person sees a figure, the attention immediately focuses on the face first. Therefore no matter how wonderful the body is, a bad-looking face really ruins everything.sign1
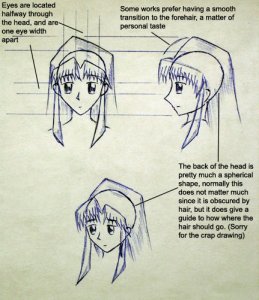
The first picture is how one would draw a human face in anime-style (ignore the hair for the moment):

This picture only gives a general impression on how an anime face looks like, I could not help on actually drawing one since that requires practice (read: try-and-error...:mrgreen: )
It might be the case that most of the head is not visible, since they are normally concealed by hair. But they do have some rules governing their shape, otherwise the head would seem unatural. The head can be considered as mostly a sphere, with the face somewhat "protruding out" from the basic spherical shape. Sphere is not interesting, give it a shape primitive and we're all set. It's this irregular-shaped human face that we're interested in.
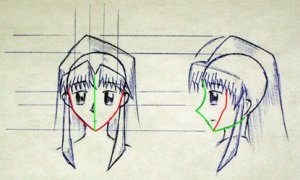
Taking a closer look at the shape of the face then:

We can make out two lines from this drawing, the green line, which is the central line of the face, governs how the face looks like from the side. That one is simple, simply tracing the line in the side view will do, since this line is flat when viewed from the front. The other line is the red line, which governs the shape of the face when viewed form the side. This one is slightly complicated, since it is not flat when viewed from the side. It's approximate shape is shown in the side view. (this shape depends on personal preference, different shape gives different styles) With these two lines as fixed reference, we have the basic framework to design our face in 3D space. (P: This picture itself can be a good reference in face design)
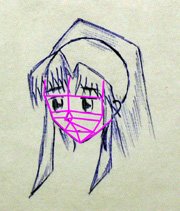
We now need to fill in the gap between those two lines, and we need the prospective view for that. Please bear in mind that it's a cardmodel we're designing, so the model must be buildable as well as realistic. There's no point in using a 3D artist's high-poly approach to design, since the parts would unfold into a jumbled mess on any figure less than 20cm in height. Rather, we're looking at something simpler.
I listed here 3 choices of design, but of course, a designer is free to choose or develop his/her own styles. So these are more like a guide than anything else.
The simplest we can get is Hako, that's 100% easy to build, but a square face is as unappealing as it gets. However using the Hako's philosophy, we can directly connect the central line to the side line, as shown in this picture:

And to make things more fitting, the nose in modeled as a small protruding part from the face (optional, if the size is too small, the nose can be neglected without comptomising the final effect too much). The eyes and mouth however, are all done with tetxtures and not as 3D shapes (which essentially is the philosophy of anime-type face). This design looks good from front and side, reasonably fine from prospective. And it only gives 2 or 3 parts when unfolded, buildable even by low-skilled modelers and is found on a lot of figurine models.
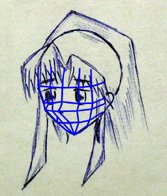
A slightly more complicated design is found on Suiraku's models. These offer an ever higher degree of realism, even when viewed from any angle.

This is essentially obtained from deforming a sphere, fitting it to the shape of the face. It's drawback however, is that no matter how you unfold it, it unfolds into more than 6 parts with seams running across visible regions of the face, and without proper skills often give a "mummy" look on the completed model. Again, the eyes and mouth are done with textures.
Running further into the "realism" direction, is a render-style face, now we have reached the stage when eyes and mouth can not be treated as flat shapes and must be modeled in detail. I don't have much experience in this one, so please check other tutorials for render-type face design on the net, --and by all means, our Kezn's Batman thread is a good reference.:thumb:
Pictures follow shortly.........
Okay that's all for now, will add more as time goes.
----------------------------------------------------------------------
After seeing a rapid increase in the number of designers and great design tutorials recently, Lex was tempted to finally write one himself, for the good of the public mass
Not sure if I'll finish it, plus I'm not good at explaining things, but, I will do my best ^^ --Let's make a start shall we?==Useless Intro==
Some of you reading this might have felt the same as I had felt half a year ago: seeing so many figurines coming out on the Pepakura website (and else), that I started wondering, I can design aircrafts, spaceships, and all sorts of other stuff, but a mere human figure proved to be an unbeatable obstacle for a designer...wall1 Well, it's not that hard as I found, if there's something we can't do, learn it!
So, this tutorial is for those who:
--Eagerly wants to design a figure. (anime-style)
--Has basic experience on a polygon modeler software (Meta, Sketchup, anything. But not Rhino, haven't figured out how to do it with curves yet...) This is simply to check you don't sit there and wonder how to create a surface... :mrgreen:
--Knows a tiny little bit of photoshop, so that texturing is not a problem. If some reckon that this could be done in Paint that's just fine.
--Manga drawing skills is helpful, but not necessary. (Plenty of tutorials on the net anyway) Either way it's a figure we're designing and the last thing to happen is to get the body proportions wrong...
Um, well, I'm saying this because I don't do things on a step-by-step basis, that's all.
==Useless Intro Ends Here==
1, The Head and the Face
Before talking anything else (even body proportions), let's discuss about face... Since from my experience, if someone knows how to design the entire human head, that's half the total job done. Because once a person sees a figure, the attention immediately focuses on the face first. Therefore no matter how wonderful the body is, a bad-looking face really ruins everything.sign1
The first picture is how one would draw a human face in anime-style (ignore the hair for the moment):
This picture only gives a general impression on how an anime face looks like, I could not help on actually drawing one since that requires practice (read: try-and-error...:mrgreen: )
It might be the case that most of the head is not visible, since they are normally concealed by hair. But they do have some rules governing their shape, otherwise the head would seem unatural. The head can be considered as mostly a sphere, with the face somewhat "protruding out" from the basic spherical shape. Sphere is not interesting, give it a shape primitive and we're all set.
It's this irregular-shaped human face that we're interested in.Taking a closer look at the shape of the face then:
We can make out two lines from this drawing, the green line, which is the central line of the face, governs how the face looks like from the side. That one is simple, simply tracing the line in the side view will do, since this line is flat when viewed from the front. The other line is the red line, which governs the shape of the face when viewed form the side. This one is slightly complicated, since it is not flat when viewed from the side. It's approximate shape is shown in the side view. (this shape depends on personal preference, different shape gives different styles) With these two lines as fixed reference, we have the basic framework to design our face in 3D space.
(P: This picture itself can be a good reference in face design)We now need to fill in the gap between those two lines, and we need the prospective view for that. Please bear in mind that it's a cardmodel we're designing, so the model must be buildable as well as realistic. There's no point in using a 3D artist's high-poly approach to design, since the parts would unfold into a jumbled mess on any figure less than 20cm in height. Rather, we're looking at something simpler.
I listed here 3 choices of design, but of course, a designer is free to choose or develop his/her own styles. So these are more like a guide than anything else.
The simplest we can get is Hako, that's 100% easy to build, but a square face is as unappealing as it gets. However using the Hako's philosophy, we can directly connect the central line to the side line, as shown in this picture:
And to make things more fitting, the nose in modeled as a small protruding part from the face (optional, if the size is too small, the nose can be neglected without comptomising the final effect too much). The eyes and mouth however, are all done with tetxtures and not as 3D shapes (which essentially is the philosophy of anime-type face). This design looks good from front and side, reasonably fine from prospective. And it only gives 2 or 3 parts when unfolded, buildable even by low-skilled modelers and is found on a lot of figurine models.
A slightly more complicated design is found on Suiraku's models. These offer an ever higher degree of realism, even when viewed from any angle.
This is essentially obtained from deforming a sphere, fitting it to the shape of the face. It's drawback however, is that no matter how you unfold it, it unfolds into more than 6 parts with seams running across visible regions of the face, and without proper skills often give a "mummy" look on the completed model. Again, the eyes and mouth are done with textures.
Running further into the "realism" direction, is a render-style face, now we have reached the stage when eyes and mouth can not be treated as flat shapes and must be modeled in detail. I don't have much experience in this one, so please check other tutorials for render-type face design on the net, --and by all means, our Kezn's Batman thread is a good reference.:thumb:
Pictures follow shortly.........
Okay that's all for now, will add more as time goes.
")
")


 ) --And I assume everyone reading this has adequate photoshop skills... Experience tells Lex that learning Photoshop in-situ is not fun >_<


