Lambo 2

Sky Seeker

Well Established Member
Recently my area got hit with a microburst with thunderstorms and hail. Long and short of it was that electricity was down, trees got knocked down and blocked the roads, and everything was just generally mess. So what does this Zealotian do? Why make a card stock model of course! This one was in my to do box and since it was already printed out I got to work.

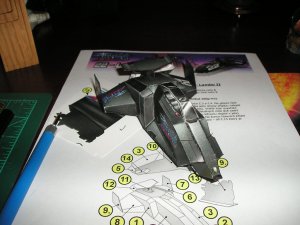
Assemblage of main body part #1 - back view
upload_2017-4-8_16-38-44.jpeg

Front view - part #1
upload_2017-4-8_16-39-28.jpeg

upload_2017-4-8_16-40-2.jpeg

Right Side Part #4 joined with part #1 before connected to part #3
upload_2017-4-8_16-40-20.jpeg

Left side Part #3 joined to part #1
upload_2017-4-8_16-41-17.jpeg

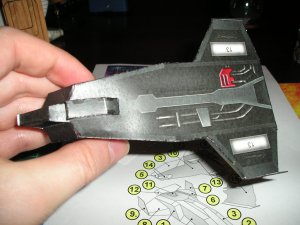
Part #2 - canopy joined with the model.
upload_2017-4-8_16-42-8.jpeg

Part #5 5 joined to the front of the model.
upload_2017-4-8_16-43-20.jpeg

Part #8 right side wing - connected to model
upload_2017-4-8_16-44-14.jpeg

Part #6 left side wing - connected to model
upload_2017-4-8_16-45-54.jpeg

Bottom part #10 connected to lower bottom glue tab of part #1 (had to start somewhere). Then working from the back I glued the wing tabs, then the side tabs until you reach the tip. Allow the glue to dry between each tab before you glue the next one.
upload_2017-4-8_16-46-26.jpeg

That's it for now.

Sky Seeker
:tank:
 
Last edited:

Sky Seeker

Well Established Member
More pics.

Bottom attached and joined part #11 - tail to the model. Note that some of the areas that were white were covered over with a thin tip black marker.
upload_2017-4-8_16-50-0.jpeg

Parts #7 left wing tip and Part #9 right wing tip joined to respective wings.
upload_2017-4-8_16-51-39.jpeg

Part #12 horizontal stabilizer connected to tail part #11.
upload_2017-4-8_16-52-29.jpeg


That's it for now.

Sky Seeker
:tank:
 

Attachments

  • upload_2017-4-8_16-53-19.jpeg
    upload_2017-4-8_16-53-19.jpeg
    146.1 KB · Views: 1
  • upload_2017-4-8_16-53-47.jpeg
    upload_2017-4-8_16-53-47.jpeg
    154.7 KB · Views: 0
  • upload_2017-4-8_16-53-59.jpeg
    upload_2017-4-8_16-53-59.jpeg
    154.7 KB · Views: 0
  • P4080124.JPG
    P4080124.JPG
    154.7 KB · Views: 0
Last edited:

Sky Seeker

Well Established Member
More pics.

Bottom view - attaching part #14 - front landing skid

upload_2017-4-8_16-57-58.jpeg

Attached rear landing skids parts #13.
upload_2017-4-8_16-58-36.jpeg

Front view.
upload_2017-4-8_16-59-33.jpeg

Left side view.
upload_2017-4-8_16-59-46.jpeg

Back view.
upload_2017-4-8_17-0-8.jpeg

Right side view.
upload_2017-4-8_17-0-20.jpeg

upload_2017-4-8_17-0-34.jpeg

upload_2017-4-8_17-0-42.jpeg

That's it for this build. As always Jan Rukr's designs are complex, but made simple to assemble with easy to follow numbers on the tabs for figuring out which one goes where. I always love what he has done with using one page for the model and another for the instructions. Jan Rukr - Alien99 is a genius model maker. Whoever you are out there if you have assembled one of his models do take the time to say thank you to this genius model maker for his wonderful gifts to our community of model makers.

Sky Seeker
:tank:
 

Rhaven Blaack

!!!THE MAN BEHIND THE CURTAIN!!!
Staff member
Administrator
Moderator
That looks really good! You did a GREAT JOB on it!
I really need to try my hand at these little models!
 

zathros

*****SENIOR ADMINISTRATOR*****
Staff member
Administrator
Moderator
Nice model!! These, if built with thick cardstock, would make excellent toys for younger relatives, who would have something hand made, and appreciate it more than a "ready made' toy. :)
 

Sky Seeker

Well Established Member
Nice model!! These, if built with thick cardstock, would make excellent toys for younger relatives, who would have something hand made, and appreciate it more than a "ready made' toy. :)

Z-

I think that could be easily done. Before the bottom part is glued in place or "buttoned up" another series of strategically placed reinforcements could be glued in place inside. Maybe make a laminate of a series of cardstock pieces. That would make it REALLY tough. Externally, a clear coat could be applied to make it last longer. Kids are pretty rough on toys. Of course it depends on the kid and how special they view the toy.

Sky Seeker
:tank:
 

Sky Seeker

Well Established Member
That looks really good! You did a GREAT JOB on it!
I really need to try my hand at these little models!

Rhaven,

Thanks!:Drinks:

BTW love your rebuild of the Starfighter.:)

As to building these Astro Racers.. Careful once you start forever it dominate your destiny, consume you... ;) Ok you've heard this before. Nuff said! They are way too fun to build! Very relaxing actually..:)

Sky Seeker
:tank:
 

zathros

*****SENIOR ADMINISTRATOR*****
Staff member
Administrator
Moderator
Z-

I think that could be easily done. Before the bottom part is glued in place or "buttoned up" another series of strategically placed reinforcements could be glued in place inside. Maybe make a laminate of a series of cardstock pieces. That would make it REALLY tough. Externally, a clear coat could be applied to make it last longer. Kids are pretty rough on toys. Of course it depends on the kid and how special they view the toy.

Sky Seeker
:tank:


I gave my flight instructors son a paper model of a Lotus Europa car. An excellent model. That was 13 years ago, he still has it. :)

Lotus Europa.jpg
 

zathros

*****SENIOR ADMINISTRATOR*****
Staff member
Administrator
Moderator
Top