homeworld papercraft

lons fede

Active Member
hello everyone, I hope you are well, it's been a long time since I posted something. ha ha ha ha ha ha
I show you the construction of a kadeshi multifaceted frigate from the homeworld space war video game
This model is as beautiful as it is complex to build in its original size. I would recommend that it be scaled to 10cm or 15cm long. which would make construction much easier. for the paper use a common paper of 150gr. this model is free and with the permission of its creator I can publish in this cover in addition to other models that he gave me as a gift and that I will upload as I build them. I already told him that if he wanted to join this lining and he told me he would think about it.

without further delay I show you its construction

I started with the smaller parts of this model, first the turrets and then the command bridge. these pieces are very simple.

WhatsApp Image 2022-10-23 at 18.51.40.jpegWhatsApp Image 2022-10-23 at 18.51.41.jpeg

after the small parts I made the engine that is not very complex but before joining it completely I suggest you look at it carefully.

WhatsApp Image 2022-10-23 at 18.51.41 (1).jpegWhatsApp Image 2022-10-23 at 18.51.41 (2).jpeg

After the engine I started with the parts of the sides, this part is a bit more complicated due to its small parts with many angles, you must be careful to paste and you have to do it patiently before continuing to paste the following tabs.

WhatsApp Image 2022-10-23 at 18.51.41 (1).jpegWhatsApp Image 2022-10-23 at 18.51.41 (2).jpeg


after having both parts of the sides, I started with the main body, I suggest that once you have half of the piece glued, you should leave a lid to facilitate the union of all the previously assembled parts.
The sides will be glued first and then the engine. Once I do this, the lid begins to close little by little, but not completely.

WhatsApp Image 2022-10-23 at 18.51.42.jpegWhatsApp Image 2022-10-23 at 18.51.42 (1).jpeg


The gun turrets on the sides will be glued first, then the command bridge and finally the turrets on the side of the bridge. that leaving the last part of the lid open to help us place these parts with precision and without deforming

WhatsApp Image 2022-10-23 at 18.51.42 (2).jpegWhatsApp Image 2022-10-23 at 18.51.43.jpeg

With everything glued, we proceed to close the last part of the lid as shown in the images

WhatsApp Image 2022-10-23 at 18.51.43 (1).jpeg

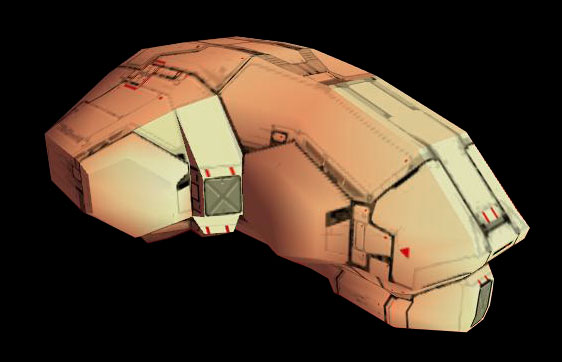
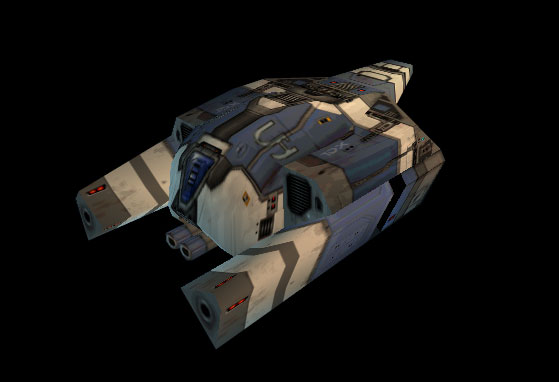
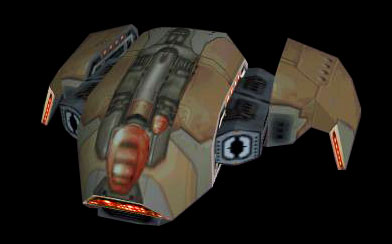
everything is ready now you can play with it, I show you the photos of how the final result is.

WhatsApp Image 2022-10-23 at 18.53.12 (1).jpegWhatsApp Image 2022-10-23 at 18.53.12.jpeg
WhatsApp Image 2022-10-23 at 18.53.11 (2).jpegWhatsApp Image 2022-10-23 at 18.53.11 (1).jpeg
WhatsApp Image 2022-10-23 at 18.53.11.jpegWhatsApp Image 2022-10-23 at 18.53.10.jpeg

here I leave a little of his history
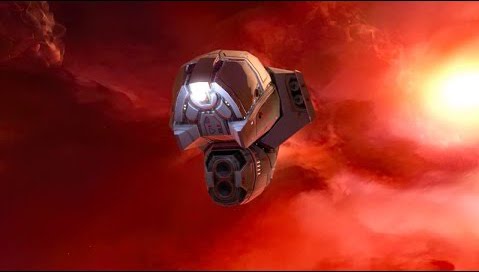
 

Rhaven Blaack

!!!THE MAN BEHIND THE CURTAIN!!!
Staff member
Administrator
Moderator
This looks like a very interesting ship (and model).
I will be following this thread.
 

lons fede

Active Member
Hi, how are you? It's been a while.
Now I show you the second model of the homeworld papercraft. This model is very simple compared to the previous one and I will also upload it to resources (I have permission from the creator) for those who want it

this model is called SWARMER and belongs to the kadeshi, it is a short-range fighter but it is very effective. If I go for tida the story I leave this link where you will see it complete.

I started it with the simplest part, which would be the part of the weapons, it is very easy to do


WhatsApp Image 2022-11-05 at 19.46.34.jpegWhatsApp Image 2022-11-05 at 19.46.35.jpegWhatsApp Image 2022-11-05 at 19.46.35 (1).jpeg

then continue with the tail, in this part you must be careful that they are not crooked, which can happen easily

WhatsApp Image 2022-11-05 at 19.46.35.jpeg

then we start with the nose, here do all the doubles before gluing it, this part will make up the front part of the main body.

WhatsApp Image 2022-11-05 at 19.46.36.jpeg

then we start with the main body, here the upper part should be left there so that it can be used later to close the model. meanwhile the engine part is done.

WhatsApp Image 2022-11-05 at 19.46.36 (1).jpegWhatsApp Image 2022-11-05 at 19.46.36 (2).jpegWhatsApp Image 2022-11-05 at 19.46.37.jpeg

already with the body armed at this point the nose sticks to it (one tongue at a time so it doesn't get crooked)

WhatsApp Image 2022-11-05 at 19.46.37 (1).jpegWhatsApp Image 2022-11-05 at 19.46.37 (2).jpeg

then carefully we are closing the lid that we left
but first we glue the pieces made previously by pressing from the inside so that they stick to the part of the body without any problem

WhatsApp Image 2022-11-05 at 19.46.38.jpegWhatsApp Image 2022-11-05 at 19.46.38 (1).jpeg
WhatsApp Image 2022-11-05 at 19.46.38.jpegWhatsApp Image 2022-11-05 at 19.46.39.jpeg

Ready, in the following images I show you how it should look at the end of the construction. the following model will be a little more complex than this one and I will publish its assembly shortly


WhatsApp Image 2022-11-05 at 19.46.40 (1).jpegWhatsApp Image 2022-11-05 at 19.46.40.jpeg
WhatsApp Image 2022-11-05 at 19.46.39 (2).jpegWhatsApp Image 2022-11-05 at 19.46.39 (1).jpeg
 

lons fede

Active Member
hello hello I'm here for whom they were crying, a lot has passed since I published and now I'm back to bring you another homeworld model that in my opinion has a good design.
without further ado I present to you SOMTAAW ACOLYTE
and before talking about its construction I leave you a link of its history


We start assembling the weapons, these have little pronounced angles and are the easiest part to make. always make the marks before you start gluing

WhatsApp Image 2022-11-25 at 18.27.23.jpeg

With the weapons made, we start with the part of the body, it has its own things when it comes to putting it together, and with each photo I will give you the tips

WhatsApp Image 2022-11-25 at 18.27.23 (1).jpegWhatsApp Image 2022-11-25 at 18.27.23 (2).jpeg

already with these two armed pieces we begin the construction of the body

WhatsApp Image 2022-11-25 at 18.27.24.jpegWhatsApp Image 2022-11-25 at 18.27.24 (1).jpeg

then we start with the turret and we begin to glue from the front to the sides like a cover

WhatsApp Image 2022-11-25 at 18.27.24 (2).jpegWhatsApp Image 2022-11-25 at 18.27.25.jpegWhatsApp Image 2022-11-25 at 18.27.25 (1).jpeg

As in the previous one, the main parts have already been glued and the turret placed, we leave covers to be able to place the weapons making a little pressure both from the outside and from the inside

WhatsApp Image 2022-11-25 at 18.27.26.jpegWhatsApp Image 2022-11-25 at 18.27.26 (1).jpegWhatsApp Image 2022-11-25 at 18.27.26 (2).jpeg

Once the weapons are in their position, we close the covers that we left at the top and leave the cover that remains in the lower part of the ship

WhatsApp Image 2022-11-25 at 18.27.27.jpegWhatsApp Image 2022-11-25 at 18.27.27 (1).jpeg

Once the upper lids are closed, they may be sunk inward and this is solved by pressing from the sides as shown in the photo and they must be concavely shaped


WhatsApp Image 2022-11-25 at 18.27.27 (2).jpegWhatsApp Image 2022-11-25 at 18.27.28.jpeg

and this is how it should look at the end of everything

WhatsApp Image 2022-11-25 at 18.27.28 (1).jpegWhatsApp Image 2022-11-25 at 18.27.28 (2).jpeg

WhatsApp Image 2022-11-25 at 18.27.29.jpegWhatsApp Image 2022-11-25 at 18.27.29 (1).jpeg

WhatsApp Image 2022-11-25 at 18.27.29 (2).jpeg
 

lons fede

Active Member
Hello everyone, it's been a long time since I posted anything on the forum. My most sincere apologies, there was a lot of study involved.
Having said that, I continue with this section that I like so much since getting the models that I show here was very fun since it was like a treasure hunt hahahahahahahaha.

Today I bring you, after a long time, the model of the super acolyte of the Bentusi faction from the homeworld video game, which is the only ship of this faction made exclusively for the convate.

Here I leave the link that talks a little about its history and characteristics:

The file is in PDO and after an agonizing wait the creator gave me permission to upload it to the forum.
It takes almost forever to reply to my message hahahahaha

This model is made up of a single sheet and several pieces with many angles.
The first thing that I start with is the wings that, as you can see, have their work, since the way to pay for the piece to make the shape is not very comfortable, let's say, and it can be crooked.


WhatsApp Image 2023-01-12 at 10.48.20.jpegWhatsApp Image 2023-01-12 at 10.48.20 (1).jpeg

then we continue with the main body that has no major drawback than that of slightly curving the pieces so that it has a more vaulted appearance

If possible, keep the model's belly as flat as possible.

WhatsApp Image 2023-01-12 at 10.48.20 (2).jpegWhatsApp Image 2023-01-12 at 10.48.21.jpeg


The part of the tail can present discomfort as it can very easily be cut and/or remain symmetrical. that's why care and patience since it is a very fine piece
After placing the tail, the cannons are made, which are the pieces that will join the wings with the main body.

WhatsApp Image 2023-01-12 at 10.48.22.jpegWhatsApp Image 2023-01-12 at 10.48.22 (1).jpegWhatsApp Image 2023-01-12 at 10.48.22 (2).jpeg


Everything is ready and all that remains is to join it. Apart from that, there is a small pizza that, to make it look good, should be placed at the end and carefully waiting for each tab of the joint to dry before the next.

WhatsApp Image 2023-01-12 at 10.48.23.jpegWhatsApp Image 2023-01-12 at 10.48.24.jpeg

And that's it boy, we already have the model built and now enjoy it. More details can be added but I think it looks great as it is. I hope you enjoy


WhatsApp Image 2023-01-12 at 10.48.23 (1).jpegWhatsApp Image 2023-01-12 at 10.48.23 (2).jpeg

WhatsApp Image 2023-01-12 at 10.48.24 (1).jpegWhatsApp Image 2023-01-12 at 10.48.24 (2).jpeg
 
Top