If you have wide enough temperature variations, you may still have some expansion/contraction problems. One member of our modular club used to constantly complain about people leaving small gaps between the ends of the rails from one module to the next in our modular setups. When he was put in charge of one set up at a mall, he insisted that the rail joiner tracks be cut exactly to fit between the modules without play. It worked fine on the Friday night set up. The next morning as the sun came up and began warming rails through the mall's skylights, the rails started warping when they had no room to expand! We ended up removing joiner tracks and cutting them to allow a 1/8 inch gap at each end of every module. If you have drops soldered to every section of rail, a small gap between sections of track won't hurt your electrical continuity at all, but will allow for expansion of the rails. That is one reason that I always reccomend for people to solder drops to the rails and not solder rail joiners or try to use rail joiners for electrical connections.
Garage Layout
- Thread starter DeckRoid
- Start date
You are using an out of date browser. It may not display this or other websites correctly.
You should upgrade or use an alternative browser.
You should upgrade or use an alternative browser.
Well Folks, we have started. A buddy from the train club came over this afternoon and we put up some framework/benchwork. First, let me delve into my choice of book...

This book is a must, if you are thinking of building L-Girder style of benchwork. I consider this the Holy Grail of Benchwork (as others do, I am sure.)
Next, the most important tool we used today was this little ditty I picked up at Lowes last night.
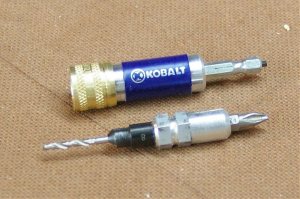
Counter sink/pilot hole drill bit on one side, flip it around and put in the screw. Best of all, it's made in the USA. (sorry to those from the UK and elsewhere, but I am tired of buying tools made in China.) This thing saved us SO much time today.
And this is the end result of 3 hours of work.
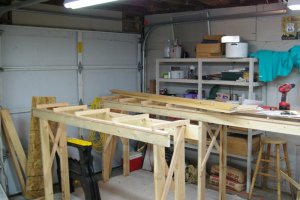
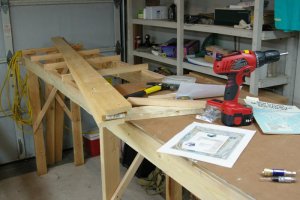
We shot the bull alot and referred to the book more times than needed, but we had a great time. We got 2 of the 4 sides up and ready to go. The plans call for one side to be 24 wide inches and the other to be 18. The other 2 sides, yet to be built, are going to be 24 inches wide and 12 inches wide. I will also try to build in a split, so when we move in ~ 2 yrs, I wont have to scrap this baby and start over.
What's nice about this is that this girder system is SO strong. It just does not move 1 iota, yet it is light and can be easily moved. How heavy it will be when plaster, sculptamold, buildings and the like are on it... well, that's another story.
I am having a blast building this thing and learning so much about how these things go together. I tip my hat to Linn Westcott. This book was written in the late 50s and the one I have is from 77, when Linn was still alive. The one that is out now is basically the same thing but with some updates and such.
I am still trying to figure out how to build a Lift Out section, but I know someone here was asking not long ago, so it's a research night for me. :thumb:
Until next time,
George

This book is a must, if you are thinking of building L-Girder style of benchwork. I consider this the Holy Grail of Benchwork (as others do, I am sure.)
Next, the most important tool we used today was this little ditty I picked up at Lowes last night.

Counter sink/pilot hole drill bit on one side, flip it around and put in the screw. Best of all, it's made in the USA. (sorry to those from the UK and elsewhere, but I am tired of buying tools made in China.) This thing saved us SO much time today.
And this is the end result of 3 hours of work.


We shot the bull alot and referred to the book more times than needed, but we had a great time. We got 2 of the 4 sides up and ready to go. The plans call for one side to be 24 wide inches and the other to be 18. The other 2 sides, yet to be built, are going to be 24 inches wide and 12 inches wide. I will also try to build in a split, so when we move in ~ 2 yrs, I wont have to scrap this baby and start over.
What's nice about this is that this girder system is SO strong. It just does not move 1 iota, yet it is light and can be easily moved. How heavy it will be when plaster, sculptamold, buildings and the like are on it... well, that's another story.
I am having a blast building this thing and learning so much about how these things go together. I tip my hat to Linn Westcott. This book was written in the late 50s and the one I have is from 77, when Linn was still alive. The one that is out now is basically the same thing but with some updates and such.
I am still trying to figure out how to build a Lift Out section, but I know someone here was asking not long ago, so it's a research night for me. :thumb:
Until next time,
George
That framework is looking good..!! I enjoy carpentry a lot (so I tend to overbuild...), but it's justified as your layout will only be as good as the frame it's sitting on....
If you have a move in your future, I recommend using foam as a good base to keep the weight down...I moved my previous layout 3 TIMES...and that super frame with 2X4's I built for it was no fun to drag around....
Keep up the good work, and post your progress as you go along...
P.D. - Those little kwik-change fittings do make work go a lot faster, don't they...?
Thanks for the encouragement and the foam idea. I have 2 full sheets of the blue stuff (the RIGHT stuff this time!) that I am thinking of using.
I just went out to the garage to get some icecream out of the freezer and I had to just stand there for a while smelling that wonderful Fresh Cut Wood smell.
"I love the smell of Wood Dust in the evening... smells like... benchwork."
And when you only have 1 cordless drill between 2 - 3 folks, yeah, those chucks are nice. Next time we are going to have 2 to 3 drills.
George
Speaking of wood smells....I have just a few little bits of wood roadbed my ol' man used on his very first layout...Back in the early 50's....And that's about the only thing that I remember of that layout...the very particular smell of those bits of wood...
P.D. I think I'm going to find a special place for them in my new layout...
P.D. I think I'm going to find a special place for them in my new layout...
George
That is a lot of work to tear down (I know something about that), but you made the right choice! The new layout plan and benchwork look sweeeeeet! It is very evident that you have an excellent eye and a lot of talent:thumb::thumb::thumb:...I look forward to watching your progress!
...........plus, us Northern Pacific modelers have to stick together!:mrgreen::thumb:
George
It is very evident that you have an excellent eye and a lot of talent
As for an eye, well, I may not know a lot yet, but I know what I like. As for talent... well, that is most debatable. We kept going back to the book because the benchwork was going together TOO easily. I kept telling Ted there is no way it can be this easy. We have to be doing something wrong. He agreed, but we followed the book.
The thing I like most about this style is that no 2 ends are butted up against each other. I can't cut a straight edge with anything less than a table saw, but for L-Girders, it just doesn't matter.
And as for NP modelers sticking together... well, there are only 2 guys in our club who run NP. Gary and myself. Our LHS owner is a member of our club and gets excellent deals from shops that are dumping stock and Gary gets the phone call 1st if any NP shows up. I am second on the list. Almost once or twice a month Gary comes in with something that really sparks off some envy.
sign1
And that scratch built grain mill is great, or to quote Deano "SLAP AWESOME!!!!!"
I have started my 1st scratch build. It's from the April issue of MRC, the River Fish Fillet.
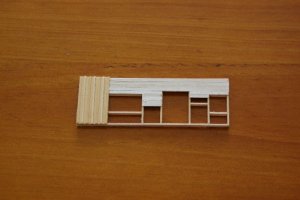
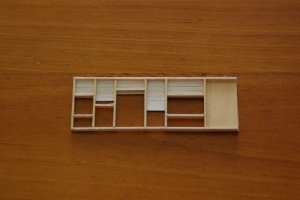
I had to stop there because I am out of scale 2x6s and 2x8s. Guess I had better get to the LHS... I know, I know... twist my arm.
George
I know it must have been painful, but i think you did the right thing starting over. One thing I noticed in the original layout that looked like a potential problem was the curve and especially the crossover inside the mountain. If you do something like this again, be sure to provide yourself some access to the inside, so that you can fix derailments.
I do miss not running my trains, but I have such good feelings about this new benchwork/layout. And I did put in a hole in the backdrop of my last layout. I figured I would need something like that as my arms aren't 4 feet long! lol...
This time, with the tunnel, I am going to have access from underneath the layout. I figure this would be the best way to get to any issues.
George
This time, with the tunnel, I am going to have access from underneath the layout. I figure this would be the best way to get to any issues.
George
Ok, it's been 4 months since my last update... I guess it's time to show more pics.
I haven't been able to get as much done as I had wished, but I think that's a universal issue...
Pardon the mess... I either have time to clean my area or clear a spot and build for a bit. You can guess what I usually choose!
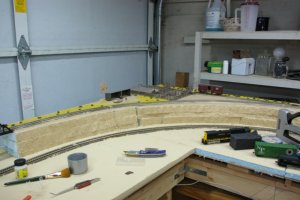
These were taken last month, I have the foam glued and some stacked. I used toothpicks and glue when stacking the foam for the hillside.
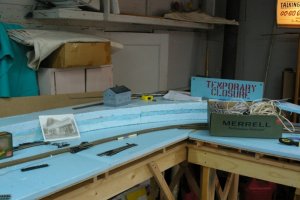

Being a total novice at soldering, I decided to solder 2 3' sticks of flextrack together on my workbench instead of in place. When I laid the track, it came out oh so nice. I sometimes suprise myself when I put good advice to good use.
Over the past couple of weeks I would go out, super evelvate the corners and lay a section or 2 of track.
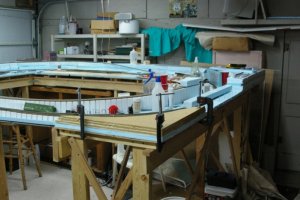
More to come...
I haven't been able to get as much done as I had wished, but I think that's a universal issue...
Pardon the mess... I either have time to clean my area or clear a spot and build for a bit. You can guess what I usually choose!
These were taken last month, I have the foam glued and some stacked. I used toothpicks and glue when stacking the foam for the hillside.


Being a total novice at soldering, I decided to solder 2 3' sticks of flextrack together on my workbench instead of in place. When I laid the track, it came out oh so nice. I sometimes suprise myself when I put good advice to good use.
Over the past couple of weeks I would go out, super evelvate the corners and lay a section or 2 of track.

More to come...
Here we see where a river is going to be crossed. I plan to flow it inbetween the tracks... make it like a river canyon back home.
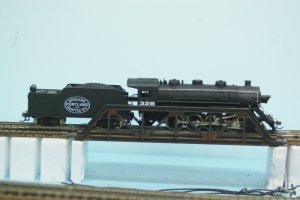
Further out, you can see where I am thinking of putting my restaurant.
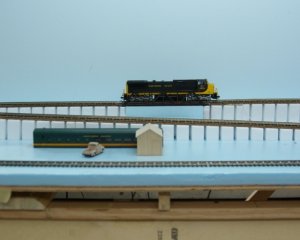
I still have to paint it all, but you can see what I am aiming at...
Also, I have been restoring my 1977 Tyco cars. I got the set from my grandma that xmas... the Chattanooga set never really worked right. The loco started and halted, lurched and jump track. The cars couldn't stay on track 3 times around... but I still built a wee 4x6 over-under layout. A Plywood Prairie, if you will.
Instead of fixing them all up with Kadie couplers, I made transition cars of two of them. I gave them all new wheels. I had to play with the trucks to get the new wheels to fit, but I took the end result down to the club and what do you know? They worked like a charm! When around and around with no issue.
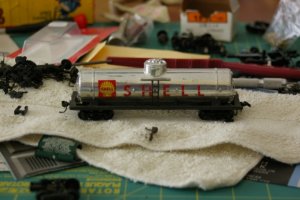
I will post more as I try to 1.) take more pics and 2.) get out to my layout more often.
Till next time!
George

Further out, you can see where I am thinking of putting my restaurant.

I still have to paint it all, but you can see what I am aiming at...
Also, I have been restoring my 1977 Tyco cars. I got the set from my grandma that xmas... the Chattanooga set never really worked right. The loco started and halted, lurched and jump track. The cars couldn't stay on track 3 times around... but I still built a wee 4x6 over-under layout. A Plywood Prairie, if you will.
Instead of fixing them all up with Kadie couplers, I made transition cars of two of them. I gave them all new wheels. I had to play with the trucks to get the new wheels to fit, but I took the end result down to the club and what do you know? They worked like a charm! When around and around with no issue.

I will post more as I try to 1.) take more pics and 2.) get out to my layout more often.
Till next time!
George
Let the foam fly. Cut and hack and shape. Great to see you making progress.
I think those early Tyco trainsets must have done more harm to the MR hobby than good. I wonder how many adults, today, have bad memories of them and never want to go back to the hobby?
I think those early Tyco trainsets must have done more harm to the MR hobby than good. I wonder how many adults, today, have bad memories of them and never want to go back to the hobby?
Latest Installment....
I have been running trains for about a week and a half now, a couple of hours a night testing my track, and so far, no issues. (Other than cleaning... sheesh... I think the Black Gunk Elves come along and paint my rails for me...)
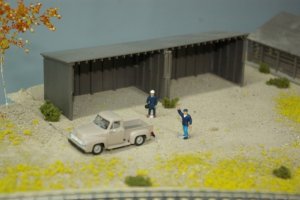
I know these next pictures are rough, but I couldn't stand looking at the blue foam any more. So I decided to bust out the paint and dirt to do one corner, and see where it takes me. I don't like the tree I quickly put together... I went for the birch look that Kevinrey was talking about. This was my first attempt at birch, so forgive me.
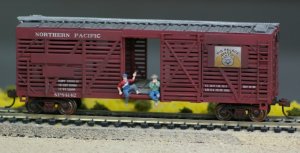
Here is my first attempt at weathering... (Freeloaders Bill and Robert are waiting to catch a ride into town.)
We see Phil and Elija helping Dan (who isn't in the truck... as God is my witness, he was in there last night when I was gluing him in... ) back up.
I originally wanted beef for my stockyard, but the pigs were on sale, and they do match the pig company on the stock car.
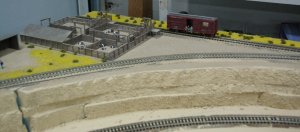
The cliff won't be there in the end. I am going to put in a snow shed for the lower level town. I didn't want a tunnel, but I wanted something that would break up that corner, so I thought a nice snowshed... something you can see through while breaking up the abruptness of the hillside.
George
I have been running trains for about a week and a half now, a couple of hours a night testing my track, and so far, no issues. (Other than cleaning... sheesh... I think the Black Gunk Elves come along and paint my rails for me...)
I know these next pictures are rough, but I couldn't stand looking at the blue foam any more. So I decided to bust out the paint and dirt to do one corner, and see where it takes me. I don't like the tree I quickly put together... I went for the birch look that Kevinrey was talking about. This was my first attempt at birch, so forgive me.

Here is my first attempt at weathering... (Freeloaders Bill and Robert are waiting to catch a ride into town.)

We see Phil and Elija helping Dan (who isn't in the truck... as God is my witness, he was in there last night when I was gluing him in...

I originally wanted beef for my stockyard, but the pigs were on sale, and they do match the pig company on the stock car.

The cliff won't be there in the end. I am going to put in a snow shed for the lower level town. I didn't want a tunnel, but I wanted something that would break up that corner, so I thought a nice snowshed... something you can see through while breaking up the abruptness of the hillside.
George
That's looking REAL good..!!! Nothing like having somewhere to run your trains..!! I see you like testing your track..."Only" 2 hours a day....Sheesshhhh...!!! :mrgreen:
The black gunk is probably coming from your wheels...Are you replacing plastic wheels with metal ones..? That'll help keep the gunk off....
Keep up the good work...and the pictures comin'...!!! :thumb:
The black gunk is probably coming from your wheels...Are you replacing plastic wheels with metal ones..? That'll help keep the gunk off....
Keep up the good work...and the pictures comin'...!!! :thumb:
Looks good. I see the cattle car has metal wheels, as Gus said, plastic wheels will leave black gunk on the rails, but even going to metal wheels might not correct the problem. One of the disadvantages of building a layout in the garage if you are not able to seal off the garage door is a tendency to collect all of the dirt that gets into the garage and that open garage door with 1/4 - 1/2 inch of clearance all the way around will allow a lot of dirt to enter.
on the subject of garage layouts... I am in the same situation and was wondering about positive presurization of the garage with some sort of exhaust fan working in reverse with a filter on the outside. My theory is that if you are pushing clean air in, then the dust and dirt will be blown out any gaps and be less likely to work it's way in. Wonder if this is a good idea.... Hmmmmm

