Eastern Tn logging on the DG CC & W RR 1928

gbwdude

General Manager, W.R.Ry.
Western Lime

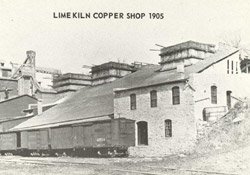
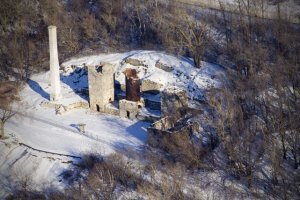
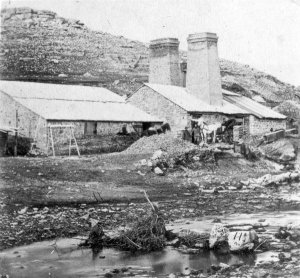
Seeing Montgomery Furnace reminds me of my plan to model the lead smelter. Mind you this is a lime factory but the building layout would be similar. This is like a half mile away from my old house, it's the Western Lime and Cement factory that burned down... sometime (can't remember when). The ruins now sit in High Cliff State Park in Sherwood and at one point the factory had it's own town, complete with lumberyard, post office/general store, and a rumored depot. I have a book on the history of High Cliff but none of the pictures show this depot and only talk about it, since the original Wisconsin Central used to service the lime factory. As you can see from the overhead picture the furnaces that are left are similar to your iron smelters as they were rebuilt over the years, you can tell from the early picture that they looked almost identical to your smelters poking out of the roof.

On the WRRy, the only difference that would be noticable from making it a lead mine is it'd need a hoist for the shaft, as I'll say the mine was founded in the 1850's but put the mine shaft in the late 1890's. Oh projects... I need time to work on you.

Tyler
 

Attachments

  • highcliff2.jpg
    highcliff2.jpg
    14.8 KB · Views: 93
  • limekiln.jpg
    limekiln.jpg
    78.5 KB · Views: 20
  • ruinssign.jpg
    ruinssign.jpg
    72 KB · Views: 19
  • leadblastfurnace.jpg
    leadblastfurnace.jpg
    73.7 KB · Views: 13

Bill Nelson

Well-Known Member
Lime Kilns

There were some lime kilns around here, I forget where exactly, one of the ruins I saw I mistook for an Iron furnace, as it was pretty much the same shape.

nice photo's of the ruins. One of my favorite industrial ruins is is Sherwood TN. , where there was a plant that made concrete, and cast concrete blocks that looked like cut stone blocks . the silos were built with crenelations on top, and so were the rectangular sections, so the building had the look of a castle, which became even more interesting as a ruin.

Bill Nelson
 

Bill Nelson

Well-Known Member
more lime kiln ruins

http://www.sherwoodtenn.com/gager/gager.htm


here is a link to some info on the "Castle" in Sherwood. I visited there several times when I was enrolled nearby at the University of the South, in Sewanee TN. nearby .

from what I have read on the internet, it has deteriorated seriously since then.

A company want's to reopen an operation there, but is stalled by the government due to the existence of a rare snail on the property. some folks say they mined lime there for 40 years without killing all the snails, but what do they know!
 

Mountain Man

Active Member
after dirterizing the turntable"pit", It is much more notiveable that the engine house/shops, car shops, and other turntable leads in Crooked Creek have not been ballasted, while all other track has been, even the dead end spur that will either be a rip track or a team track, that hasn't had one of it's code 55 rails spiked in place yet.


I have a big bag of details for this area that has yet to be painted and installed also. I also need to figure out how I'm going to make the hinges for the six pairs of double doors for the engine house.


this has been a case of rolling inspiration, but before I do anything else I need to test the recently fixed tracks by the tannery and the iron furnace, to see if they really work.


Bill Nelson

What does "notiveable" mean? :confused:
 

Bill Nelson

Well-Known Member
What does "notiveable" mean? :confused:

It means I didn't use my spellchecker. Besides being dyslexic, I have worn many of the letters off my keyboard, and have a bad memory . There is no telling what new and interesting words I will produce; I won't try to provide all of the meanings, and will leave some of that fun to others,


I cut some rafters to size for the back Wall of the Crooked Creek engine house. this is tricky, as there is no overhang on that side , as the back wall is flush with the north wall of the RR room, so I am aiming at making some progress over there.


Bill Nelson
 

Bill Nelson

Well-Known Member
more workSML A=1 14@ MF 2.jpgSML A=1 14@ MF.jpg SMLA=1 rftr rfrnc.jpg SMLA-1 rftrs #2.jpg

I did some more work on the Crooked Creek engine house roof; getting the rafter locations marked on the rear half of the ridge beam, so I can add the rafters and get the spacing right for the skylight openings.and on the switches in Montgomery furnace.

Over in Montgomery furnace I have been working to fix multiple broken solder joints on the code 55 switches. This time I'm using more solder, when building the switches I tried to use as little solder as possible trying to keep the switches looking good. Now I'm blobbing it on going for strength.

Bill Nelson
 
Last edited:

Bill Nelson

Well-Known Member
SMLA-1  cc  eh rf #3.jpg SMLA-1CC E H bk  rf #1.jpg SMLA-1  CC  EH-1.jpg after a long period without any work on my Crooked Creek engine house, I have attempted to build the basic rafter structure for the back half of the roof.

As it is, it is missing four rafters. these will be tricky, as I have to frame in openings for four skylights.

I did not do that to start with, as I wanted to be sure the roof fits correctly, before I do so much fancy work I have test fit it, and it is just a hair tight, and that is good, as after I have the skylights framed and glue on the firing strips for the roofing, it will be a lot stronger, and I can lightly sand the front and rear edges until it is a perfect fit.

Soon I will have to try to fabricate brass working hinges for the 6 double doors, a job that is going to be so much fun; (the reason I have had the doors ready for 6 months, and haven't hung them yet.


Bill Nelson
 
Last edited:

Bill Nelson

Well-Known Member
SMLA-1 CC E H Bk RF  #3a.jpg since the back roof fits well, or will once it and the front roof are lightly sanded, I started to frame in the skylights. There will be an additional rafter added above and below each skylight opening. For skylights I am using City Classics factory windows, I also cut some of these down to make the windows in the walls. I also used them on my car shops and the sawmill.


once I have those added then I can start adding firing strips. those will make each roof half stable enough to sand lightly till they are a perfect fit. then they will get painted with flat gray, and some flat black (from the smoke). after that I ca start looking for tin roofing material.

I allowed myself a little time to work on this as a reward for working on taxes, after working all night. Time to go to sleep. I will have to decide weather I want to cut firing specially for this project, or use some wood I have pre cut. Since I'm planning on painting the wood to get a gray weathered look, I won't need to use red ceder to match the rafters.


Bill Nelson
 
Last edited:

Bill Nelson

Well-Known Member
SMLA-1 CC E H  skylt frmg.jpg a little more progress

I got the extra short rafters in for the framing of the skylight windows on the back of the engine house roof. I am making progress, next for the firing. Then I can lightly sand the edges of both roof sections so they fit extra snug.

Bill Nelson
 
Last edited:

Bill Nelson

Well-Known Member
SMLA-1 CC  EH bk rf  frrng #1.jpg starting to add firring

Down in my garage I found a bundle of yellow poplar that was cur to the right size for the firing for the Crooked Creek Engine house roffing, and I began to add firing to the rafters.


The firing will add some rigidity to the roof structure, which will allow me to lightly sand it until it is a perfect fit between the front roof section and the wall.

once all the firing is on. and the roof section has been sanded to fit; I will lightly spray it with spray paint to get it a dark gray color, and then I will dust it with black to represent soot from the engines. later on it will get smoke jacks and tin roofing.

Bill Nelson
 
Last edited:

Bill Nelson

Well-Known Member
SMLA-1 CC E H RF  frrng #2.jpg After a nap, I am listening to a Hockey game on the radio, and working some more on the firing on the back half of the engine house roof.

Before I got a lot of firing on the rafters; the rafters were flexible, but now they have a lot of rigidity, and I will be able to sand the back and front to get a tight fit, and on the ends to be able to get those ends really neat, which is a consideration, as depending how I do the trim the ends of the firing might be visible on the finished building.


Doing the roof this way is a lot of work, one doesn't want to do this on every building, but as any who have been following this build will know I have been pulling out all the stops on this model. I only have a hand full of models that are this detailed, and all but the Montgomery Furnace, which is is more complicated, and less finished. This building will be a centerpiece for my RR.


as my RR has run out of room for expansion, the only expansion possible is toward more detail.

Bill Nelson
 
Last edited:

Bill Nelson

Well-Known Member
The back side (really the north side) is done; and the I have started putting the firing on the South side roof section. I haven't photographed any of that as it is much like the north section, except there are some structural members glued on the bottom of the southern rafters, that key into the beams, and lock the southern roof in place. the north roof is just a drop in fit between the south roof and the wall / backdrop.

putting the firing on the southern roof is much trickier than the north roof was, as the structural elements prevent the rafters from laying flat enough on the build board to reliably use push pins in every location to hole the firing tight while the glue dries.


I also have some tricky work to do on the north roof, as it won't set perfectly flush, as it contacts a support beam , that raises it up about 1/32nd of an inch. I will have to put masking tape on the beam, and paint the offending edge of the covered beam with acrylic paint, and then set the roof in place before the paint dries.

that way the paint will mark the exact contact point, and I can go in with a needle file and file out notches on the rafters so they will set down flush on the end walls.


Bill Nelson
 

Bill Nelson

Well-Known Member
SML A-1 fll rf frrng a1.jpg after all together too much work I have the firing on the rafters on the Crooked Creek engine house. After the glue dries haed, I can trim the skylight and edges flush, and do some sanding to get as good a fit on the building as possible .

once that is done I will go ahead and paint the rafters gray, which will both color the wood, and seal it, which will help prevent any possibility of warping.


I don't think I have enough metal roofing on hand, I will have to check. I already have some on back order, so I may have to check my records, and order a different brand . It won't hurt me to have way too much, my sawmill still doesn't have a roof, and Montgomery furnace and the iron ore transfer will need metal roofs as well, plus the tannery and God knows what else.


Bill Nelson
 
Last edited:

Doctor G

Well-Known Member
Roof work is incredible!!!

Bill,

That roof work is incredible and well detailed!!! It reminds me of your fine craftsmanship in building those wonderful bridges of yours. Very nice.:thumb::thumb::thumb:

Doc Tom
 

Bill Nelson

Well-Known Member
Thanks guys, this is the first board by board building I have done in a very long time, and I'm trying to push the envelope.


Bill
 

Bill Nelson

Well-Known Member
SML A-1 CC EH DF pntd  @-a-6.jpg The roof has been fitted!


I need to paint the edges, and the skylights green, but the fit is good, and I had some worries about that.

Can it be done in N scale? That is a good question. My favorite Model train Magazine is the Narrow Gauge and Shortline Gazette, In building this model I'm desperately trying to match in HO, the quality of work I have seen photo of on On3 and Fn3 layouts. It is an article of faith with me that I'm unlikely to get all the way there, but If I keep trying I'm sure to get closer than I would have if I had taken the attitude of, that level of detail can't be done in this scale. It is all about working harder and harder to push the envelope and develop your skills. You learn stuff with each project; and the harder you push that envelope, the more you learn, and the better your stuff looks, so give it a shot, If you aren't satisified, and even if you are, try harder the next time .

Most of us have a limited space to work with, and before we know it we are up against the four walls, and I my case ; I'm up against the ceiling too. at that point there is no where to go put toward more detail, at least in the important buildings that can be focal points. One great thing is our minds take shortcuts. If we take a building that is a natural focal point , and do insane level of detail, others looking at the scene will have their brain assuming that level of detail exists elsewhere, weather it does or not.


Bill Nelson
 
Last edited:

gbwdude

General Manager, W.R.Ry.
Wow... I love it when I hop off this site for two weeks (due to Mother Nature) and become amazed all over again like it's the first time coming to the site and seeing Bill and Dr. Tom's amazing achievements. I know I was amazed even before the roof wasn't complete, the level of detail in the engine house is jawdropping. Seeing it in person takes the cake though, the camera can't capture every aspect. I need to have Bill rub off some of that modeling talent so the WRRy will look as good as the DGCC&W.

Tyler
 

Bill Nelson

Well-Known Member
Thanks Tyler,

On my work bench now, are eight skylights , waiting for me to paint green, and to try to find some glazing for. Also burried on my work bench are the doors for the engine house. they were built to fit each opening, and once were organized. they have been knocked around, hopefully I can puzzle out which one goes where.

Making the working hinges will be challenging, but similar to some of the work I have done on the Surry Parker loaders over on the Your unique logging equipment thread. the work will be pretty straight forward, but there will be twelve pairs to make and fit.

I also have a big bag of details, shelving, locomotive parts, stoves some cranes stairs (to go down into the two inspection pits). a set of cleanout tools for the ashpit, smoke jacks, oil cans & miscellaneous stuff, some of it purchased for this project, and some of gathered over the last 30 years of modeling, lots of detail painting will be needed to fill out this scene.

Bill Nelson
 

Bill Nelson

Well-Known Member
SML A-1 Skylts.jpg Skylights!

I just put the glazing in the skylights, after the glue has set up, it will be time to glue the skylights onto the roof, and check my suply of metal roofing, which I am rather certain will be inadequate.


Bill Nelson
 
Last edited:
Top