DeHavilland DH89 Dragon Rapide by Schreiber Bogen build thread

Boris

Well-Known Member
Hello everybody.

And so we begin our jorney...
The model is 1:24 scale, some parts (wings and tail) are metallized
The model is designed as skeleton with wrappings. I don't really like this type of construction so it's going to be a challenge for me
The model comes with three cardboard pages and I will be using them.
I began with laminating the parts on cardboard. Usually I do this with contact cement, but I used UHU glue. This made the parts a bit stiffer. It is a waist of money, but, hey, with my build rate I can allow it.
As usual for me, I used Carioca water based felt tip pens for edge painting. I highly advise on using these.
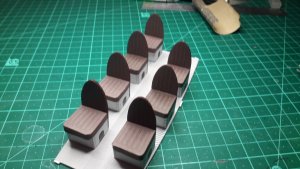
Then I made the passenger seats. After this, I cut out the floor of the passenger compartment and mounted the seats on it.
Nothing too complicated here, just need to be careful.
There is only one thing that I have issue with. When cutting out parts for skeleton, how the parts should be cut? Inside the outline, on the middle of outline or outside of outline??? After staring at instructions, I decided to cut onthe middle of outline and then remove the outline with sandpaper.
Results can be seen below.
We have a long weekend so, probably I will have more updates tomorrow.
20210410_021232_copy_1024x576.jpg20210415_030617_copy_1024x576.jpg20210415_030622_copy_1024x576.jpg20210415_030729_copy_1024x576.jpg20210415_033407_copy_1024x576.jpg
 

Attachments

  • 20210415_033415_copy_1024x576.jpg
    20210415_033415_copy_1024x576.jpg
    129.4 KB · Views: 6

Rhaven Blaack

!!!THE MAN BEHIND THE CURTAIN!!!
Staff member
Administrator
Moderator
It looks like you are off to a great start! I like how the seats look! The are very clean, clear, and crisp. I am looking forward to seeing how this project turns out!
 

Boris

Well-Known Member
Thank you all.
So I had some time and continued with the build. Added the safety belts to the seats and then began cutting out the ceiling, the side walls, rear and front walls, top and bottom formers, front edge and floor of pilot compartment.
What can I say? The cardboard provided with the model is very good. Three broken X-Acto blades and one Olfa-like can prove this. It has been a very long time since i had so much pain in my fingers ... The cheap X-Acto like knife with plastic handle was very useful, suprisingly
But, the passengers compartment is ready and began with the pilot's compartment
In all, the fit is good for now.
20210416_005026_copy_1024x576.jpg20210417_012459_copy_1024x576.jpg20210417_012501_copy_1024x576.jpg20210417_013516_copy_1024x576.jpg20210417_015247_copy_1024x576.jpg20210417_020535_copy_1024x576.jpg20210417_021724_copy_1024x576.jpg20210417_021725_copy_1024x576.jpg20210417_021731_copy_1024x576.jpg20210417_024929_copy_1024x576.jpg20210417_025522_copy_1024x576.jpg20210417_025526_copy_1024x576.jpg20210417_032800_copy_1024x576.jpg20210417_032804_copy_1024x576.jpg20210417_032808_copy_1024x576.jpg20210417_032822_copy_1024x576.jpg
 

zathros

*****SENIOR ADMINISTRATOR*****
Staff member
Administrator
Moderator
Oh how I do wish to build this plane. I may double the size though. Excellent workmanship Boris!! :)
 

Boris

Well-Known Member
Thank you all.
Zathros, please note that this model quite large. We're talking about more than 60 cm wingspan (about 2 feet). It means that you'll have to devise a way to reinforce the rear structure significantly.
 

zathros

*****SENIOR ADMINISTRATOR*****
Staff member
Administrator
Moderator
Whoa!! I didn't realize that. No size increasing necessary. Thanks!! :)
 

Boris

Well-Known Member
Hello all.
I am back with some update
This time it's the tail frame and external wrappings
Passenger compartment's sides are pretty large panels, but the window frames require some accuracy and really sharp blades. I am talking about 2 mm wide stripes arranged in different shapes. A for Accuracy here.
Then I began with the tail frame. Frankly, it seems to be pretty weak. Maybe I will have to reinforce it with wooden coffee stirrers.
Rear wheel is no real issue.
Tail side panels are simple large panels. After attaching the tail frame with super glue, side panels were attached to the frame to the rear flat part and to the front flat part. Also the panels were attached to the frame by 4 glue dots to horizontal frame plate. The side panels gluing tabs were left free to allow joining of top and bottom plates
In all, fit is really good. My decision to use UHU glue to attach paper to cardboard provided with the model was not a smart one. The cardboard became stiff and hard to cut with X-Acto like knife. The cutting tips getting dull or broken really fast.
Next part are the lower wings root parts.
20210508_033351_copy_1024x576.jpg20210514_223355_copy_1024x576.jpg20210515_005609_copy_1024x576.jpg20210515_023749_copy_1024x576.jpg20210515_030727_copy_1024x576.jpg20210515_035334_copy_1024x576.jpg20210515_035756_copy_1024x576.jpg20210515_040433_copy_1024x576.jpg20210516_012507_copy_1024x576.jpg20210516_013417_copy_1024x576.jpg20210516_021840_copy_1024x576.jpg20210516_021844_copy_1024x576.jpg20210516_022800_copy_1024x576.jpg20210516_032433_copy_1024x576.jpg20210516_032914_copy_1024x576.jpg20210516_234438_copy_576x1024.jpg20210517_005237_copy_1024x576.jpg20210517_012642_copy_1024x576.jpg20210517_012654_copy_1024x576.jpg
 

zathros

*****SENIOR ADMINISTRATOR*****
Staff member
Administrator
Moderator
Boris, this model is coming along wonderfully!! Excellent craftsmanship!! :)
 
Top