BSG MedEvac Raptor.
- Thread starter DanBKing
- Start date
You are using an out of date browser. It may not display this or other websites correctly.
You should upgrade or use an alternative browser.
You should upgrade or use an alternative browser.
You are doing a GREAT JOB on this model.
It is starting to look better then mine.
Thanks for the compliment RB. But I dont think I am anywhere near your standard in this hobby. It was your build that inspired me to build this model.
I am following your build thread to help me.. :thumb:
Thanks for the compliment RB. But I dont think I am anywhere near your standard in this hobby. It was your build that inspired me to build this model.
I am following your build thread to help me.. :thumb:
Thank you for such a compliment. To have my work not only inspire, but also to used as a guide for a (your) build is one of the BIGGEST compliments that I could ever receive.
If you have any questions or need any advise, please feel free to PM me, and I will do what I can to help you.
I will be following this thread.
You can try various craft stores like Micheal's or Hobby Lobby.Ok probably pointless since you are not in USA but... where do you get your 1.5mm card?
You can also use Cereal boxes or the card board back of (most) note pads and laminate the card board to the desired thickness that you need.
Ok probably pointless since you are not in USA but... where do you get your 1.5mm card?
Hi Micah, I used card from the back of an old picture frame in this case. But as RB says above, card backing from note pads, cereal boxes, framed pictures of your ex, anything really that willl suit. Make sure you avoid the corrugated types of card though.
Ok that's what i was thinking... I've been saving cracker boxes and such
Then get 'cracking'
I use what time I have after work before bed to cut down 11X17 card to A4 size. I have 6 sheets so far. I want to print two copies so I can laminate some other details as well.
I use what time I have after work before bed to cut down 11X17 card to A4 size. I have 6 sheets so far. I want to print two copies so I can laminate some other details as well.
Cool! Looking forward to seeing your build. If I can offer advice with anything. PM me.
Late day today and early morning tomorrow so no paper modeling :-(, But I will try tomorrow afternoon.
I have been busy finishing off a section of a build for a friend, which you can see here: http://www.zealot.com/forum/showthread.php?t=173263
I haven't had much time to work on the Raptor a lot, but have been doing some bits and bobs when I can......
I started with the canopy bubble. I edge glued the thing together with tacky craft glue and when dry, strengthened the joints with CA glue.
I really was not happy with the outcome, so I sanded all the joints with 1000 grit glasspaper. This of cause removed most of the print.......
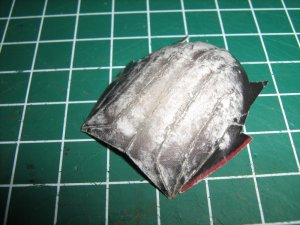
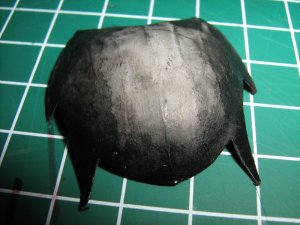
So, repair time.... I coated the whole sanded surface with white watercolour, especially in the middle and blended it outward. Once this had dried, I used many coats of watery but pigment rich black water colour. I paint the middle of the dome and let gravity pull the pigment naturally downwards towards the edges of the dome. In the pic you can see the result. It needs many more coats yet to get it right....
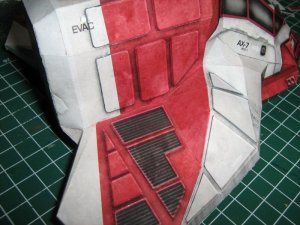
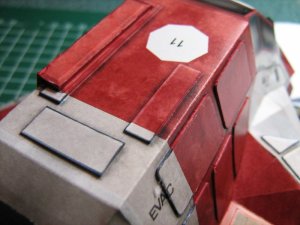
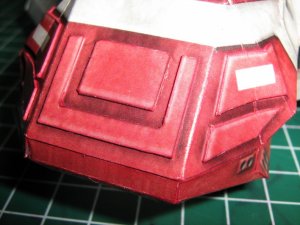
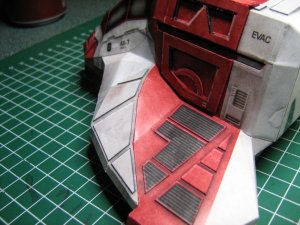
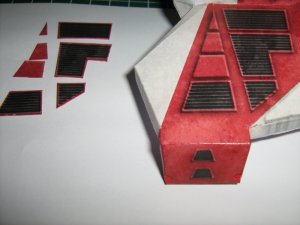
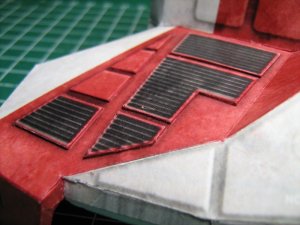
Even though Revell-Fans texturing is superb, I wanted to enhance the model a bit more, so I decided that I was going to detail up the surfaces of the model with armour paneling... I should of done it when everything was still in the flat, but it is still workable this way. As I tend to print 2 copies of a model, I laminated the second spare 160gsm printed stock to 200gsm stock, to give the desired thickness. I cut out the panels and then glued them on.
I only started this bit tonight, but will do some more.... But I really like the effect so far!! :mrgreen:
Laters.

I haven't had much time to work on the Raptor a lot, but have been doing some bits and bobs when I can......
I started with the canopy bubble. I edge glued the thing together with tacky craft glue and when dry, strengthened the joints with CA glue.
I really was not happy with the outcome, so I sanded all the joints with 1000 grit glasspaper. This of cause removed most of the print.......

So, repair time.... I coated the whole sanded surface with white watercolour, especially in the middle and blended it outward. Once this had dried, I used many coats of watery but pigment rich black water colour. I paint the middle of the dome and let gravity pull the pigment naturally downwards towards the edges of the dome. In the pic you can see the result. It needs many more coats yet to get it right....

Even though Revell-Fans texturing is superb, I wanted to enhance the model a bit more, so I decided that I was going to detail up the surfaces of the model with armour paneling... I should of done it when everything was still in the flat, but it is still workable this way. As I tend to print 2 copies of a model, I laminated the second spare 160gsm printed stock to 200gsm stock, to give the desired thickness. I cut out the panels and then glued them on.
I only started this bit tonight, but will do some more.... But I really like the effect so far!! :mrgreen:


Laters.

Very nice work on the armor panels kinda the effect I am going to use soon. first three parts pages printed and I'm outta ink Razza Frazzin :-(
You are doing a FAN(FRAKKING)TASTIC job on this build.
I like how you are taking the texturing to the next level.
I plan on doing the same when I rebuild mine.
Keep up the GREAT work.
I like how you are taking the texturing to the next level.
I plan on doing the same when I rebuild mine.
Keep up the GREAT work.
I'm back....
I've been busy on couple of projects for a friend: http://www.zealot.com/forum/showthread.php?t=173263 and http://www.zealot.com/forum/showthread.php?t=173389.
But I am back now to finish off the Raptor.
I got back to the canopy, as a start. I wasn't happy with the result of my colouring or finish of the previous attempt. And then I read the MOM for mcusanelli's finished Raptor, and I liked the finish he achieved on his canopy. So I decided to give his finish a try.
Using strips of sticky labels on the inside, I fitted the canopy in position and ca glued all the joints nice and snug.
I gave the whole canopy various good soakings in ca glue and let it dry thoroughly. I then gave it a good sanding with 1000 grit glasspaper.
Next, I coloured the glazing with a black permanent marker. I wasnt too worried about black ink on the frames as I am raising the detail of the frames later.
The black ink is semi glossy, so it helps to show up the imperfections in the finish. It is just a case of colour, fill, sand, colour, fill, sand,... until the surface is as smooth as possible. I used gap-filling (gel) ca glue to fill small holes and imperfections.
Once I got it to a semi decent finish, I very carefully gave the canopy a light coat of Future, or, Pledge Parket Plus, as it is called here in Holland.
I have had a lot of experience with this product and its multitude of uses, but I was a little concerned with screwing the finish on my Raptor, but apart from a small run that stained the finish, I had no problems.
The pics below show the result after 2 coats.
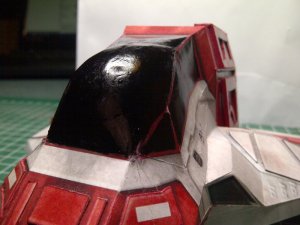
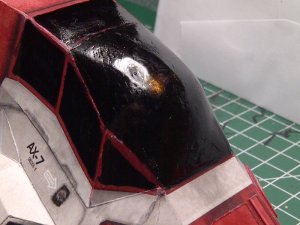
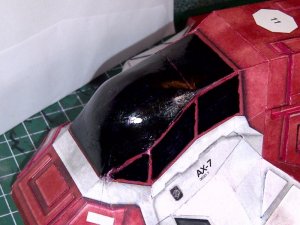
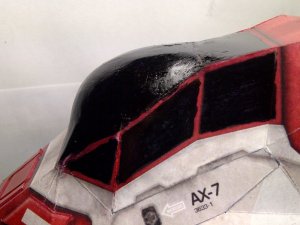
I am still going to do another colour, (fill) and sand routine, and then give it a final 3 or 4 coats of Future. Once that has hardenen well, I will buff it up with MicroMesh polishing papers to dull the gloss to a more fitting lustre.
I'll be working on it over the next few evenings, so will keep you posted.

I've been busy on couple of projects for a friend: http://www.zealot.com/forum/showthread.php?t=173263 and http://www.zealot.com/forum/showthread.php?t=173389.
But I am back now to finish off the Raptor.
I got back to the canopy, as a start. I wasn't happy with the result of my colouring or finish of the previous attempt. And then I read the MOM for mcusanelli's finished Raptor, and I liked the finish he achieved on his canopy. So I decided to give his finish a try.
Using strips of sticky labels on the inside, I fitted the canopy in position and ca glued all the joints nice and snug.
I gave the whole canopy various good soakings in ca glue and let it dry thoroughly. I then gave it a good sanding with 1000 grit glasspaper.
Next, I coloured the glazing with a black permanent marker. I wasnt too worried about black ink on the frames as I am raising the detail of the frames later.
The black ink is semi glossy, so it helps to show up the imperfections in the finish. It is just a case of colour, fill, sand, colour, fill, sand,... until the surface is as smooth as possible. I used gap-filling (gel) ca glue to fill small holes and imperfections.
Once I got it to a semi decent finish, I very carefully gave the canopy a light coat of Future, or, Pledge Parket Plus, as it is called here in Holland.
I have had a lot of experience with this product and its multitude of uses, but I was a little concerned with screwing the finish on my Raptor, but apart from a small run that stained the finish, I had no problems.
The pics below show the result after 2 coats.


I am still going to do another colour, (fill) and sand routine, and then give it a final 3 or 4 coats of Future. Once that has hardenen well, I will buff it up with MicroMesh polishing papers to dull the gloss to a more fitting lustre.
I'll be working on it over the next few evenings, so will keep you posted.


