Bridge building in balsa

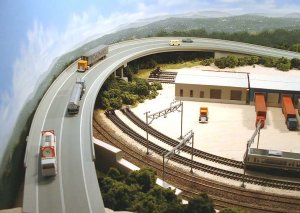
Here's a view from the other end.

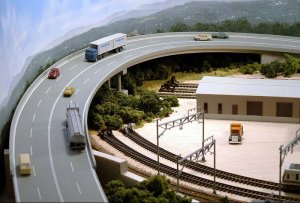
Hmm ... a problem of perspective. The broken lines on the road appear to get l-o-n-g-e-r as they get further away, even though they are in fact all the same length. An optical illusion created by the brain's need to perceive "distance".

If it was only possible to view the road from the front, I would just progressively shorten the lines into the distance, but this bridge will also (usually) be viewed from the side.

What to do? I may decide to make it a wide 2-lane bridge (with shoulders) and forget about the broken lines.
 

Attachments

  • bridge18.jpg
    bridge18.jpg
    90.9 KB · Views: 364
Looks good to me. I wouldn't worry about the broken lines. Every critic has to have something to complain about. If the lines get noticed all you have to do is reassure them that you are aware of the problem and that it is caused by an opticial illusion.

What I noticed more is: Here in Oregon the double lines between opposing traffic are yellow not white. But if it is right for what you are modeling, who am I to say it shouldn't be done that way. ;)
 
Hi Gavin,

Thats one beautiful piece of work you did there and I was very impressed to say the very least. Keep those pictures coming as we all really enjoy them. I wish the Wyoming Highway Dept. could paint our lines that neat. Keep up the wonderful work.

Ron :cool:
 
Thanks guys!

I have changed my mind.

The MRD (Main Roads Department) has resurfaced this bridge with just two (wider) lanes and concrete breakdown shoulders.

The wider lanes look more suitable for heavy vehicle traffic on a bridge that services an industrial area.

Solves the optical illusion problem as well - no broken lines.
 

Attachments

  • bridge19.jpg
    bridge19.jpg
    95.4 KB · Views: 443
WOW!!
You've made everything come together so well, Gavin!
A fantastic looking scene!
 
Absolutely beautiful Gavin!! The road looks MUCH better with two travel lanes and breakdown lanes.

You are an inspiration, no doubt. Your step by step construction photos satisfy my need to know 'HOW did they DO that?!?!'...lol

Now I need to know....what happens where the road comes down to the table??
 
Tomboygirl,

You're too kind!

At the moment the bridge/road ends where it meets the table (I WAS only trying to hide the hole in my backdrop you know, LOL).

Now my next project is to work on the flat surface around the truck terminals (which, you may have noticed, are not actually properly built yet) and connect the surface roads to the bridge.

I also want to "bury" the layover tracks adjacent to the mainline in "dirt", leaving just the railheads showing.

Here, an articulated Light Rail Vehicle heads under the bridge.
 

Attachments

  • bridge23a.jpg
    bridge23a.jpg
    71.5 KB · Views: 347
Light benchwork

On the issue of light wood for benchwork, take a look at
http://www.miniatur-wunderland.de/html/framepage.htm
and begin with earlier weeks (on the bottom). What kind of wood and how thick do you do you think this is? As I am about to begin benchwork I am wondering whether this kind of gird underframing is a good idea.
Cheers,
Donn
P.s., this is fascinating documentation of the construction of the Minatur Wunderland layout in Hamburg
 
Re: Light benchwork

Originally posted by Donn Welton
On the issue of light wood for benchwork, take a look at
http://www.miniatur-wunderland.de/html/framepage.htm
and begin with earlier weeks (on the bottom). What kind of wood and how thick do you do you think this is? As I am about to begin benchwork I am wondering whether this kind of gird underframing is a good idea.

Hmmm ... sorry Donn. I got completely lost at that site. Probably because I need a few lessons in ... German (?)

Gavin