

[I am moving this out of my Intro thread to this forum so that it is in the right place.]
I put my Landraider project on hold for a side project that I felt was worth some attention. Since its a hobby, I can do that sort of thing. I went looking for a good printout for a Warhound Titan. (again, go big, or go home) I didn't find one that was spectacular. However, I did find a simple DIY Warhound (if you search google for that you will find the pdf) This was a basic black and white version of a Warhound. So I set out to make it. I quickly found that it was missing alot of stuff, and had zero detail. It did however, have shape.
So, I sent out to remake it into the type of titan I wanted to make. I took the bitmap plans and put them into Illustrator and went to town. The goal was to make almost every piece better in some manner. Using the stuff I learned from the previous models and Patoroch's skills. I knew I could add simple lines to just about everything and make it all fancy schmancy. I wanted more. In the plans I saw that they require some piston to be added to it. There is nothing in there about a piston. So I had to do some calculations and measuring and playing to get a cool piston. What I came up with was a big piston that actually acted like a piston. Next, I wanted the basic model to be more 3d. Not just lines added onto whatever and colorized. I added new pieces that fit the motif. I looked at many pictures of the Warhound from Games Workshop. It had quite a bit of filigree. So that was my next part. Add coolness to the model.
So enough talking. Let me give you guys some pictures with a couple of thoughts...

The new foot compared to the old foot.
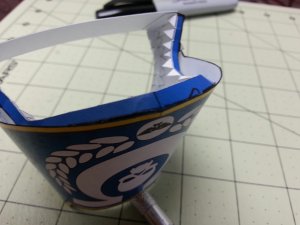
This is about my lucky piston. A simple hint is to use anything you can to make things right. You can see that I tightly wrap one part around a screwdriver and the other around an Xacto knife. With that done, Now, I glued all of my pieces in place. (except for the opening.)


I actually started doing this in the opposite manner. Glue the open end first and the piston end. Once dry, slide them together and seal both ends. I also found that this particular piece is about the same size as a standard hole punch. So much easier than cutting by hand.
Here is a good hint. If you ever have to glue something that is very close to another thing but don't want them to be permanently stuck together. Put some glue on an extra sheet of paper. then use your finger to transfer the glue into the place you want, lightly. Once you have the glue in place, set your piece. This is all done very carefully.
Best thing in the world.......
Elmers Craft Bond Quick Dry Glue... OMG, it is almost as good as sooper glue.
I put my Landraider project on hold for a side project that I felt was worth some attention. Since its a hobby, I can do that sort of thing. I went looking for a good printout for a Warhound Titan. (again, go big, or go home) I didn't find one that was spectacular. However, I did find a simple DIY Warhound (if you search google for that you will find the pdf) This was a basic black and white version of a Warhound. So I set out to make it. I quickly found that it was missing alot of stuff, and had zero detail. It did however, have shape.
So, I sent out to remake it into the type of titan I wanted to make. I took the bitmap plans and put them into Illustrator and went to town. The goal was to make almost every piece better in some manner. Using the stuff I learned from the previous models and Patoroch's skills. I knew I could add simple lines to just about everything and make it all fancy schmancy. I wanted more. In the plans I saw that they require some piston to be added to it. There is nothing in there about a piston. So I had to do some calculations and measuring and playing to get a cool piston. What I came up with was a big piston that actually acted like a piston. Next, I wanted the basic model to be more 3d. Not just lines added onto whatever and colorized. I added new pieces that fit the motif. I looked at many pictures of the Warhound from Games Workshop. It had quite a bit of filigree. So that was my next part. Add coolness to the model.
So enough talking. Let me give you guys some pictures with a couple of thoughts...
The new foot compared to the old foot.
This is about my lucky piston. A simple hint is to use anything you can to make things right. You can see that I tightly wrap one part around a screwdriver and the other around an Xacto knife. With that done, Now, I glued all of my pieces in place. (except for the opening.)
I actually started doing this in the opposite manner. Glue the open end first and the piston end. Once dry, slide them together and seal both ends. I also found that this particular piece is about the same size as a standard hole punch. So much easier than cutting by hand.
Here is a good hint. If you ever have to glue something that is very close to another thing but don't want them to be permanently stuck together. Put some glue on an extra sheet of paper. then use your finger to transfer the glue into the place you want, lightly. Once you have the glue in place, set your piece. This is all done very carefully.
Best thing in the world.......
Elmers Craft Bond Quick Dry Glue... OMG, it is almost as good as sooper glue.


")


")


