

Z
Bc 304 usaf daedalus
- Thread starter luciencarroll
- Start date
You are using an out of date browser. It may not display this or other websites correctly.
You should upgrade or use an alternative browser.
You should upgrade or use an alternative browser.
The Daedalus you are making is, I believe, the first model of this ship.
Jaybats was the first, but i heard there were lots of issues with it.
The detail you are adding is going to be built up from separate pieces, not just graphics, where possible?
there will be graphic underlay and/or labeled markings) for the panel location, but yes the idea is to have it built up for depth.
You will be pleasantly surprised, or at least have your suspicions confirmed, we are legion!!")
I hope so. plenty of views not so many comments, but this is really for those that want it. Its not going to bother me in the least if i am the only one that ever builds it. I really did start this cause I always wanted one:mrgreen:.
I'm just dreading the thought of putting all those little details on the hull. Not that I couldn't or wouldn't, but it's a lot like how Tim Ketzer described building his 32" studio replica of the Millennium Falcon:
i whole heartily agree with Tim. it was getting that way with my build of the Sulaco so i started alternating. Build a bit of the superstructure then do some paneling and repeat.
oh and ill be lighting mine with fiber optics so if anyone knows a good place for lighting kits please let me know.
I don't know about lighting kits, but I know www.thefiberopticstore.com is THE best place to buy the stuff. There's barely any minimum order and you can get as much as you need.
Once you get the fiber optic filaments, get an LED, bundle enough together that they're roughly the same diameter as the LED, then take some heat shrink tubing (which you can get at any hardware store) and use that to attach them to the LED, being careful not to melt the fiber optics. Finally, wire the LED to your battery pack.
Once you get the fiber optic filaments, get an LED, bundle enough together that they're roughly the same diameter as the LED, then take some heat shrink tubing (which you can get at any hardware store) and use that to attach them to the LED, being careful not to melt the fiber optics. Finally, wire the LED to your battery pack.
Very nice. I was racking my brain on how to light the cable without making the whole thing glow from the inside. I like how you think.
Z
Zathros
If you have room, you may not even heave to shrink the tubing, as you are just trying to prevent unwanted light escaping. You could seal the ends with black electrical tape. You also could make purpose built conduits inside out of heavy gauge cardboard.
The heat-shrink is to attach the LED to the fiber optics without glue. Most glues, including epoxies and superglue, will etch the fiber and drastically reduce the amount of light they transmit. White glue however is superb for attaching fiber optics to the holes you drill/punch through the paper.
By the way, heat shrink is much better than tape for attaching fibers to the LED, because it doesn't require a third hand to wrap the tape.
By the way, heat shrink is much better than tape for attaching fibers to the LED, because it doesn't require a third hand to wrap the tape.
Z
Zathros
O.K., I just got lost. I thought you were running fiber optics? What are the LED's for? Are you using using them to terminate the fiber optics for a wider light distribution? Just a wonderin'. I am definitely up for learning something new today!
The LEDs are what give the light to the fibers. One end of of the heat shrink tube,maybe a quarter of an inch long, holds the L.E.D. The other end of the tube holds the bundle of fiber optics. Presto no glow from the inside.
Thanks millennium real good advise that I will use. Now I just need to work out the circuit. But I need to finish the model and work out where the light will go first.
I also like zathros idea about internal conduits have to play with that idea. Trying not to get ahead of myself.
More soon
Thanks millennium real good advise that I will use. Now I just need to work out the circuit. But I need to finish the model and work out where the light will go first.
I also like zathros idea about internal conduits have to play with that idea. Trying not to get ahead of myself.
More soon
Oops, forgot one other thing: superglue also has the tendency to make fiber optics brittle enough to snap on their own. Thought I oughta mention that while we're on the subject. I'd also use a little more than a quarter of an inch of heat shrink, if your LEDs are the big 5mm types. If they're 3mm or 1.8mm, then a quarter inch should be fine. I have a rule: cut the tube twice the length of the lamp plus a couple of millimeters. This gives it the grip it needs to hold the fibers.
I'm glad you appreciate the advice. I've been lighting kits for nigh on fifteen years now. In fact, I'm about to finish my first lit paper model, and will be posting some tips and tricks to lighting them when I do.
I'm glad you appreciate the advice. I've been lighting kits for nigh on fifteen years now. In fact, I'm about to finish my first lit paper model, and will be posting some tips and tricks to lighting them when I do.
Z
Zathros
Oh, what a dummy I am. I forget that there are really bright LED's now. In my '73 Mercedes, fiber optics are what light the dash board. The light bulb is in the center counsel, and it is bright, it sits in a housing and the optics terminate there. I was thinking backwards.  :
: ops:
ops:

:ops:
Oops, forgot one other thing: superglue also has the tendency to make fiber optics brittle enough to snap on their own. Thought I oughta mention that while we're on the subject. I'd also use a little more than a quarter of an inch of heat shrink, if your LEDs are the big 5mm types. If they're 3mm or 1.8mm, then a quarter inch should be fine. I have a rule: cut the tube twice the length of the lamp plus a couple of millimeters. This gives it the grip it needs to hold the fibers.
I'm glad you appreciate the advice. I've been lighting kits for nigh on fifteen years now. In fact, I'm about to finish my first lit paper model, and will be posting some tips and tricks to lighting them when I do.
This will be my first non kit lighting so this is amazingly helpfull I look forward to your postings. What model is it so i can follow. My last lighting was the ds9 plastic one and I never finished because i broke all the drill bitswall1.
Z
Zathros
This will be my first non kit lighting so this is amazingly helpfull I look forward to your postings. What model is it so i can follow. My last lighting was the ds9 plastic one and I never finished because i broke all the drill bitswall1.
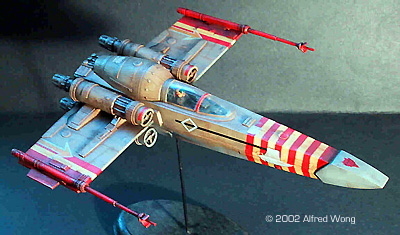
The model? A Corellian Engineering Corporation CR-90a "Assassin"-class corvette:

This one is a model I have unfolded. I was going to just post it (which would have made it available a little over two weeks ago), but I thought why not build it in order to fix any potential mistakes? And since I like it, I thought it would be nice to try lighting it. Lighting 11 engines plus running lights is making things a bit slow, though. But I'd rather finish before I post anything. I have this habit of posting about a build, then never finishing it. I need to finish this one though because it'll be a model (no pun intended) for a comic strip I'm cartooning. It hasn't gotten to the point of needing the model yet, but the ship's debut is only seven or eight strips away so I need to get cracking. With machines, I need a model in front of me for consistancy in the sequential images. I'm also doing the Z-95 Headhunter for the same reason:
I don't mean to derail the thread with my work, though. I'll be posting this fairly soon, I think. Probably in a couple of weeks.
Back to the subject at hand . . .
If you have a Harbor Freight near you, you can actually buy drill bits small enough to do the job on the DS9 model, if you're using Ertl's fiber optic kit. In fact, if that's the diameter of the fibers you're using for this beast, you might just pick up some bits for when you get to that point. The little pack I got was about $10 and has about 10 of the #80 bits, which are the same size as the bits found in Ertl's lighting kit. You'll just have to buy a pin vise in order to use them (don't worry, they're dead cheap on eBay or Amazon and come in all shapes and sizes. I prefer Games Workshop's pin vise because it has a nice rubber pommel that doesn't hurt my hand when I drill with it. It's on the expensive side at $12, but it comes with several 1/32" bits and four different sizes for the chuck, so I think that's a bargain).
Also, you might want to think about soaking some cardboard in CA (superglue) and using that as not only the skeleton of the lit areas (the hardware for lighting can take it's toll on paper just from handling it as you work on the sections; just ask Ekuth about his Galactica), but as a firm base to dril into for the fiber optics. Doing this will mean you don't have to light-block the paper, because dense cardboard is naturally almost opaque, and superglue will give the cardboard even more stiffness. This is the same principle that fiberglass operates on: soak a relatively flimsy material in a hardening agent in order to get the best of both worlds, that is, a firm structure with little mass. You can also use basswood as a good base, though it'll be a little heavier I think. I'm not sure; I haven't used that material in quite a while, ever since I quit building with wood and switched to paper and plastic.
Since I'm on a roll with lighting tips today apparently, think about investing in some self-adhesive aluminum tape. It's not expensive, and it makes light-blocking an interior section a snap. Just cut some strips of it, peel off the paper backing, and slap it on, then trim it if necessary. Couldn't be simpler. Actually, I usually opt for supergluing aluminum foil to the interior of my models. It's a bit more labor-intensive, and CA gets all over your fingertips if you're like me and instinctively use your fingers to wipe off excess glue, but if you want an alternative using household items, it's just as good as the aluminum tape. Just be sure you glue the aluminum to extra card first. Superglue will make paper translucent, which has the effect of making the paper look like it's contracted some weird disease.
Additionally, don't fall for the trick of using blue LEDs for blue engine lights. It sounds weird, but it's true. Blue LEDs produce a VERY rich and saturated blue light, whereas if you look at the engines of the ship in the show they glow with more of a bluish-white look. That's a clue. Start with a white LED, then put a filter in front of it. I am using the texture that came with the model to light my Corellian Corvette, and it works *exactly* the way I want. Alternatively, you can also paint the LED with Tamiya Clear Blue, which can be found at many hobby stores. Or, you can go to your local middle school, high school, or community college and see if they are throwing away any used light filters. The middles are always shot, but the *edges* are often pristine. Plus, they are cut from a continuous roll. If you know someone, you may be able to get a TON of the stuff for free! Well, maybe just a couple of yards. But you're making filters for a lamp that's half a centimeter in diameter. If you're using that much filter, I'd love to know why. This by the way is exactly how they lit miniatures in the old days of incandescent light bulbs, so it works for replicating that particular look of starships from "the good ol' days", especially if you find a source for cheap incandescent-colored LEDs.
Speaking of which, I know of some great places for LEDs, resistors (we'll get to that in a second) and other components. The first is www.unique-leds.com. These guys stock several different kinds of LEDs useful for just about anything, including those superbright, so powerful they need their own dedicated heat sinks, LUXEON LEDs. Those babies are so bright they would literally blind you if you stared at them too long (and you thought those LED flashlights were the bright ones . . . they're a lightning bug compared to those Luxeons). They list them as "Star" LEDs, but they're virtually the same thing. These are powerful enough to need a really good power source, which must also be heat-sinked. but since you're building in paper, which has a nasty tendency to catch fire, you probably won't be needing these. Just thought I'd mention it.
They also stock those aforementioned incandescent colored LEDs. They call them warm white, but they look exactly like a light bulb and are great for giving your model an old-fashioned look (something you want if you're building a replica of a model that was made way back before flourscent tubes and white LEDs became the norm). Another great place for online components is www.oznium.com These guys actually cater to car modders, but they stock the tiniest LEDs I've ever seen or used. I've got a Federation Work Bee that will be using surface mount LEDs as small as a grain of sand for the position markers, once I gather the courage to try soldering such tiny devices, because I needed something small enough to mount on the surface of the ship, which will have an interior, so I couldn't use fiber. There's a minimum radius beyond which fiber optics cannot transmit light. www.mouser.com and www.digikey.com are both great sources for other components, though Digi-Key's site is a little hard to navigate. But you can't beat it with a brick stick for selection.I mentioned resistors. You'll definitely want to use resistors to make sure you don't accidentally fry your LEDs. In order to use resistors a little bit of math is required (don't worry, you only need three numbers and a calculator
). Just plug the numbers into the following equation: R=V/I, where V is the voltage supplied and I is the current. How much of each? Well voltage can be determined by adding up the total listed on the batteries, if they're in series. Same with current. The result tells you how much resistance is needed so the circuit doesn't fry itself. Now, get a voltmeter and measure out the resistance of the LEDs. If the resistance is lower than what you calculated, simply find a resistor at Mouser or Digi-Key that is a little higher than the calculation. This is to prevent surges from overcoming it. There is a little more to it than that, but that's the gist of lighting. I'll write more if you don't understand something or other, or want a broader explanation on something.Ace Ventura said:Take care now, bye-bye then. :mrgreen:
Hey, is that Connecticut I see there? I live in Connecticut!!
Yes it is. :thumb:
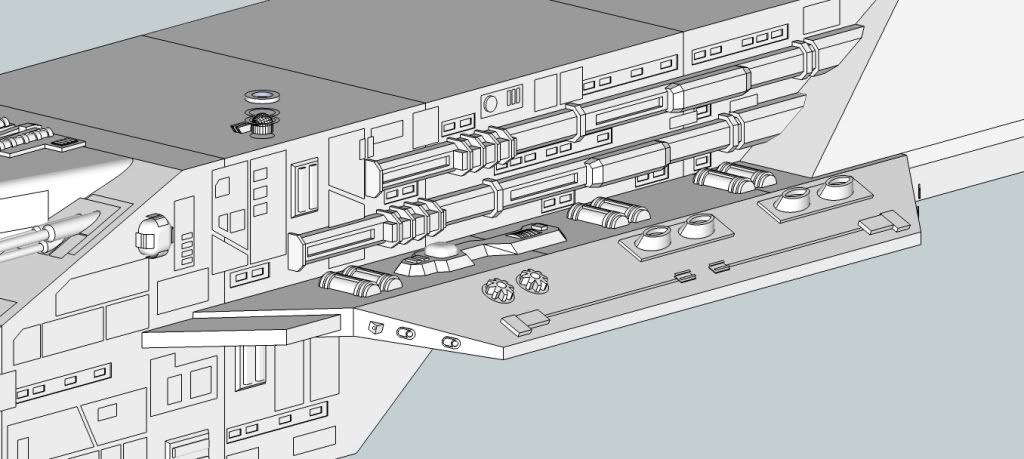
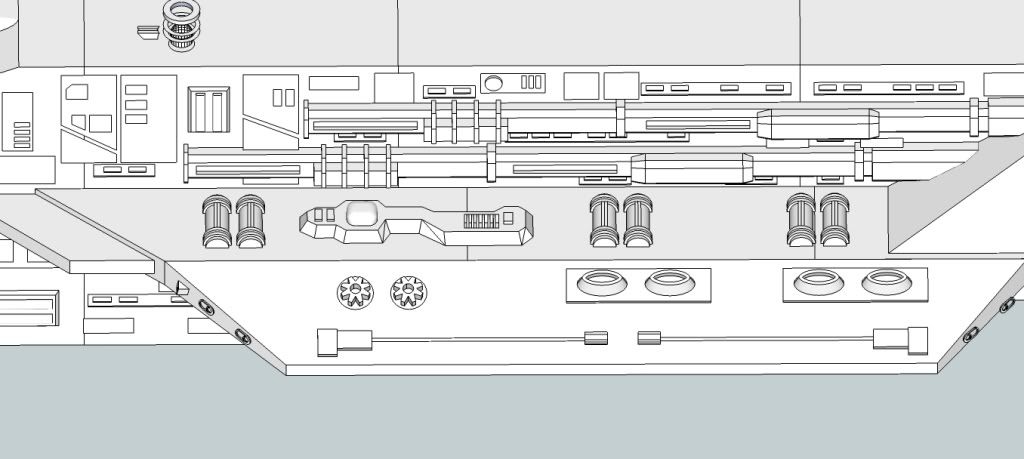 Its to the point where I'm really looking forward to your posts! With this much detail, you could almost just build it without textures and spray-bomb it with gray paint.
 I also like how some of the seams are hidden by panels. This will make the model look a lot cleaner once it's finished.
With this much detail, you could almost just build it without textures and spray-bomb it with gray paint.
that was one of my original thoughts but I wanted to keep it within reasion.
I also like how some of the seams are hidden by panels. This will make the model look a lot cleaner once it's finished.
Trying to cover as much as I can wile maintaining the right look