

I'm really having a rough time getting my flextrack soldered together. If the connection is solid, it looks aweful, and runs worse. Are there any conductive adhesives that can be used? Is there any snaptrack that comes without a roadbed?
Alternatives to soldering track
- Thread starter stormfather
- Start date
You are using an out of date browser. It may not display this or other websites correctly.
You should upgrade or use an alternative browser.
You should upgrade or use an alternative browser.
Sorry to hear your having problems. Are you using code 100 track? Atlas snap track does not have roadbed, just the ties.
But, somewhere along the way, you will still have to solder the track together, or solder feeder wires to every piece of track to maintain current flow. And, your limited to the curve you can use with snap track.
Maybe we can help with the soldering. What wattage iron are you using, solder and all that? Can we see a picture of your soldering?
There is also a good tutorial here on soldering track, That might help.
Loren
Make sure that the soldering iron is of a high enough wattage to heat the area both sufficiently and quickly. With a too-small iron, the heat will dissipate faster than the iron can provide enough heat to make a strong bond. I use either a 40 or 200 watt iron: either will complete the job in a second or so. Remove a couple of ties on either side of the joint, and use wet rags to avoid melting the ties beyond that. I also like to use a track gauge on either side of the joint area. Some track seems to have a slight oily film on it, probably from the drawing process - a touch of alcohol on a brush should remove that, if necessary. Small-diameter resin-core solder, such as used in electronics, works well. Do not use acid-core solder or flux.
I use a chisel-style tip, placing it atop the joiner and against the inside of the rail, then place the tip of the solder at the same point, but on the outside of the rail. The solder should flow almost immediately, and will be drawn into the minute space between the rails and the joiner - any build-up that shows on the side of the rail is superfluous, contributing nothing to either the mechanical or electrical joint. You can use a file to remove it later, although I find that careful use of a cut-off disk in my Dremel is both faster and neater. Watch closely as you work, and remove both the soldering iron and the solder from contact as soon as you've seen the solder flow.
Modify those ties that you removed earlier, using a needle file and/or knife, to accommodate the extra width and thickness of the joiners, then slip them back in place. When you do your ballasting, the ballast and glue mixture will hold them in place.
Wayne
There's no such thing as a good sloder joint that won't conduct power properly. Are you using a separate flux with your solder? Don't depend on the rosin within the solder. Does your soldering tool have enough power for the job? I used to use a 30 watt soldering iron. While it was good enough for small jobs it lacked the power to sufficiently heat the rail to achieve a really good joint. The joint looked good enough but wasn't of good enough quality to do the job required. Once I started using a 100 watt soldering gun that stopped.
Stormfather, (odin?) Don't give up on solder.
Solder BEFORE you lay down your flex track. Its much easier to solder two straight pieces than two curved pieces.
Use a fine flat file to clean up the edges
Be sure to solder moving rail to moving rail ... (learn from my mistake here!)
Use a hot iron.
Make sure your iron tip is tight..
Solder BEFORE you lay down your flex track. Its much easier to solder two straight pieces than two curved pieces.
Use a fine flat file to clean up the edges
Be sure to solder moving rail to moving rail ... (learn from my mistake here!)
Use a hot iron.
Make sure your iron tip is tight..
What do you mean by "moving rail"?Be sure to solder moving rail to moving rail ... (learn from my mistake here!)
What do you mean by "moving rail"?
On Atlas flextrack, one rail slides. I think this is what he means... Unfortunately, it's not always possible - the sliding rail should be on the inside of the curve, so if you have a (broad) S-curve, the sliding rail will switch from left to right as you go through...
Andrew
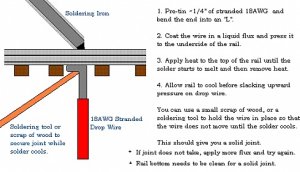
I put a small dab of flux in the rail joiner then slide the pieces of track together then solder them. The flux wicks the solder right into the joiner.
Do or Do Not use Flux Core solder?
I have a hard time finding flux (other than what I have for plumbing) my local RS dose'nt seem to ever have it.. also, what solder if using flux
I use the small-diameter resin-core solder used for electronics, not the lead-free stuff. You should be able to find it anywhere they sell soldering irons, and likewise for the flux, which usually comes in a small metal or plastic container. Do not use acid core solder or acid-based flux. I've had good results using only the flux that's in the solder, which should work fine if the area to be soldered is clean. If you do use additional flux, this type of solder also works well with it.
Wayne
After you get the flux situation under control, make sure that , as mentioned above, you have a sufficiently high wattage soldering iron. The solder should flow into the connectors, not lump up on the surface of the rail. Very little solder will be required to make a solid joint and you won't see much of it beyond the rail connectors. Practice on a piece of scrap track.
Stock up on that leaded solder. The world is going lead-free!
Now, here's a really big rail-soldering machine, being used for the installation of new tracks for our local New Mexico Rail Runner:
Rail Runner Express: One smooth ride - SantaFeNewMexican.com
Here's a little video they put together showing how it's done:
http://www.santafenewmexican.com/www/Flash/Editorial/061608WEL/061608WEL.swf
Credits to the Santa Fe New Mexican newspaper.
Thanks for the post. I always wondered how they did that.
135# rail - they've come a long ways from the lightweight stuff of the early days. No more tracklaying crews lifting and carrying and no more gandy dancers.
135# rail - they've come a long ways from the lightweight stuff of the early days. No more tracklaying crews lifting and carrying and no more gandy dancers.
I wouldn't bother
to solder the rail joints.
Even though the NS rail is an improvement over brass, it still isn't the best electrical conductor.
With Free-MOn30 modules, there is a heavy bus-wire running the length of the layout and every section of rail has a feeder.
We actually discourage soldering the rail joints to allow for some movement.
Rail joiners are fine for holding the rails in alignment, but I wouldn't rely on them for conducting electricity or a clean DCC signal.
I'd only bother to solder rail joints between sections of rail that are small. [Less than 1-foot long] Instead of soldering the rail joiner, I prefer to solder a small jumper wire between sections of rail.
Attachments
to solder the rail joints.
Even though the NS rail is an improvement over brass, it still isn't the best electrical conductor.
Actually, the brass is a better conductor than the nickel silver -
 -unfortunately, the oxide that forms on it is the poor conductor. The oxide that forms on the nickel silver does conduct electricity, making its use more suitable for rail.
This illustrates another difference between DC and DCC, though. It seems that almost everybody that's using DCC advocates the use of a bus wire, with feeders going to each piece of track. Poor me, stuck in the dark ages, and still using DC, soldered all of my track together. I have no bus wire, and only two feeders going to the rails. No stalling, no slowing trains as they journey away from the feeders, and no track cleaning.
If you're using DCC, by all means follow the advice of those with experience using the same. I wouldn't expect, though, that the soldering problem will be much different if it involves feeders rather than joiners. As others have noted, practice your technique on some scrap track, following the suggestions given about soldering. When you get it down pat, you'll be able to solder rail joiners, feeder wires, and probably brass locomotives, too.

") :-D Just remember to have fun while doing so.
:-D Just remember to have fun while doing so.
Wayne
About rail joiners & soldering.....I noticed a few days ago that the locos stalled when entering one of the spurs in the yard at Portales.
http://forum.zealot.com/t159719/
This is track that's been recently painted & ballasted. I traced the problem to a joiner not doing its electrical duty.... So now I'm going to have to solder the joiner, or put in a feeder wire. I think the wire is the safest bet, as there is probably matte medium in the joiner....wall1wall1wall1:curse: