Abrams inspired 40K MBT (Patoroch)

Sudsy

Well-Known Member
So, the BMP build is what got me started here and into hardcore paper model buildin in the first place. Sitting, since that time, has been the instructions and the file for printing off these Abrams inspired vehicles.

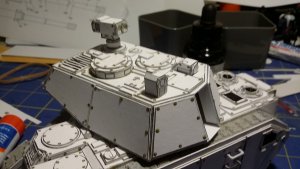
To my knowledge, other than the real world inspiration and some 40k ish general design items, this is an original design on the part of Patoroch. Frankly, these are the designs that are the best to me as they are inspired by post WW2 vehicles and more match my own sensibilites about what a good solid tank or other AFV should be like in the future (regressed, because, well, grimdark...). I'm hoping to turn this (and maybe a couple more) into the center piece of my slowly expanding Imperial Guard mechanized (possibly armored) regiment.

Lore wise, I'm thinking an armored regiment (cavalry style) got re-constituted with mechanized rifle regiment resulting in the mash up of Abrams tanks with BMPs and misc armored recon cars like the Panhard I built earlier last year.

20200506_220252.jpg20200506_213529.jpg20200506_202808.jpg20200506_202803.jpg20200504_213239.jpg
 

Sudsy

Well-Known Member
Just some quick updates on my box building and greebling!

For my tread sections, I stuck to just thicker card strips cut the width of the boxes and run in an "X" pattern, which I again used on the turret roof combined with the bent angles:

20200507_163106.jpg20200509_202921.jpg

After assembling the boxe for the treads, I 3D printed individual tread secions and ran them along one of the boxes:

20200509_175429.jpg20200509_182644.jpg20200509_202917.jpg

They came out rough, not being one of my better models... So I used some putty to make up some of those shortfalls.

20200509_214410.jpg

Finally, I decided to cut out the vents and make them a little more three dimensional with some paper strips:

20200509_221025.jpg20200509_221634.jpg20200509_221849.jpg

Then I had to kick myself for not giving that exhaust vent a nice coat of black ink or paint before gluing it into that box! Ink it shall be when I get to it later! Primer spray and my paint brush are going to have some trouble getting at those edges later if I leave it alone until the end!
 

Sudsy

Well-Known Member
Monday madness building tonight!

First, fixed my issue of missing the black ink on those rear engine vents:

20200511_212040.jpg

Black ink liberally applied with a cheap camel hair brush from the hardware store!

Got the initial box of the turret built with the ring on the bottom:

20200511_211926.jpg20200511_211932.jpg20200511_211941.jpg

I also began the process of laminiating my first hull greeblies:

20200511_211952.jpg

First of many flat layers. This will be followed up by glue dot rivets prior to laying down the next flat layer, which will again be followed by glue dot rivets and the next layer... until it is completed.

20200511_212006.jpg

Bottom is completed.

As I'm building this, I'm starting to realize just how much this is going to require being in sub-assemblies. Those tracks are going to be one of the last things I put on this model just to ensure I get them primed and intial painting done with the amount of detail this main hull is going to end up packing in!
 

Sudsy

Well-Known Member
Just continuing with the process outlined yesterday on the hull, adding rivets to the base layer and first laminated layers:
20200512_212540.jpg

I also added some stiffeners to the engine exhaust vents:

20200512_212535.jpg

Since I made some fancy vents with strips of paper for this, I'm going to do so for the rest of the model. By my count, that is four more vents. We have the two on the top of the hull we can see in front of the round turbine parts (well, I think they are turbine intakes...), and then two more on each side of the treads toward the rear. It'll be a lot of work, but well worth it in the end I think.

Not pictured is the second successful batch of 3d printed tread links. Took about four trys to get them right. I ended up re-slicing the models because my first printed layer was way too thin (0.05mm) so I bumped it up to 0.1mm for that first layer. Worked like a charm! I have learned to print more than I need though as errors crop up, and this print lost a couple of links due to such errors.
 

dr_tetrode

Active Member
Awesome use of 3d printer, doing those treads. Hmmm..... I wonder what I could do with the Silohette Cameo. Oh, oh, another project!

A couple of questions, what weight of card stock are you using to laminate with?
It looks thicker than mine. Or are you laminating 3 layers?

Another thought, if you say that glue holds the PLA well, maybe a cheaper alternative to the putty would be a coating of glue to 'seal' the 3D print holes? Love the build.

Scott ;-)
 

Sudsy

Well-Known Member

dr_tetrode

Active Member
Thank you for quick reply. Hmmm... 80# + 100# cover stock. I'll have to look, local.

Type III shrinks? Hmmm. been using Type II titebond and have not noticed that. OK thanks for the heads up on shrinking.

Scott ;-)
 

Sudsy

Well-Known Member
Thank you for quick reply. Hmmm... 80# + 100# cover stock. I'll have to look, local.

Type III shrinks? Hmmm. been using Type II titebond and have not noticed that. OK thanks for the heads up on shrinking.

Scott ;-)

I think all PVA type glues shrink to some extent... I'll let some of the older paper crafting hands address that one!
 

Sudsy

Well-Known Member
Last night I worked on some smaller greeblies.

I started with the upper hull vents like I did the rear exhaust vents. These might be more correctly intakes... But then, that is why it's "greebly" and not given names in most cases!

20200513_204730.jpg20200513_211530.jpg20200513_215717.jpg

I also worked on the round turbine looking greeblies:

20200513_222210.jpg

I added a half sphere bead to the middle because it looks closer to those hubs you see on these kinds of turbine fan blades toward the front.

Finally, I finished up the side armor of the turret:

20200513_222513.jpg

Happy greebling!
 

Sudsy

Well-Known Member
Slowly but surely, the front details are finishing up and coming together. Rear details are close to being mounted as well. Next major front assembly will the be the bolter, and for the rear, the exhaust stacks. I'm certainly looking at deviating from the pattern on the rear exhaust stacks based on prior experience and my desire to ensure they appear to be perforated shielding around the exhaust pipe... More on that later.

I raised the turret ring another layer (chipboard in this case) and added a wood dowel (1/2" or 12.7mm ish) for strength.

20200517_160115.jpg20200517_160110.jpg20200517_160057.jpg20200517_160049.jpg20200517_151451.jpg20200517_151446.jpg20200517_150559.jpg
 

Sudsy

Well-Known Member
Reverse how I actually worked... Pictures uploaded most recent first...

Got all my treads glued to the base tread structure and started on the skirt armor first layer. Got a vent onto the turret, painted the base black first and rear of the vent, then glued it on after it dried.

20200517_215320.jpg20200517_200826.jpg20200517_200455.jpg

I started off finishing the hull with the rear vents glued into place. While I finished the exhaust stacks with shield, I'm going to paint those seperate and then glue them to the hull during final assembly. I changed how I did the exhaust pipe full length and having the shield around it like we would see on the real thing. That ivolved measuring the small strips to get the width, then measuring that height combined with the shield height. So, they are about 22mm wide by 23mm tall before rolling. After rolling, I gave the exhaust pipe a coat of black ink and glued them to the round base (part 12 and 12a). I also coated the inside of the shield with black ink. For the head and tail lights, I selected appropriate sized half sphere beads and CA glued them to the card stock. I've set these to side to prime and paint as sub assemblies as well.

20200517_194554.jpg20200517_194129.jpg20200517_194124.jpg20200517_191626.jpg20200517_191612.jpg20200517_191041.jpg20200517_185928.jpg20200517_173332.jpg20200517_173035.jpg

20200517_171842.jpg

Yup, the main hull is done! Just needs a coat of primer and paint prior to final assembly!

20200517_170905.jpg20200517_170858.jpg
 

Gandolf50

Researcher of obscure between war vehicles...
Staff member
Moderator
Reverse how I actually worked... Pictures uploaded most recent first...
Wow, Dude...You have really stepped up your game...Very nice innovations going on here and showing some GREAT "Greebling"!! Love it!!
 

Sudsy

Well-Known Member
Wow, Dude...You have really stepped up your game...Very nice innovations going on here and showing some GREAT "Greebling"!! Love it!!

Well, being 'stuck' at the house since March has it's perks (well, we aren't that restricted, but all the extra-curricular activities are canceled and eating out is still not really happening...). I get to spend more time building! Gives me more time to play with stuff and try new things, or find new things other people do...
 

Sudsy

Well-Known Member
Nothing overly astounding as far as major progress tonight. Mostly just finer details that mostly involved laminating layers of armor on the skirt armor and creating the vents for the sides. I added the turret roof plate and started greebling the roof as well. Lots of glue dot rivets today!

20200518_214839.jpg20200518_213242.jpg20200518_213141.jpg
Okay, so I did add some rod to looking like hinges as that vent cover looks like has hinges on the bottom...

20200518_212831.jpg20200518_202531.jpg20200518_192650.jpg20200518_192636.jpg20200518_190554.jpg
 

Sudsy

Well-Known Member
Hull and treads completed enough to assemble the main assembly and prime! Turret greebling has begun with the commanders hatch and copula.

20200519_222600.jpg20200519_222556.jpg20200519_214604.jpg20200519_205046.jpg20200519_205028.jpg
 

Sudsy

Well-Known Member
Got some work done. Mainly greeblies on the turret working toward prime and paint. Not quite at the priming phase, but closer....

...got distracted by a combination of wedding anniversary, birthday, Memorial Day (US), and building a new PC. I managed to get a couple hours of papercraft in however! Here are the results:

Finished hatches and the base of the missile launcher. Instead of rolling the paper tube, I measured the diameter of the part that fits on top and cut a 5/16" diameter dowel to length.
20200525_223237.jpg20200526_175729.jpg20200526_175952.jpg

While that was drying, I took some CA glue to the hand holds to seal them a bit better as I cut them from a few layers of laminated card:

20200526_180534.jpg

Then I finished the missile launcher:
20200526_182003.jpg20200526_182007.jpg20200526_182324.jpg20200526_184600.jpg20200526_184617.jpg

Now I am working on the main gun. Instead of making the barrel from a few segments of rolled card, i took meaasurements and made the base tube from a single piece and just cut other gun tube greeblies to the appropriate length. Moslty by wagging it and using trial and error (mostly error).

20200526_213910.jpg20200526_213924.jpg20200526_213937.jpg20200526_213944.jpg

For the base of the tube, again, I skipped some tube rolling and opted to use some paper sticks (found in they DIY candy section of your local craft/cooking store).

20200526_215713.jpg20200527_125202.jpg20200527_130109.jpg
 

Attachments

  • 20200526_184608.jpg
    20200526_184608.jpg
    634.9 KB · Views: 7
Top