Train Room Lighting

steamhead

Active Member
Apr 16, 2005
2,360
0
36
75
Brownsville, TX
Hi,

As if I didn't have enough to do, I've started to re-do the lighting in the train room. I initially mounted incandescent light fixtures around the room, but these are kind of hard on the eyes, HOT, and not-unexpensive to operate. So I set up a valance on the ceiling and want to install fluorescent light fixtures, only I don't know what kind of fixtures there are available. I don't want the "clinic" white light. I'm looking to have a softer, more sun-like lighting. Any suggestions?

Thanks for the input.:thumb:

Gus (LC&P).
 

hminky

Member
Oct 13, 2004
396
0
16
76
I use the twisty flourescents in clamp light fixtures. I have a web article at:

http://www.pacificcoastairlinerr.com/4x8/lighting/

obj21geo21pg1p33.jpg


Thank you if you visit
Harold
 

RailRon

Active Member
Nov 23, 2002
1,602
0
36
80
Trimbach, Switzerland
Harold,
the link you posted only shows the same pic you posted here. This is too bad since your article about your lighting system is very informative and full of great ideas (like your system of making a valance, the lighting up of the harsh shadows along the edge and so on). :thumb:

So I post the link to the article here again. Forgive me for 'intruding' on your post, but for anybody looking for lighting information your article is a must-read! Thank you very much for this one (as well as for the lots of other info about your great layout in other posts! :wave:)

Funny, here in Europe I never saw those fluorescent twisty bulbs, but we have so called 'energy saving bulbs' which technically must be about the same. A 14 Watt lamp (here on 230 Volts) produces the same brightness like a old-fashioned 100 Watt incandescent lamp.


I stumbled over another lighting novelty: Lots of folks use the tiny halogen spot lights, both in 220 V and 12 Volt versions. They become awfully hot and are quite expensive. (IMHO they could pose a serious fire hazard for a layout.)
Now I found the same spotlights for 12 Volts, but instead of a single incandscent bulb they contain a cluster of 15 or 18 hi-intensity white LEDs. Price is about the same, but they use much less power and stay cool. Has anybody already used them on a layout?

Ron
 

LoudMusic

Member
Jul 21, 2006
620
0
16
45
I recently saw a layout where the backdrop was spaced about four inches back from the table and the lighting came up in the gap to create a sunrise or sunset effect. My apologies if I've stolen someone's thunder on The Gauge - I honestly don't remember where I saw it. I don't know how well it would actually light the layout, though. Just an interesting lighting effect.
 

hooknlad

Member
Mar 28, 2005
396
0
16
57
Woodbridge, NJ USA
Gus, being in the electrical field, those twisty type lamps come in various hues such as daylight, soft white, blue hue, etc... are you planning on putting up a drop ceiling? Home depot ( a home improvemnet super center here ) usually carry recessed lights ( Hi-hats ), the entire fixture with an eyeball trim complete kit for about $10. I believe WestingHouse make... Also, if you wanted, you could install flourescent strip fixtures, single lamp assemblies in 4 foot lengths. You could mount these to your ceiling joists in a single row, when you are ready to install your drop ceiling, you can buy a frosted 2 foot by 4 foot frosted plastic sheet. you can cut these easily and install them in your ceiling grid for your drop ceiling. if you do not like the single lamp assemblies, also home depot sells Shop Lights, 2 lamp 4foot fixtures which are hung from the ceiling with chain. You can also leave these in the ceiling of a drop ceiling using the same method i mentioned above.
You can buy various Hues of light for these flourescent lamps as well... If you need further help on how to convert your present lighting setup to different type, please dont hesitate to ask..... also with any type of lighting, please refer to manufacturers recommendations to mounting the fixture. Hung fixtures cannot be affixed directly to the ceiling joists, due to heat dissapation requirements.
 

steamhead

Active Member
Apr 16, 2005
2,360
0
36
75
Brownsville, TX
Hi,
Thanks for the suggestions. I've already installed a valance around the center of the room (14'x 8'-14" wide) and intend to fix fluorescent 2 or 4 foot fixtures to it, facing the walls of the room so the layout will be lit - the layout, as you may have guessed is an around the walls setup. (See my "Gus' Layou Party" post back in March I think.) What I need to know, what kind of fluorescent lights will give a soft, sun-like color instead of the cold "clinic"-like light. Also, I plan on getting power for them from a ceiling-mounted socket that used to power the garage door opener. Can it carry the load of 6 fluorescent light fixtures??
Thanks for the responses.

Gus (LC&P).
 

doctorwayne

Active Member
Sep 6, 2005
3,516
0
36
Canada, eh?
Gus, fluorescent tubes come in many different colour temperature ranges. My first layout used four foot, double tube fixtures, mounted below a suspended ceiling. The tubes were "balanced" for colour photography. Regular fluorescent tubes will give a greenish cast to photos, while this type allows to use of regular "daylight" colour film. This was some time ago, but as best I can recall, the temperature of the light, in degrees Kelvin, determines the quality of the light. While the light is quite pleasant, the quantity of light is significantly less than what you would get from a regular "Cool White" tube. The other disadvantage is the cost: I paid about $16.00 per tube about 20 or 25 years ago. These tubes are also harder to start than regular ones: I finally got to the point where I left them on 24 hours a day. My current layout uses four foot, double tube fixtures, mounted above a suspended ceiling. There are 16 fixtures in the layout room: when the second level is built, there'll be another 8 suspended below the upper deck, for lighting the layout now in place. I use "Cool White" tubes: while I'm not nuts about the quality of the light, these type give the most light for the wattage, and are cheap and readily available. I talked to the guy at Home Depot about light output, and light quality, explaining what I was going to use them for. He suggested that I buy two of each type that I thought might be suitable, take them home to try out, then bring back those that weren't suitable and exchange them for more of the type that I decided was best. I tried "Warm White", "Daylight", and possibly one other. While all had decent light quality, they simply didn't put out enough lumens for my liking.
If you have a digital camera, the quality of the light is not important, as the camera will compensate. Several people have commented on the well-done lighting of my layout, but all credit for that is due the camera. The camera will also compensate, up to a point, for low light, so it's best to go with the type you most "like the looks of".
One other disadvantage of fluorescent lighting is that the light is very "flat": you won't get distinct shadows (this can be good or bad, depending on what you're photographing), although I sometimes hang a 100 watt "trouble light" from the ceiling grid if I want shadow effects.
As for putting 6 fixtures on one circuit, it will depend what else is on that circuit, and of course on the Code in your particular area. In Ontario, the Electrical Code allows a combination of up to 12 light fixtures or receptacles per circuit.

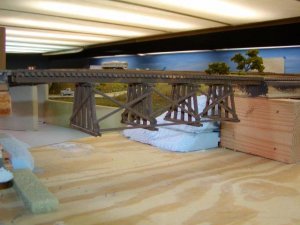
Here are a couple of photos: the first was taken to show the bridge, but, as is often the case, a couple of extraneous items slipped in in the background. The clear acrylic sheet in the lighting panels is called "cracked ice", although there are other types available.
100_5763.jpg


This one's just a random shot of the layout, showing how the camera compensates for the improper colour temperature of the fluorescent lights. (On my computer monitor, which has an almost non-existent "red" component to the colour shown, the pictures look very true to what a film camera would see: the same scene with a decidedly greenish cast.)


100_5752.jpg


Wayne
 

hooknlad

Member
Mar 28, 2005
396
0
16
57
Woodbridge, NJ USA
Gus - on average, those fixtures draw about 1 amp a piece. As long as there is relatively nothing on that circuit, the draw on the circuit should be about 6 amps. If the circuit breaker or fuse is rated at 15 amps, you can load that circuit up to 80% of the 15 amps....
Just a thought, If and when you do this, could you possibly get a dedicated circuit from your breaker panel just for lighting? its kind of a bad practice to have power receptacles ( outlets ) on the same circuit your lighting is on.. Sure its done all the time, but when you overload your lighting circuit by running some type of electric motor on your lighting load, you risk being in the dark , in the basement... Who turned out the lights - lol

I hope we were able to help you Gus
 

steamhead

Active Member
Apr 16, 2005
2,360
0
36
75
Brownsville, TX
Hey all,
Thanks a bunch!!! I'll take a quick trip to HD this weekend and see what is available. The circuit I plan to wire the lights to just powered the garage door opener, which is no longer there!!! (My car sleeps outside...) So I guess I can power the center lights off that outlet. Dr., your pictures just blow me away!!! Great work...As is Harold's, to whose site I've been to several times.
Thanks to you all. It's this kind of comradeship which makes this forum special!!:thumb: :thumb:

Gus (LC&P).
 

steamhead

Active Member
Apr 16, 2005
2,360
0
36
75
Brownsville, TX
Doc. Another question...On that bridge (the prototype, of course...), are the legs anchored within the footings, or do they just "sit there", as it were. I ask 'cause I see a trestle in my future...

Gus (LC&P).
 

doctorwayne

Active Member
Sep 6, 2005
3,516
0
36
Canada, eh?
On the prototype, there are large bolts imbedded in the concrete footings. These extend through a heavy plate at the bottom of each "leg", and large washers and nuts hold everything in place. I was going to use small screws imbedded in the footings, with a small nuts holding things in place, but not all of my bridges have cast plaster footings: the footings of the bridge in the picture are pieces (lots of pieces) of .060" styrene sheet, stacked and glued together with lacquer thinner. Instead of bolts, I drilled a hole in the top of each footing and ca'd a piece of piano wire in place, then drilled a corresponding hole in each bottom plate. This keeps the bridge from moving around, but still leaves it removeable for when I get around to finishing the scenery.

Wayne
 

steamhead

Active Member
Apr 16, 2005
2,360
0
36
75
Brownsville, TX
Hi Doc,

I had planned to cast the footings in plaster and set them in a plaster bed. I like the idea of slipping a wire in there to hold the bridge in place. I'll keep it in mind. Thanks for the info.

Gus (LC&P).
 

Gary Pfeil

Active Member
May 7, 2001
2,510
0
36
Boonton NJ
Visit site
I use the two 4" flourescent fixtures too. I mounted them to my celing, which is a bit low, and made my own "filters" from white butcher paper. I ripped 1x4's into 1x1's and madea rectangular frame, which I glued the paper to. The frames rest on aluminum angles either fastened to a wall or the backside of fascia. I can remove a frame to replace lamps. This rather silly photo shows the panels pretty well. The light on the 4 1/2' wide section of benchwork is very even, but as you can see on the 18" wide shelf in the distance I spaced teh fixtures too far apart and I get dark spots on teh backdrop. Funny enough, the dark areas are not apparent on the flat roadbed. I do plan on moving the fixture end to end to eliminate this problem. This is one half of the basement, it uses a dedicated 20 amp circuit to power 16 fixtures. Another similar circuit handles the other half.
 

Attachments

  • P1010179ajpg.jpg
    P1010179ajpg.jpg
    51 KB · Views: 116

doctorwayne

Active Member
Sep 6, 2005
3,516
0
36
Canada, eh?
Innovative idea, Gary. It's also gratifying to know that I'm not the only one who thinks that you can never have too much light.:thumb:

Wayne
 

steamhead

Active Member
Apr 16, 2005
2,360
0
36
75
Brownsville, TX
Hey!

Speaking of trestles...! Is this a case of the ground fitting to a prebuilt trestle?? Is that long beam at the bottom permanent or is it there just to hold everything in place 'till it meets the ground? Good looking trestle.

Gus (LC&P).
 

doctorwayne

Active Member
Sep 6, 2005
3,516
0
36
Canada, eh?
Probably the best way to build a trestle is to either build it first, then make the site fit the bridge, or build a well-planned site, and make a bridge to fit it. While my bridges over water were fairly well planned, my two steel trestles were built to suit the scenery (landforms) which was already in place, but had in no way been prepared as bridge sites. That's why the length of the legs on each of the towers varies so much on this bridge, which is probably not very prototypical. This area will eventually become heavily overgrown with trees and brush, so most of the visual problems should be hidden.
100_5763.jpg


These bridges were also built on site, with no real provision made for installation. The bridge in the background suffers from the same problems as the one in the previous picture. Footings for both were made by stacking layers of .060" styrene sheet, each successive sheet cut larger than the one above it, until each was tall enough to reach the ground beneath each leg. The sheets were cemented together with lacquer thinner, then the sides were filed with a large mill file until the properly sloped sides were achieved. Then, using an X-Acto knife, the bottom of each footing was carved to suit the terrain upon which it was intended to sit. The bridge in the foreground sits on cast plaster piers and abutments. While each abutment is particular to this site, the piers are all similar except for their height. Because of this, only one mould was made, and it was designed to be used "upside down": The required height (plus a little extra) for each pier was marked on the inside of the mould, then the mould was only filled to that point. That "little extra" on the bottom was an allowance for carving the bottom of the finished pier to fit the site. Both of the abutments for the bridge at the rear where also cast in plaster (only the one to the right is visible), but this was done right on the layout. While the cast piers were easy and enjoyable to make, the cast abutments were not as much fun, and the styrene footings were tedious. Next time, I'll plan things out more thoroughly before construction.
100_5651.jpg


On the bridge in the forground, the short vertical steelwork immediately above each pier is keyed into a depression cast into the top of the pier. This helps to keep the bridge, which is removeable, in line.

Wayne
 

hooknlad

Member
Mar 28, 2005
396
0
16
57
Woodbridge, NJ USA
Hi guys - I love those pics and those bridges are awesome, Mine look somewhat similar, but they are still in my head.. can i make a suggestion ? Is there anyway that we can move these threads with the trestle to a new topic? im gonna wanna look for it when i get to that point, and forget that it's located under "train room lighting ".. Once again, those pics are awesome !!!!! Wayne, do you hire out ???? For that matter, Does anyonehere hire out for building layouts? Heck I just thought of a new topic - lol, I cant put even this here - lol Thanx all !!!
 

doctorwayne

Active Member
Sep 6, 2005
3,516
0
36
Canada, eh?
I don't know about anyone else's bridge pictures, but all of mine, in fact, all of the pictures that I post on the Gauge, are posted in the Gallery. You may have to hunt for some of them, however, as there are 22 pages (and counting). The upside, at least for some viewers, is there's no commentary.:D

Wayne